Athletics Game Rules – PSEB 10th Class Physical Education
Question 1.
Describe the various officials for the athletics competition.
Answer:
Officials:
The following officials are needed to conduct an athletic event-
Administrative Officials:
- Manager
- Secretary
- Technical Manager
Officials for the Meet:
- Referee for Track Events
- Referee for Field Events
- Referee for Walking Events
- Judge for Track Events
- Judge for Field Events
- Judge for Walking Events
- Umpire
- Time-keeper
- Starter
- Asstt. Starter
- Markman
- Lap Scorer
- Recorder
- Marshal
Additional Officials :
- Announcer
- Official Surveyor
- Doctor
- Stewards

Question 2.
Mention the Track events for men and women in Athletics competitions.
Answer:
Track Events for Men:
- 100 Metre Race
- 200 Metre Race
- 400 Metre Race
- 800 Metre Race
- 1500 Metre Race
- 3000 Metre Race
- 5000 Metre Race
- 10000 Metre Race
- 42195 Metre or 26 Mile Race
- 3000 Metre Steeple Chase
- 20.0 Metre Walking
- 30.0 Metre Walking
- 50.0 Metre Walking
Track Events for Women :
- 100 Metre Race
- 200 Metre Race
- 400 Metre Race
- 800 Metre Race
- 1500 Metre Race
Hurdle Races for Men :
- 110 Metre Hurdle Race
- 200 Metre Hurdle Race
- 400 Metre Hurdle Race
Hurdle Races for Women :
- 100 Metre Hurdle Race
- 200 Metre Hurdle Race
Relay Races for Men :
- 4 x 100 Metre
- 4 x 200 Metre
- 4 x 400 Metre
- 4 x 800 Metre
- 4 x 1500 Metre
Relay Races for Women:
- 4 x 100 Metre
- 4 x 200 Metre
- 4 x 400 Metre
MEDLEY RELAY RACE :
800 X 200 x 200 x 400

Question 3.
What are the general rules of Race?
Answer:
Rules of Track Events:
The rules of track events for the athletes are as follows-
1. Athletes should wear such clean clothes as are not subject to any objection.
2. Athletes can participate in a game with foot on feet. The footwear should be such as provides no additional help to the players in the game.
3. A player who causes an obstruction for other players or obstructs the progress of any player may be disqualified.
4. Each athlete should bear marks distinctly on his chest and back.
5. In lane races, a player shall have to confine himself to his lane from the beginning to the end of a play.
6. If a player knowingly runs out of his lane, he is disqualified. If, in the opinion of the referee, he has not done it knowingly, the referee may or may not disqualify him.
7. A player leaving his track of his own will is not allowed to continue his race.
8. If track and field events start simultaneously, a judge may allow an athlete to take part in a different way.
9. A point is scored against an athlete who makes an unnecessary delay in field events, and he is not permitted to take part in the trial. If he persists in it, he shall not be permitted to participate in one more trial, but his first performance shall be reckoned
10. The athletes are forbidden to use or even keep with them intoxicants and other such drugs. An athlete who makes use of such drugs may be disqualified.
11. In 800 metre race, the starter shall say in his own language: “On your marks”…. “set”, and the pistol shot is fired and the athletes start the race. For races above 800 metres only these words shall be uttered: “On our marks”, and when the players are ready, the pistol shot shall be fired.
12. An athlete should not touch the ground in front or start line with his hands or feet when he is in the position of “on your marks”.
13. If an athlete crosses the start line before the pistol shot, his start shall be a foul all athletic are given a warning for it. If any body does it twice he may be disqualified.
14. The position of the players is decided on the finish line. A player touching the finish line first with any part of his body is considered to have reached across first.
15. In hurdle race, are player may be disqualified if he obstructs other competitors by extending his hand and feet, covers the hurdle of the other player’s lane, and if, in the opinion of the referee, fells that hurdle knowingly.
16. A player cannot be disqualified if the hurdles fall due to other reasons than rules mentioned above.
17. he referee can order for replay of the race in case a player has obstructed another player.
18. If the number of participants in throw events is excessive, the referee fixes qualifying marks, and six chances are given in the end.
19. If a racer continues to throw hurdles not with his hands but with his feets, he cannot be disqualified.
20. An athlete is barred from participating in the race if he takes start fouls twice
Question 4.
In how many categories can we divide Athletics?
Answer:
There are long jump, high jump, triple jump and pole vault in field events for men. For women, there are long jump and high jump. In throwing events for men, there are shot put, javelin throw and hammer throw. Only hammer throw is not meant for women.
Decathlon for men:
In Decathlon there are ten events which the athlete has to complete in two days.
First day events:
- 100 metre Race
- Long Jump
- Shot-put
- High Jump
- 400 metre race
Second day events:
- 110 metre Hurdle
- Discus throw
- Pole vault
- Jevelin throw
- 1500 metre Race
Hepatathelon for women:
In Hepathelon there are seven events which the Athlete has to complete in two days.
First day events:
- 100 metre hurdle
- Long Jump
- Short-put
Second day events:
- 200 metre Race
- Jevelin throw
- 800 metre race

Question 5.
Draw a diagram of 200 metre Track and 400 metre Track.
Answer:
Track for 200 metres:
The length of this track is 94 metre while the breadth is 53 metre-
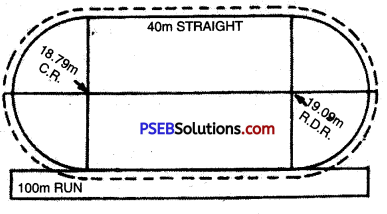
- Total running distance = 200 metres
- Length of sides = 40 metres
- Space covered by the sides = 40 x 2 = 80 metres
- Space covered by the corners = 120 metres
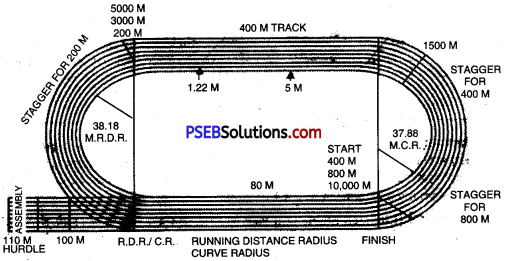
- Track for 400 metres:
- Minimum dimensions = 17.40 x 90.40 metres
- Total running distance = 400 metres
- Straight length = 80 metres
- Distance of both sides = 160 metres
- Distance of curves = 240 metres
- Diameter = 38.18 metres
- Radius of the running distance = 38.18 metres
- Marking radius = 37.88 metres
Question 6.
What do you mean by sprints?
Answer:
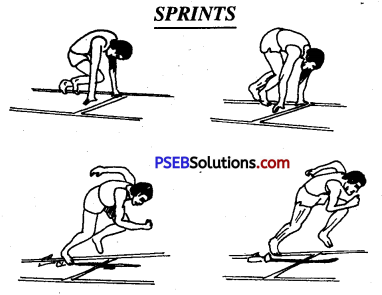
You can obtain creditable achievements by sprinting under the ; conditions of the competition, and by developing strength and stamina. through heavy hurdles instead of focusing attention on the method of running. The basic aspects of a race include the pace and length of steps in addition to the starting technique. Many players learn to acquire efficiency in sprinting at high speed. Don’t waste much time in the training of running outside the blocks.
- Developing Speed: Run a sprint 10 yards off the rolling start, and record the time. You can run a number of sprints.
- Leg-action: Clear a track of 70 yards. Coming out of 15 yard rolling start, run a sprint on the cleared track. Mark the footsteps. You will see that the length of footsteps after having increased comes 4 to definite length.
- The length of footsteps and the speed of legs are co-related. These are determined chiefly by the length of legs, flexibility and strength of hips. You can hope to increase to some extent, to an important extent, the length of your steps, if you increase through training the flexibility and strength of hips and keep a steady pace in the lane.
The following methods may be useful :
(i) Movements of Arms:
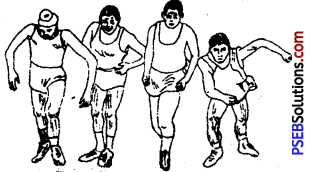
The movements of arms in sprinting is essential to keep the body in action. It is a common practice with the racers to move the arms backward and forward of their bodies by moving these briskly at 90° ahead. While bringing the arm back, it should be straightened and then bent at the angle of the wrist. But it develops naturally in co-ordination between pace of legs and time.
(ii) The Start:
The movement of front foot is seen in figures 3 and 4, and it is an important aspect of efficient start. Keeping the blocks depends upon the length of your arms and legs, and to a certain extent upon your strength. Keep the blocks in such a way that the front block is 18 inches behind the line, and the rear about 36 inches away from the line. Continue practising with these distances till you develop good rate for your body and strength.
Bend your body, in the condition shown in figure 2, to such an extent that most of the weight falls on arms and the hips raised be above the shoulders. Now remember that the front knee forms an angle of 90°. In this condition, the face of the front block is at 60°, and of the rear block perpendicular. Raise the shoulders as much as possible. Increase the extra length of arms by straightening each hand.
(iii) Training:
You can acquire efficiency in sprinting by getting training in increasing the speed of your running at full speed on the track. You can prepare a daily routine in accordance with the example given ahead :
Form a rolling start of 6 x 70 yards with the rest intervals of 1 x 180 yards. When you are used to it, repeat it after the rest of 5 minutes. When you are perfectly normal, repeat this schedule thrice. By following it, you can increase the load of the work by steadily decreasing the rest intervals. When you practice in a group with an efficient starter, and the use of the pistol shot, the training for the start of sprint becomes very important.
Some useful practice should be done in the presence of the critics. Of course, each sprinter should be ready to make his start under possible good conditions. Set a standard for your training. Don’t feel satisfied with a little achievement. The training of heavy hurdles is essential for the whole body of a sprinter, particularly for his arms, shoulders and legs. Two practice sessions of at least 40 minutes each per week are essential for it.

Question 7.
How many events are there in track events? After how many fouls after the wrong start can an athlete be dismissed?
Answer:
Track Events of Races-Short, Middle and Long:
(I) Sprinting.
Sprint is that race which is run at full speed and with full strength. It includes 100 and 200 metre races. Even 400 metre race has come to be included in it now-a-days. In these races, reaction time and speed hold much importance.
(i) Start-
Generally, three types of start are taken in sprints:
- Bunch Start
- Medium Start
- Elongated Start
1. Bunch Start:
For this kind of start the distance between blocks should be 8 to 10 inches. The next block should be 19 inches away from the starting line. The sprinter bends in the block in forward direction so that the toes of his back foot and the heel of the forward foot are in the same line. The hand should form a bridge on the starting line and behind the line. In this start, as soon as the set position is declared, the hips are brought upward. This start is the most unstable.
2. Medium Start:
In the medium start the distance between blocks is from 10 to 13 inches. The distance between the first block and the starting line is about 15 inches. The athletes often make use of this start. In this start, the knee of the lagging leg and the central part of the leading leg are in the same fine. At the set position, hips and shoulders are at the same height.
3. Elongated Start:
The athletes rarely make use of this start. In this type of start, the distance between blocks is 25 to 28 inches. The knee of the lagging leg is in the line with the heel of the leading leg.
Start:
The three types of orders have to be adhered to while taking the start for a race-
- On your mark
- Set position
- Go, with the pistol shot
Finish of the Race:
The finish of the race also holds much importance. Generally, athletes finish the race in the following three ways-
- Run through
- Lunging
- The shoulders string
(II) Middle-distance Races:
Track events include a few middle distance races. The races more than 400 yards and less than 1000 yards fall in this category. They are generally 400 and 800 metre races. These races require both speed and endurance. The athlete possessing both these qualities succeed in such competitions. In the beginning of such a race, uniform speed is maintained and full energy is used to win towards the end of the race. Start for 400 metre race is taken like a sprint start, whereas, the start for 800 metre race can be taken only in standing position. As far as possible, big strides should be taken in this race.
(III) Long-distance Races:
Long-distance races, as the name implies, involve greater distance, and often cover a distance of over a mile. 1500, 3000 and 5000 metre races are long distance races. In these, races, the endurance of the player plays an important role. The player has to utilize his energy and stamina in a planned way. The athletes who become well-versed in this art become successful in long distance races. In long distance races, except at the beginning, an athlete keeps his body straight and little bent in the forward direction, with head straight and eyes towards the track.
Arms are loosely lifted in the forward direction and bent at elbows and hands without tensions.The actions of the arms and legs should be as far as possible without much effort forward. While running, the forward foot should touch the ground. Even the heel touches the ground. More push is, however, taken through the toes. In these races, strides should be short and uniform. The body should remain relaxed during the race.

Question 8.
How many types are there of Hurdle races? Describe briefly.
Answer:
100-Metre Hurdle Race:
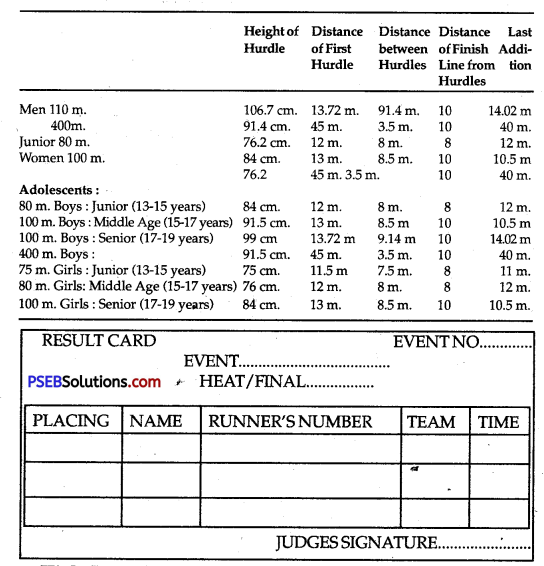
The number of hurdles, height and distance for various competition-
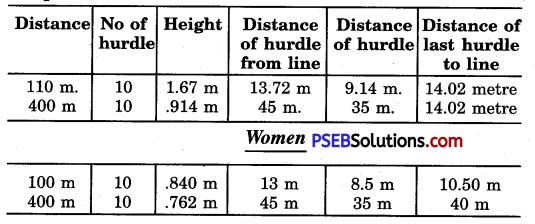
Generally, athletes taking part in hurdle race take 8 strides to reach the first hurdle. While sitting on the starting block, the take off foot is kept in front. If the hurdler has more height and can run faster, the distance in his case can be short. In such a case he will run by keeping his stronger foot on the backward block. This will come two metres behind the hurdle.
For 3 to 5 strides the hurdler should look towards ground and after that he should concentrate on the hurdles. The difference between strides will go on increasing. The last stride, however, will be 6 inches (10 cm.) shorter than the jump. While running a hurdle race, the knee of the runner will be a bit higher than in the ordinary race. Only toes and not the whole foot should touch the ground.
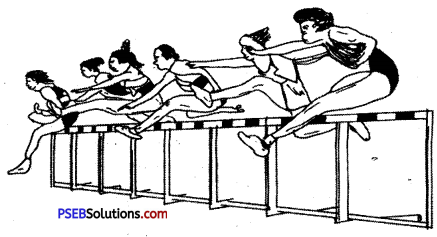
While jumping over the hurdles the athlete should keep the jumping foot straight while elevating the leading foot above the knee. Toes of the foot should be bent towards the ground, and leading foot should be straightened and brought above the hurdle. The upper part of the body should be bent forward just after crossing the hurdle. The forward thigh should be pressed down so that the toes remain beside the hurdle after it has been crossed.
At the same time lagging leg, bending at the knee should be kept parallel to the ground, and the knee should be brought near the chest. In this way, when the foot crosses the hurdle, the runner will run faster. After having crossed the hurdle, the first stride should fall at a distance of 1.55 to 1.60 metres, the second stride at 2.10 metres, and the third stride at 2.00 metres (12 m., 13.72 m., 9.14 m., 14.20 m.)
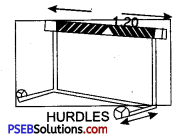
In 400-metre hurdle race the most difficult problem a hurdler faces, is to synchronise his strides, that is, to set coordination among strides. The runners generally take 21 to 23 strides to cover the distance upto the first hurdle and take 13 to 15 or 17 strides between the hurdles. Some runners take 14 and then 16 strides for covering this distance. Jumping by right foot may prove to be more beneficial.
The jump is taken from 2 metres and the first stride on the ground, after crossing the hurdle, is of 1.20 metres. The technique is the same as that of 110 m. or 100 m. hurdle races. The time of 400 metre hurdle races is more than that of 400 metre race, by 2.5 to 3.5 seconds.

Question 9.
How 6 many events are there in field events?
Answer:
LONG JUMP:
- Length of Runway
- Breadth of Runway
- Length of Pit
- Breadth of Pit
- Length of take of Board
- Breadth of take of Board
Method of Long Jump:
To strengthen the jumping foot, the same method will be followed in long jump as is followed in high jump. First of all, the jumping foot is kept forward and the other foot behind it. The right foot is taken upward with a bend at the knee, and at the same time the right arm will be bent at the elbow. The method will be the same as is that of fast runners. This action will be performed first in the standing position, and then by walking four to five steps. When this action improves, it should be repeated to running while running a bit.
This time while going upward, the ground should not be touched:
(1) Running 6-7 steps, coming forward and jumping from the height, the athlete shall touch the ground. Repeating this action for some time, he will bring the jumping foot alongwith the other foot on the ground while landing on the ground.
(2) After the athletes have done the above action many times, a handkerchief shall be tied with the pole at more than the jumping height. The athletes shall be asked to jump and touch the handkerchief. By doing this, they will learn to jump and keep the upper part of the body straight.
METHOD OF LANDING:
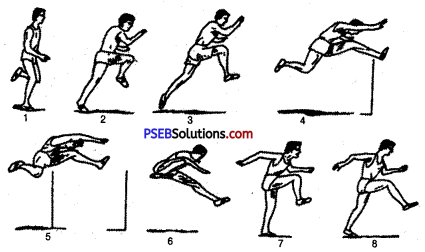
The athletes shall’stand on the edge of the pit with both the feet in line and swing their arms backward and forward. They will bow at the knees and carry both arms behind. Afterwards, they shall bend their knees a bit more, take arms forward and then upward, and then shall jump intathe pit. As the athlete goes up into the air, he will bring the free foot behind and downward so that it may join the jumping foot.
The jumping foot shall remain with the knees, and the upper part of the body shall be straight. When the athlete goes up, both of his knees will be bent and in line with the thighs. Both arms will be on the head sides and upward. The body shall be bent back, and as the athlete is just going to jump in the pit he will carry the free leg forward, bending at the knee, his belly downward, and will try to rest his straightened leg in the air.

METHOD OF HITCH KICK:
- After jumping, split in the air, feet forward and backward, the athlete shall bend on free foot, but his upper part of the body and head will be straight and will not go backward.
- Now the athlete will keep the free foot in the air and land with jumping foot taken forward.
- The other methods shall be the same as told above, except that at the time of landing free foot will be brought with the take-off foot and both feet will land together. All other methods shall be the same as described in the hang. The athletes should go on increasing the approach rim.
- After having repeated the above actions, this should be done with the help of spring boards such as gymnasts do. In the absence of spring boards this can be done from a height so that the athletes may have good practice of right action in the air.
TRIPLE JUMP:
Approach Run:
- Length of Runway = 40 m to 45 metre
- Breadth of Runway = 1.22 metre
- Length of Pit = From take board to Pit = 21 metre
- Breadth of Pit = 2.75 to 3 metre
- Length of take of Board = 11 to 13 m
- Length of take of Board = 1.22 m.
- Breadth of take of Board = 20 c.m.
As in the long jump, approach run will be used in triple jump, too, but the speed shall be neither very fast nor very slow. Length of the Approach Run. An approach run of 18 to 22 or 40 to 45 steps is used in the triple jump. It depends upon the speed of the runner. Slow speed runner will take long approach and fast speed runner will take short approach. The athletes shall run by keeping both feet together and maintain a uniform running speed.
The upper part of the body shall remain erect. While taking of, the knee will be bent less as compared to the one in the long jump. While taking off and hop step, the weight of the body will be on the back and both the arms shall also be at the back. The second leg coming fast in the air will form a split position.
Three techniques are chiefly in vogue in triple jump-
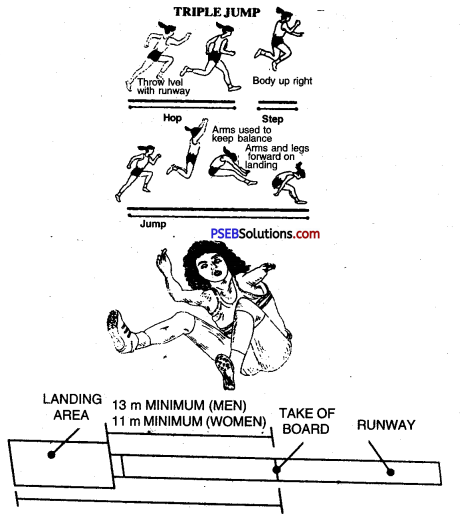
- Flat Technique
- Steep Technique
- Mixec Technique
HIGH JUMP:
- Length of Runway = 15 to 25 m
- Each side of triangle Cross Bar = 30 M.M.
- Length of Cross Bar = 3.98 to 4.02 m
- Weight of Cross Bar = 2 Kg
- Length of Pit =5 m
- Breadth of Pit = 4 m
- Height of Pit = 60 cm
1. All the trainees shall be asked to first jump on their both legs: After they have got some practice, they will be asked to jump on one leg. It should be kept in mind that while jumping, the upper part of the body should be kept straight. All the trainees should be divided on the basis of the taking off foot with which they feel comfortable :
- Jumpers on left foot
- Jumpers on right foot
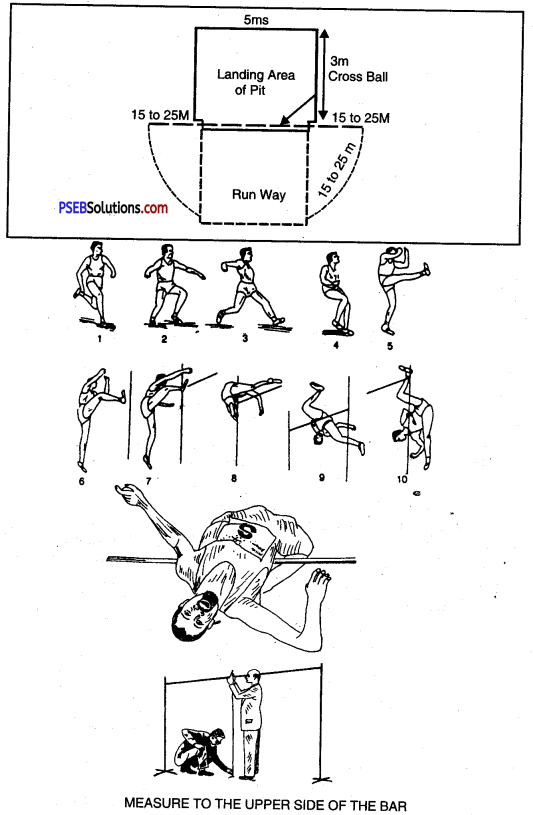
2. The trainees shall keep their take-off foot forward and the other foot behind:
They will bring both arms bent at the elbow forward and then upward with speed. At the same time they will kick the other foot upward, and after jumping in the air, will come back on the ground on the same foot. At this time the knee of the take off foot will be slightly bent. The upper part of the body will be straight, and will rise up ahead and will come back at the same place. While going upward, the jumper should try to keep the waist and the forward foot in straight position.
3. Standing at an angle of 45°, the right foot jumpers on the right side and the left foot jumpers on the left side, moving forward, shall jump over the cross bar kept at a height of 2 feet, and come back on the ground on the same take off foot. The only difference will be that instead of falling on their places they will cross the bar, and the other foot, as they fall, will come 10 to 12 inches forward of the first and will move ahead.
4. The height of the cross bar will be increased: The athletes will be asked to elongate the take off foot while taking off. The heel should come on the ground first. Both the arms should be bent at the elbows. While jumping, the athletes should concentrate on the cross bar, with the head leaning behind and the toes of the foot upward and straight.
Points to be remembered:
The following points should be kept in mind-
- Both the arms will be taken upward quickly.
- The take off foot will leave the ground only when free leg reaches its full height.
- The above activity will also be done while jogging.
5. Crossbar. Keeping the crossbar 2 feet (60 cm.) high, the players shall jump over the crossbar as explained in 3, and then will rotate 90° in the air while coming in the pit. Hie players taking off by left foot will turn towards the left, and the players taking off by right foot, towards the right.
The following two points shall be borne in mind:
- The players should not rotate while taking off.
- They should not rotate before reaching maximum height.
6. The athlete will stand keeping taking off foot forward but he will keep in mind that the weight of the body should be on the heel, and that they will kick upward with kick upward with free leg so that the whole body gets lifted up the ground.
7. A parallel line shall be marked on the ground. The athletes shall do the above mentioned action while standing on the right of this line. Reaching up in the air, the athlete will rotate the take-off foot towards the left, keeping his face down and lift the back foot up with a kick. In this, it shall be kept in mind that free leg is kicked straight. The take off leg will be kicked straight and will be taken up by bending it on the knee. The athletes can do it in the pit after jumping over the crossbar, because by taking fast kick, his balance may go off.
8. Jumping from three steps. Parallel to the crossbar, a line shall be drawn at a distance of 1 to 2 feet (45 to 60 cm.). The athlete will stand with both his feet at an angle of 30° with this line. Putting forward his take off foot, he will run with medium speed. The position of the third foot will be marked. Keeping both the feet on this position, the athlete will advance towards the crossbar and repeat the above mentioned activity. The height of the crossbar will go on increasing according to the convenience of the player.
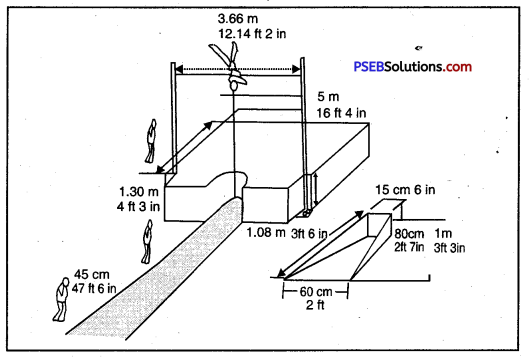
POLE VAULT:
- Length of Runway = 40 to 45 m
- Breadth of Runway = 1.22 m
- Landing Area = 5 x 5 m
- Length of Cross Bar = 4.48 x 4.52 m
- Size of one side of triangle Cross Bar = 30 M.M.
- Weight of Cross Bar = 2.25 Kg
- Height of Landing area = 61 to 91 cm
- Length of vaulting Box = 1.08 m
- Breadth of the Box from = 60 cm
Runway side:
In athletics pole vault is a very complex event. No other event while taking off in the pit needs so many activities as this event does. Therefore, it is difficult to learn and teach this event.

Selection of Athletes for Pole Vault:
An all-rounder alone can become a good pole vaulter as this is an event which maintains the stamina of the bodies in all ways such as speed, strength, endurance and co-ordination. A pole vaulter needs to be a good gymnast so that he may perform all activities at a time.
Holding and carrying the Pole:
Generally a pole is held in the left hand keeping the palm towards the ground. The right hand is placed beside the hip on the back and at the end of the pole. While holding the pole the left arm forms an angle of 100° with the elbow. The pole is held keeping the wrist straight and away from the body. With the right hand, the pole is pressed downward between the thumb and the first finger. Both the elbows form an angle of 100°. The distance between the two hands is from 24 inches (60 cm.) to 36 inches (80 cm.). This distance depends upon the body structure of the athlete and his comfort while running with the pole.
Running with the pole:
- Walking with the pole kept overhead. It takes more time to carry the pole into the box. Therefore, it is not a very suitable method.
- Walking with the pole kept at the level of head. Most of the pole vaulters in the world follow this method. While walking, the 1 pole is kept the level of head and in the line with the left shoulder. From right to left. In it, shoulders and arms remain in normal position.
- Walking with the pole kept below the head. It exerts more pressure on arms which tires the body as one approaches the box. A very few athletes use it into practice.
Approach-run:
A pole-vaulter becomes self-confident when he starts getting correct approach run. The further action can be thought of later on. The best method for this is to make the athlete run with the pole for a distance of over 150 feet (50 metre) along a marked line (with the lime) on the ground.
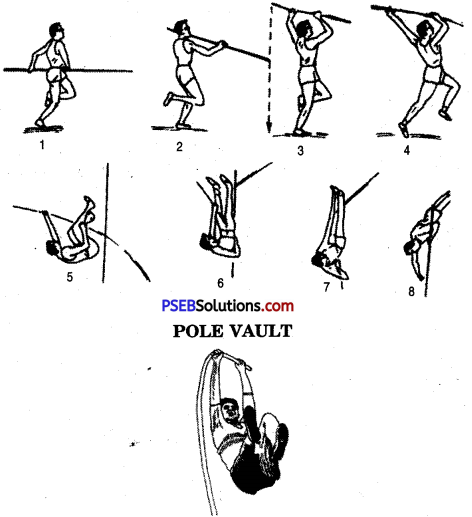
By doing this action for some days the athlete’s foot will .touch the ground at the required position. Measure this distance with the tape and then work on the runway of the pole vault. The approach run has also to be increased or decreased alongwith the feet. There should be only one check mark in the approach run of the pole vault. If there are more marks, then the athlete instead of thinking about his style continues to think about the marks. The length of the approach run should be 40 to 45 metres. The athlete should be faster during his last 4 or 5 strides.
Pole Plant:
It is not possible to plant the pole with full speed. The speed has to be limited for doing it. The pole planting should be fast in case of steel pole and slow in case of a fibre glass pole. While planting steel pole the athlete should count “1 and 2”. On 1 he will take off his left foot and the knee of the right foot will lift upward. On 2 his body will start swinging. At this point the pole vaulter should leave his right leg free so that it may meet the left one. It facilitates better swinging.
Take off:
While taking off, the right knee should come forward. In this the body is lifted and the chest is pulled towards the pole. While leaving the ground, the hand and the arm are straightened. During the swing the right leg lifts upward.
Note:
While poling the athletes lift their hips first while their legs should come upwards and the hips should be kept down. The pole vaulter should keep in mind that he should remain with the pole until it becomes straight. While leaving the pole, he should free the downward hand first. It has been observed that many fresh pole vaulters take their back above the cross bar. It happens as a result of freeing the upper hand first.

Question 10.
Discuss the throw events in Athletes and mention their respective Rules.
Answer:
|
Men |
Women |
| 1. Weight of Shot-put |
7.260 kg. ± 5 gm. |
4 kg. ± 5 gm. |
| 2. Agnle of Throwing sector |
34.92° |
34.92° |
| 3. Radius of circle |
2.135 m ± 5 M.M. |
– |
| 4. Length of stop board |
1.21 to 1.23 M.M. |
– |
| 5. Bredth of stop board |
112 to 300 M.M. |
– |
| 6. Height of stop board |
98 to 102 M.M. |
– |
| 7. Curcumference of shot-put |
110 to 130 M.M. |
95 to 110. M.M. |
1. Initial Position:
The thrower will stand with his back towards the direction of throw. The weight of the body will be. on right foot. While bringing upper part of the body down, the right heel will be lifted and the left leg bent at the knee will go up to meet immediately the right foot. Both the feet will be inclined and the toes bent forward.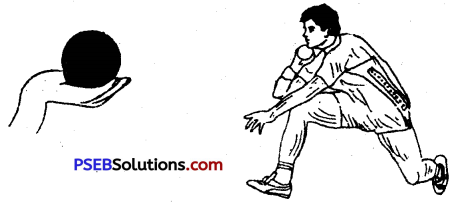

2. Glide:
Now the right foot will be straightened, and will come back with the heel of the right foot. The left foot will be kicked fast towards stop board. In sitting position the hips will be falling downwards. The right foot will be lifted up from the ground and will be kept towards the left with bent toes. At the same time the left foot will touch the ground on the right of the stop board. Now the toes of both the feet will be brought on the ground. Both the shoulders will be bent backward. The whole weight of the body will be on the right foot.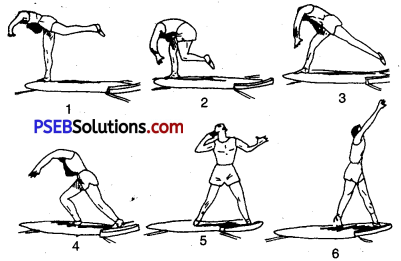
3. Final Phase:
The toes and the knee of the right foot will be rotated together towards the left and both the feet will be straightened. The whole weight of the body will be on both “the feet. The left shoulder will open forward. The right shoulder will lift up and rotate. The belly will be bent in the shape of a bow.
4. Putting/Throwing the Shot:
The right shoulder and right arm will go forward towards the shot. The left shoulder will go on advancing. The whole weight of the body will be on the left foot which will be completely straight. As the shot is thrown with right hand, the position of both the feet will change. The left foot will come backward and the right foot forward. Now the body weight will rest on the right foot. Both the upper part of the body and the right foot will remain bent forward.
Throwing the Shot by Rotating or Like a Discus:
1. Initial Position:
At the start the athlete will stand with his back towards the direction of throw. The left foot will be on the center line and the right foot on the right side. The right foot will be placed at 5 to 8 centimetres away from the rim so as to avoid foul while rotating. The shot will be near the lower part of the neck and the elbow will be lifted upward. Before starting, the shoulder, belly, left arm and the shot, all will turn towards the left and then towards the right. While doing so both the knees will remain bent.
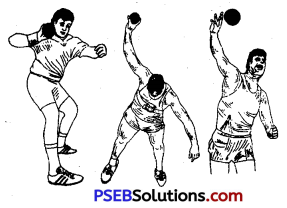
2. Rotation:
The body weight will rest on both feet. After taking one swing in the upword direction, the rotation will start. While rotating the upper part of the body, the body weight will shift on the left foot. In this position, the left arm is kept on the left and parallel to the ground, and while shifting the weight on the left toes the athlete will rotate with both knees bent. On the right toes also he will rotate through 90°. The right foot, bent at the knee, will be brought above the left foot.
While rotating on the left foot, on the completion of circle, both feet will be in the air, and the wrist will be rotated. The left foot will be on the toes of the right foot. The position of the toes of the right foot will be the same as the hand of the clock at 2 o’ clock. The foot of Mr. Bahadur Singh remains in the position of 10 o’clock. He rotates his waist even in the air. In the 2 o’clock position the left foot will come on the toes with some delay, but the upper part is kept in the centre. In the position of 10 o’clock the left foot comes fast on the ground, and there is always a possibility that the upper part of the body comes up very soon.
We shall keep the following points in mind :
- At the start, walk with maintaining the balance, and keep the left foot down.
- The complete glide will be taken with right foot. The jump will not be taken, and the upper part of the body will not be lifted.
- The right foot will be bent inward while coming in the centre.
- The left shoulder and the hip will not be lifted in haste.
- The left arm should be kept near the body.
- The left foot will touch the ground neither very fast nor very slowly.
General Rules:
1. In men’s group, the weight of the shot is 7.26 kg. while in women’s group it is 4.00 kg. In men’s group, the diameter of the shot is 110-130 cm. whereas in women’s group it is 95 to 110 cm.
2. The shot is thrown from a circle of 2.135 m. diameter. The inner part will be cemented and 25 mm. lower than the field. The stop board will be 1.22 mm. long, 114 mm. wide, and 100 mm. high.
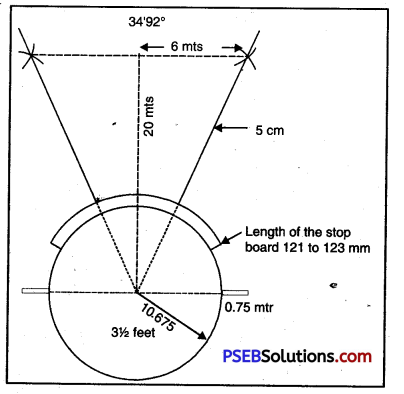
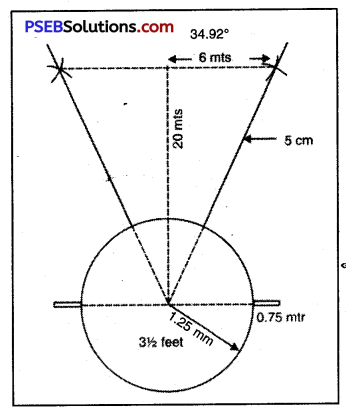
3. The shot, hammer or the discus will be a sector of 40° angle. From centre a 20 m. line will be marked. On this line a point will be taken at 18.84 m. Two more points at a distance of 6.84 m. on both sides of this point will be taken, and the two lines drawn from these two points shall make an angle of 40°. While throwing the shot the body should be kept in balance. At the fall of the shot on the ground the athletes shall come from behind the 75 cm. lines dividing the field into two parts. Now the shot will be taken in hand. It will remain near the neck and not behind shoulder. It will be considered a foul if the sector lines are touched. If there are eight competitors, 6 chances will be provided to each. If there is a tie, the number of chances may be 9.
Initial Stance of Discus Throw:
- Weight of Discus = 2 kg for men and 1 kg for women
- Radius of circle = 2.5 metre ± 5 M.M.
- Angle of throwing sector = 34.922
- Circumference of outside = 219 to 2.21 M.M.
- For men 180 of Discus to 182 M.M. for women.
The athlete will stand near the ring and in the circle with his back in the direction of throw. He will take one or two swings, with right arm arid trunk. While doing so, the body weight will shift from one foot to the other, as a result of which heels will be lifted up. When the discus and the upper part of the body are both on the right, the round will start. The round of throw shall start from the lower part, the left leg will be inclined towards the left, the weight of the body will also rest on this foot. The right foot, waist and belly will also rotate, and it will bring along with it the right arm and discus.
It is in this way that the shot activity will start. First of all, the left foot will leave the ground. After this it will advance in the direction of discus throw. The right leg, bent at knee, will advance from left to right in a semi-circle. While rotating both will be ahead of the shoulder. It will cause a bend between the upper and the lower parts of the body. The right arm holding the discus will be straight. The left arm bent at the elbow will face the chest. The head with straight. Placing the right foot a bit above the ground, the thrower will cross the circle and will come on the ground at the toes of the right foot. This foot will come almost in the centre. The toes will be bent towards the left.

Methods:
In main, there are three methods in it:
1. At the start, the trainees keep their right foot at the centre line and the left foot 10 cm. behind the ring.
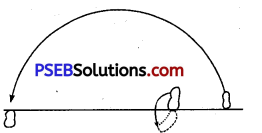
2. In the second method, the player keeps the centre line between both of their feet.
3. In the third method, the throwers keep their left leg on the centre line. Thus, the players place their feet within the circle in three ways, in the position of 3 o’ clock, in the position of 10 o’ clock and in the position of 12 o’clock. The last position (of 12 o’ clock) is considered i to be the best as it requires less rotation on the right foot and the left shoulder need not be opened. The right foot even after coming on the ground will continue to rotate and the toes of the left foot will touch the ground on left side of the centre line and the end of the circle.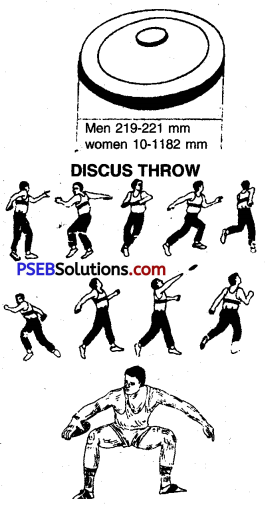
Last Step:
At this time, in the last step, both the feet will be on the ground and the waist will be bent at the back, the left foot will be straight and the right foot bent at the back, the left foot will be straight and the right foot bent at the knee. The right knee and the hip will be in the rotating position in the left. The left arm will be opened upward and the right arm will also be brought upward keeping it away from the body.
Throwing:
Both the feet going ahead in rotation will be straight. Hips will go forward, and shoulders and trunk will have finished rotation. Left arm and shoulder will stop at a position. Right arm and shoulder will advance forward. The body weight will be on the toes and both the feet will be straight. In the end, left foot will come backward and right foot will advance and will bend at the knee. The upper part of the body will be bent forward. This is done to maintain the balance of the body.
General rules:
In men’s group, the weight of the discus is 2 kg. whereas in women’s group it is 1 kg. The diameter of the circle is 2.50 m. These days an iron cage is fitted outside the discus to avoid anybody being hurt or injured with the discus. It is in the shape of the English letter C. Its height is 3.35 m.

Question 11.
Write down about the Javelin throw.
Answer:
Javelin throw:
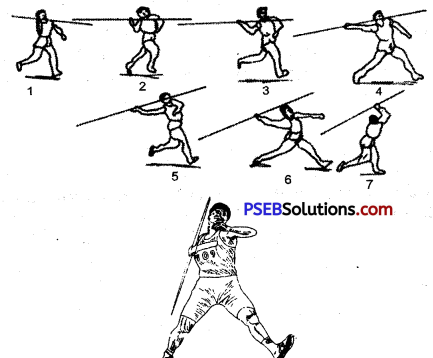
Javelin is placed near the ear at the level of head with the arm bent at the elbow. Both javelin and the elbow will face forward. The palm of the hand will be upward and parallel to the ground. The total length will be 30-35 m. The athlete shall run straight in the 3/4 th run. In the last, l/3rd part cross steps will be taken equal to five strides. In the last phase when the left foot will touch the check mark, the right shoulder will start leaving towards right and the right arm will start coming at the back. The distance between steps will start increasing.
The right hand and the shoulder will come behind and will open on the right. The waist and the upper part of the body will bend backward. A bend will be formed between upper and lower parts because the upper part will open on the right and the lower part will advance straight ahead. The eyes will remain looking ahead. In the end, the right foot will come in the end of the cross step on the ground. As the knee advances, the heel of the right foot will start lifting up. In this way, it helps the left foot in going to a long distance.
Last Phase:
In the the right foot and straightening it all shall bend the upper body in the backward direction like a bow, and will create tension in the muscles of chest and stomach.
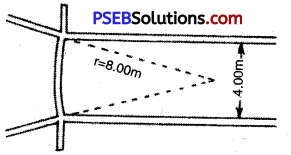
JAVELIN THROW:
- Weight of Javelin = 800 g for men and 600 gm, for women
- Length of Runway = 30 to 36.50 m
- Breadth of Runway =4 m
- Length of Javelin = 200 to 270 cm for men. 220 to 230 cm for women
- Angle of throwing
sector of Javelin = 28.95

After throwing the javelin, to maintain balance of the body and to avoid foul, the thrower will bring a change in steps. The right leg will come forward and bend at the knee, and the toes will bend on the left. The upper part of the body will bend on the right and keep balance. The right foot can advance forward, too.
GENERAL RULES:
- For men the length of javelin is 260 to 2.70 m., and for women, it is 2.20 to 2.30 m.
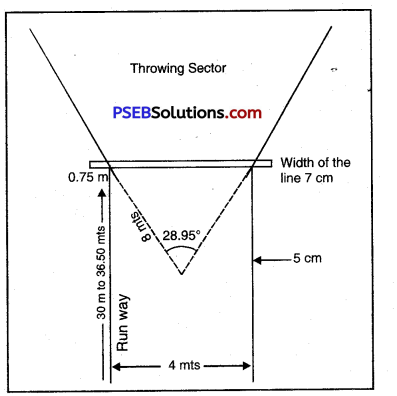
- For throwing javelin we need a path which is 30.5 to 36.50 m. long and 4 m. wide. On the front side there will be a 70 mm. iron arc white in colour and projected 75 cm. on both sides. It can be made of white lime. This line can be drawn 8 m from the centre.
- The sector for the javelin is of 29°. It is marked wherever the curve meets. For correct angle at 40 m., the distance between two lines will be 20 m. and at 60 m. it will be 30 m.
- The javelin will be thrown by holding it from the central grip. The front end of the javelin should touch the ground. Touching of any part of the body with 50 cm. wide lines or 70 cm. wide line will be deemed as a foul.
- The javelin shall remain in the direction of throw from start to finish. The javelin will not be thrown by rotating. It will be thrown from above the shoulders.

Question 12.
What do you know about Relay Races?
Answer:
RELAY RACES:
Men:
- 4 x 100 metre
- 4 x 200 metre
- 4 X 400 metre
- 4 x 800 metre
Women:
- 4 x 100 metre
- 4 x 400 metre
MEDLEY RELAY RACE:
800 x 200 x 200 x 400 metre
Baton:
In all medley relay races the baton has to be carried. Baton should be of a hollow tube and its length should not exceed 30 cm. Its circumference should be 12 cm. and weight should be 50 gm.
Relay Race Track:
The relay race track should be divided or marked by small paths for full circle. If it is not possible, then the baton exchange path should be through narrow paths.
Start of Relay Race:
At the start of the race any part of the baton can cross the initial line, but the baton is not to touch the ground above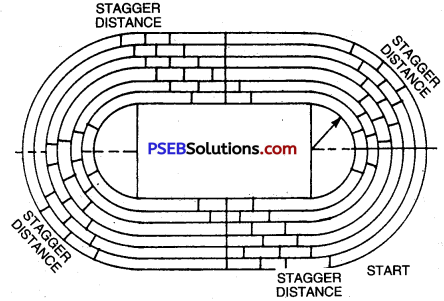 :
:
Taking the Baton:
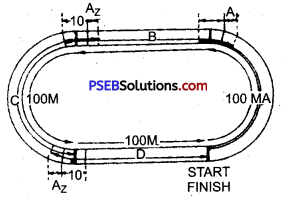
An area is also fixed for taking the baton. This area is marked by drawing a line 10 m. long on both sides of the fixed race distance line. Thus, a type of room is formed for giving and receiving the baton. In relay races up to 4 x 200 metre all the other members of the team excepting the first runner begin to run from outside the fixed area but from a distance less than 10 metre.

Exchange of Baton:
The exchange of baton should take place within the fixed area. Pushing or providing any type of help is forbidden. The runner cannot throw baton to each other. If the baton falls, it will be picked up only by the one who has fallen it.
HURDLE RACES:
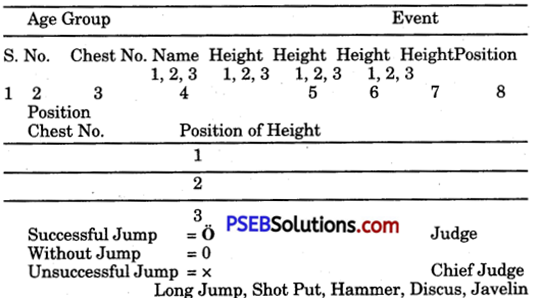
High Jump Score Sheet:

Score Sheet (For Height):
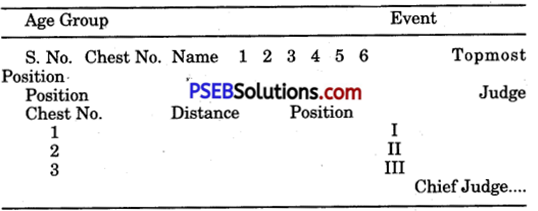
Score Sheet (For Distance):
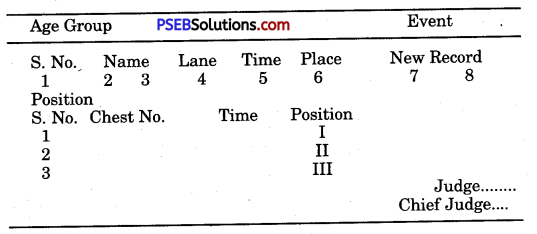
Score Sheet (Races):

Important Information About the Athletics
- No player having taken intoxicating drugs can participate in athletic competition.
- An athlete who causes an obstruction in the play of the other athlete is disqualified. An athlete who leaves the track of his own will, cannot continue his race again.
- There are two types of events in field events such as jumping and throw events. The events which are run in track are known track events.
- The length and breadth of 200 metre track are 40 and 38.15 metres respectively, while for 400 metre track these are 176.36 and 90.40 metres respectively.
- The weight of the javelin for boys is 800 gms. and for girls, from 605 to 625 gms. The weight of the discus for boys is 2 kg.
- The height of 110 metre hurdles for boys is 1.06 metres and for junior boys, the height of 100 metre hurdles is 0.75 metre. For senior girls this height shall be 0.89 metre.
Punjab State Board PSEB 10th Class Physical Education Book Solutions Athletics Textbook Exercise Questions and Answers.
![]()
![]()
![]()

![]()



 :
:


