PSEB 6th Class Computer Notes Chapter 3 Basics of Working with Computers

This PSEB 6th Class Computer Notes Chapter 3 Basics of Working with Computers will help you in revision during exams.

PSEB 6th Class Computer Notes Chapter 3 Basics of Working with Computers

Introduction
A computer is a combination of hardware and software. We can say that a computer is a machine in itself. There are always some rules which should be followed to work with a machine. Similarly if the user has to work with a computer he must have basic knowledge of working, with computers.

Operating System
Operating system is a system software without which a computer cannot work. IT acts as an interface between the hardware and the user. Each computer has an operating system installed on it. Operating system is displayed in the form of screens, menus, dialogue box, icons and widgets etc.

Definition of Operating System

  • An operating system is an interface between a computer user and computer hardware. It makes computer hardware work by controlling all the internal processes of the computer.
  • There are many types of operating systems. Each operating system is developed for different types of machines. Each operating system has a different set of commands and it understands the machine architecture very well.

Windows
Windows is an operating system developed by Microsoft. It is a graphical user interface. It means it is easy to work with pointing devices such as mice in windows. Most of the computers in this world are using windows operating systems. Everything is displayed in a rectangular frame on the screen in this operating system. That is why operating system is named as windows. It is the most popular operating system in the world.

DOS
DOS stands for Disc Operating System. This operating system is also developed by Microsoft. It is a character user interface operating system. This operating system is not very powerful. The user types commands to instruct the computer. This operating system was used on computers with small memory and low speed hardware. The user has to remember a lot of commands to work in it. That is why it was difficult to work in this operating system. Also the user cannot do a variety of work simultaneously in this operating system.

Android
The Android Operating System is one of the latest operating systems in digital word. It is the operating system which is used in mobile phones. This operating system was developed by Google. This operating system is developed for devices which have touchscreen in them. It provides a very beautiful and convenient interface which can be used by finger touch. The user can do the tasks like pinching, swiping and typing. Now the Android operating system is also used in televisions, cars , wrist watches and many other digital devices. Each of these devices have different user interfaces.

PSEB 6th Class Computer Notes Chapter 3 Basics of Working with Computers

Starting Computer System
The first task to work with an operating system is to make it work. This process is called starting the computer system. To start a computer system is not a difficult task. It is as simple as to start any other machine.

Powering on the Computer System
To start a computer it must be switched on first. Each computer system has a power button on its system case. The user has to press that power button to switch on the computer system. Similarly there is a power button on the monitor also. If the monitor is not powered on then the user has to switch on the monitor.
PSEB 6th Class Computer Notes Chapter 3 Basics of Working with Computers 1
After switching on the computer, the computer starts to place the operating system in its memory. This process is known as booting. This process takes some time depending on the memory and the hardware attached to the computer system. After the booting process screen is displayed on the monitor.

Logging-in
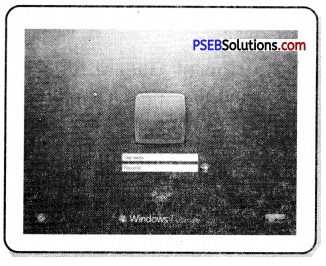
After the booting process the initial windows screen is displayed. This screen provides the opportunity for the user to connect to the main operating system. This process is known as login.

On the screen all the users are displayed which are created on this computer. To login to the screen the user must know who is username and password.

  • To Login to the computer , click on the username.
  • Windows will ask to enter the password for you.
  • Type in the password of that username.
  • Windows will let you in.
  • It will display the next screen which is called desktop.

Desktop and its Components
When the user logged into the Windows operating system, he is taken to a screen. This screen is known as the desktop of the computer. It is basically a dashboard of a computer system. All the operations are performed from this screen on. It has various parts. The parts of a desktop are discussed below.
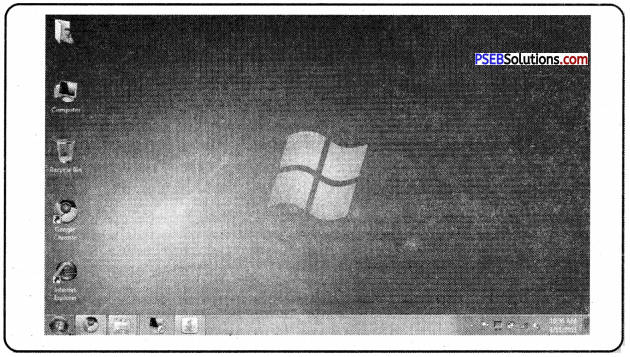
PSEB 6th Class Computer Notes Chapter 3 Basics of Working with Computers 2
Desktop

Desktop has following three parts:

  • Icons
  • Taskbar
  • Shortcut

PSEB 6th Class Computer Notes Chapter 3 Basics of Working with Computers 3

Icons
Icons are the small pictures on the desktop. These icons represent a file or a program or folder on the computer. The user has to click on this icon to open.dat file or program. The following types of icons are available on Windows desktop.
PSEB 6th Class Computer Notes Chapter 3 Basics of Working with Computers 4

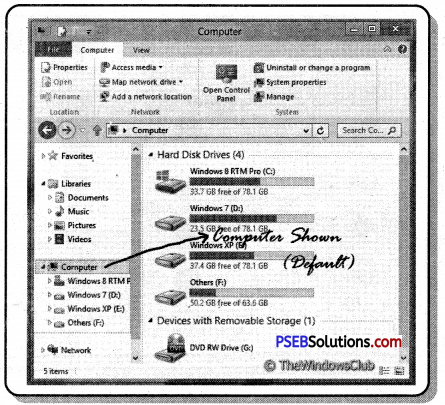
1. My Computer: This icon is used to assess the hard disc of the computer. This icon opens a window on the computer screen which displays all the hard disks attached to the computer and other removable media such as pen drives or CDs. The user can work in this window.

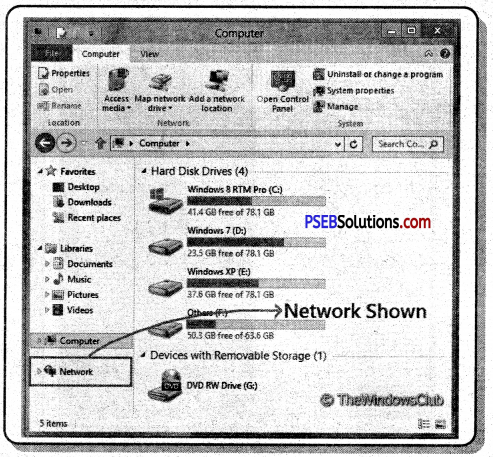
2. Network: This icon is used to connect to the network location attached to this computer system. This icon is used when the computer is connected to a local area. This icon displays icons of all the computer systems which are connected to users’ computers through Local area networks. The user can go to the other computer and work on files.

3. Recycle Bin: Recycle Bin is a folder which works like a dustbin. In this folder contains all the deleted files, folder, icons on the computer. When anything is not required on the computer system the user can delete that item. That item is shifted to the recycle bin folder. If the user deletes an item accidentally he can restore that item from the recycle bin.

4. Users File: This icon is used to assess the current user data. Thus it can hold all the default locations for the different types of files. It may include my documents, my pictures, my videos desktop etc. The name of this icon changes as per the user logged in.

PSEB 6th Class Computer Notes Chapter 3 Basics of Working with Computers

Shortcuts
A shortcut is to reach the original file. A shortcut represents a link to the program file folder or any other item on the computer. It is an easy way to assess that item. The program can be opened using that shortcut. If the shortcut is deleted then the original program is not deleted or removed from the computer system. The user can create many shortcuts for a single program or file. The shortcut icon is identified by a small Arrow on a normal icon.
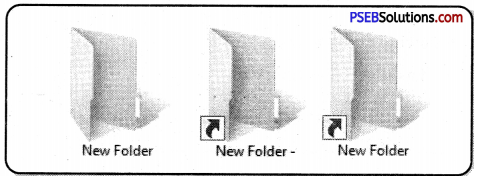
PSEB 6th Class Computer Notes Chapter 3 Basics of Working with Computers 5
Shortcut

Wallpaper
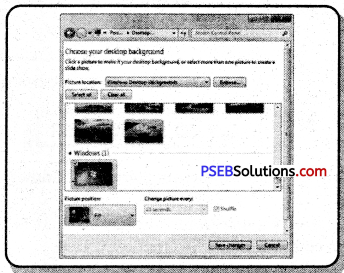
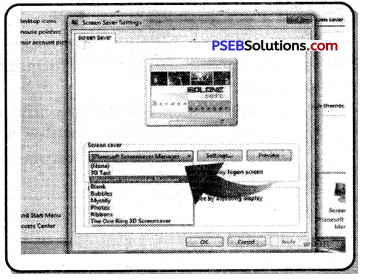
Wallpaper is an image which is displayed behind the desktop screen. It is also called a desktop background. The user can place a screen as per his requirement. This screen can be a picture colour or pattern. There are some preloaded wallpapers available in the Windows operating system. The user can change the wallpaper as per his requirement.

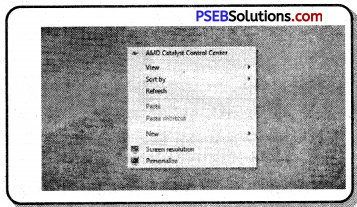
The following steps are used to change a wallpaper.

  • Right-click on wallpaper displaying on Desktop.
  • Choose the “Personalize” option from the popup menu.
  • A new window will appear.
  • Select the required theme from the window. We can alternatively click on the “Desktop wallpaper” option from the bottom and choose the wallpaper.

Taskbar
Taskbar is located at the bottom of the screen. This bar is a part of the Operating System. It allows us to start a program using the Start menu. This bar always remains visible during working in any application. We can navigate through Active programs using the taskbar. The area on the right side of the taskbar is called “Notification Area”. This area allows us to check date and time, items running in the background etc. The taskbar was first introduced with Microsoft Windows 95 and is found in all subsequent versions of Windows. We can have a look of taskbar and it’s all parts as under:
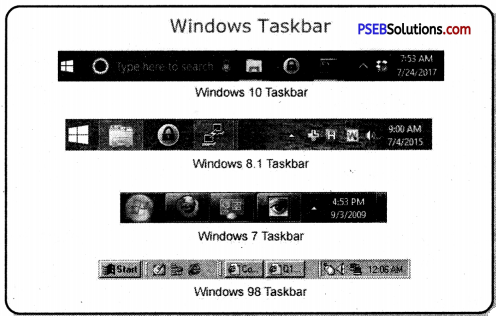
PSEB 6th Class Computer Notes Chapter 3 Basics of Working with Computers 6
Taskbar

All these parts of the taskbar are having their own functions. Let’s discuss the use of each one of them. It has a logo of windows on it. It is the first item on Taskbar.

Its icon is:

  • Start Button: We can start any application and program with the help of the Start button.
  • Quick Launch Bar: This section of the taskbar enables us to launch
    programs without locating them from the Start menu. It is located next to the Start button.
  • System Tray: It is located at the right side of Taskbar. It contains miniature icons for easy access to system functions such as fax, printer, modem, volume etc.
  • Notification Area: This area is a part of the taskbar that provides notifications and status of devices. It can also be used to display icons for system and program features that are not on the desktop.
  • Clock: At the end of taskbar, Clock is displayed where Current Time and Date can be seen. We can change Time and Date by clicking on it. It requires Administration access to change the Time or Date.
  • Active Programs: This area of taskbar is between quick access bar and System Tray area. In this area of taskbar, all the active programs appeared as an icon and we can easily navigate among them.

Working with Windows Applications
Microsoft Windows 7 provides some of the inbuilt applications which are used for different purposes. These applications are the most basic applications and each one is of a different type. Let’s discuss some of these applications.

Notepad
This is a basic text editor of Microsoft Windows. This is mainly used to type character data. It is the most simple application for creating files with text data only. This application is mainly used for writing codes (Source Files) of programming languages like HTML, Java etc.

Running Notepad

  • Start → All Programs → Accessories → Notepad
    Or
  • Click on the start button and type “Notepad ” in the search bar. Click the Icon from the list and press enter key.

Wordpad
This is a Rich Text Format word processor. We can create a document with formatting using this application. This application can be used to write letters or to create documents with texts data only. Graphics like charts, pictures, clip-art etc. cannot be inserted in it.

Running WordPad

  • Start → All Programs → Accessories → WordPad
    Or
  • Click on the start button and type “WordPad” in the search bar. Click the Icon from the list and press enter key.

Paint
This is inbuilt graphical applications of Microsoft Windows 7. We can create drawing or other basic graphical objects using this application. It is also known as MS Paint. MS Paint has several tools for drawing and colouring. We can edit an existing picture also using this application.

Running Paint

  • Start → All Programs → Accessories → Paint
    Or
  • Click on the start button and type “Paint” in the search bar. Click the Icon from the list and press enter key.

Calculator
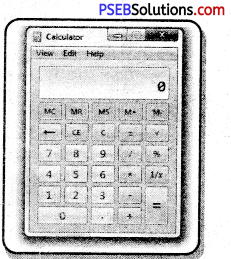
This application of Microsoft Windows 7 is used to do calculation related work. We can use this application as we use a real calculator. Its layout and buttons are also similar to real calculators. We can perform calculations up to 16 digits using this application.

Running Calculator

  • Start → All Programs → Accessories → Calculator
    Or
  • Click on the start button and type “Calculator” in the search bar. Click the Icon from the list and press enter key.

Using Run Box
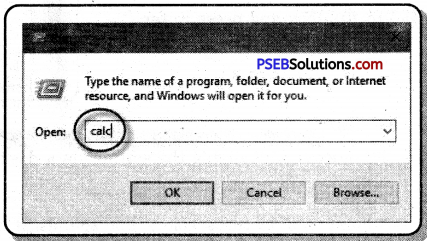
Run box allows the user to open a program by name. This option of windows is very useful for fast opening of programs. Instead of navigating through menus, we can directly type the name of the program to run. Each program exists in the computer’ as an executable file. For example, MS Paint is named as “pbrush”, Notepad as “notepad”, WordPad as “Wordpad” and Calculator as “Calc”. We must write the correct name of that program which is to start. We can also start any file by typing it’s full path. The picture below shows how the Run box looks like in Microsoft Windows 7.

To open the Run Box in microsoft windows 7, we can use the following steps:
Press Window
PSEB 6th Class Computer Notes Chapter 3 Basics of Working with Computers 7
button + R together.
Or
Click on the start button and search for “Run”. Click the Icon from the list and press enter key.

PSEB 6th Class Computer Notes Chapter 3 Basics of Working with Computers

Search Box of Start Menu
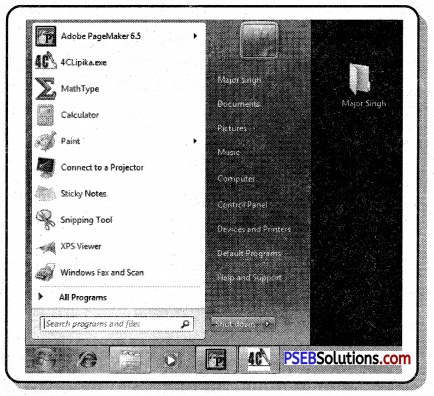
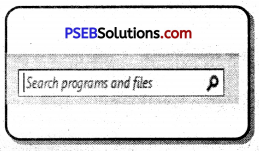
We can use the Search Box of Microsoft Windows 7 to search files or programs of computers. It can find given file from hard drive. It is located at the bottom of Start Menu of Windows 7. If this bar is missing from the start menu then we can re-enable it from Control Panel. The Search Box of start menu looks as given in the picture bellow.
If this part of start menu is missing then we can use following steps to show Search Box.

Steps to show “Search Box”

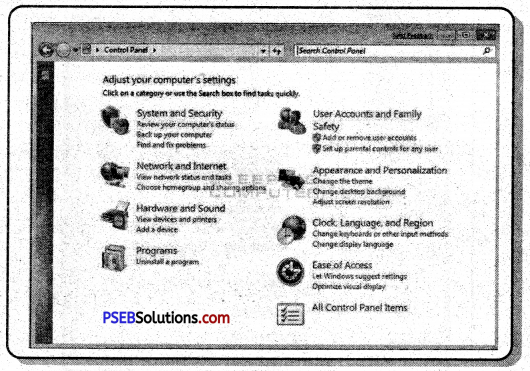
  • Open the Start menu and click “Control Panel.”
  • Click “Uninstall A Program” under Programs.
  • Click “Turn Windows features on or off.”
  • Click on the checkbox named ‘Window Search”.
  • Click “OK” to save your changes.
  • Search Box will start showing in Start Menu after restarting your computer.

Shutting Down Computer System
When the user completes its work on the computer system it is necessary to shut it down. The process of shutting down a computer system is as simple as starting it. All the tasks are performed by the computer system itself to shut it down. The user has only to start the procedure. Shutting down a computer is necessary to avoid the data loss. When the computer is in workable condition many files have been opened by it. The process of shutting down closes all those files, saving their data and returning them back to their inactive state.

Windows have given commands to shutdown the computer system. These commands are selected from the start menu of the window.

Following steps are used to shutdown a window based computer.

  • Click on the start button.
  • Click on the arrow available with the shutdown button.
  • It will display many options such as sleep shutdown log of restart lock switch user.
  • Window will start the process as per the options selected.

The detail of these options are given below:

Sleep:
This option of Power Off menu can be used when we want to leave a computer for some time. During this mode, the power of Monitor/LCD gets OFF and all your data is kept safe. When we put a computer into sleep mode then its power remains ON and its power light starts blinking. This blinking Red-Colour LED on the CPU shows that the computer is in sleep Mode. We can press the power button to resume the computer from this mode.

Shut Down:
This option of Power menu can be used when we have finished all our work. When we shut-down a computer, all parts of computer systems are turned off and no power remains active in the Computer System. We can switch off the main power-supply of the computer when it is shut down. This process can take some time and we must wait till it is over. This process may take time according to the size of data being used and number of programs currently running.

Log Off:
Windows 7 allows us to access a computer differently among users. We can keep our data secure from other users with the help of user accounts in it. If we have finished our work and want to leave a computer but another user is there to access the same computer for own work in a different user account then we can use the Log-off option of Power Menu.

Restart:
This option of power menu can be used when any new program is installed or any updation in the system is done. Sometimes when a new device or hardware is attached to the computer, it is required to restart our computer. In such a case, we can use the restart option of the Power menu to shut down our computer and start it again. When the restart button is pressed then the computer automatically gets started after being shut-down.
PSEB 6th Class Computer Notes Chapter 2 Computer Components

This PSEB 6th Class Computer Notes Chapter 2 Computer Components will help you in revision during exams.

PSEB 6th Class Computer Notes Chapter 2 Computer Components

Introduction to Basic Components of Computer System:
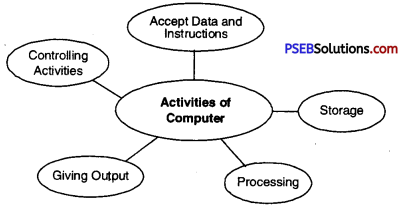
Computer is a device which gets input, processes it and gives output to the user. Input processing and output are called basic tasks of a computer system. For doing these tasks computers need various components. For this computer needs Standard Input Output devices and a Processing Unit.

Standard Input devices include keyboard and mouse. Both of these devices are necessary for a computer. If the keyboard is not attached to the computer, the computer will show an error message at the time of booting. The keyboard is used to enter text messages and the mouse is a pointing device. The most common Output device used in computers is a monitor. It is required to see the result of our work.

The combination of these systems is called the Standard Input Output unit.
PSEB 6th Class Computer Notes Chapter 2 Computer Components 1

How Computer Works?
The process of processing the data is called the processing cycle of a computer. It is the way of processing within a computer system.

Three steps are involved in this cycle.
1. Input: This part is related with input of data and instruction. Computers cannot work without proper in. To enter the necessary data and instructions in the computer input unit is required. Man can enter the data and instruction in its own language and that is converted into computer languages by this input unit.

There are many types of input devices used for input. Keyboard is the most common input device, used to enter textual data. The second common device for input is the mouse. This device is used to point a special part on the screen or to select a command your mouse pointer. The other common devices which are used for input are microphone touch screen scanner etc.

2. Processing: Processing is the process of acting according to given instructions. This is the main task done by computer as it gets instructions from the computer. The main aim of Computer is to work as per the given instructions. This task is done by the processor of the computer. The processor is just like the brain of a human being. This processor is also known as the Central Processing Unit.

3. Output: After processing the data is converted into some information. The user of the computer needs that information from the computer as its result. This result is shown to the user using output devices. The most common output device is a monitor. The other output devices are speaker, printer, plotters.
PSEB 6th Class Computer Notes Chapter 2 Computer Components 2

PSEB 6th Class Computer Notes Chapter 2 Computer Components

Block Diagram of Computer:
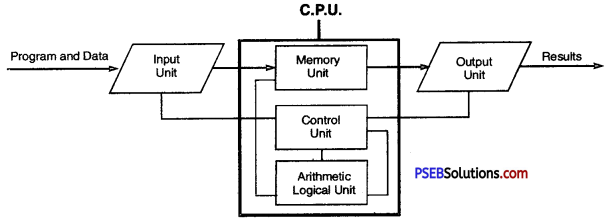
A block diagram of a computer is a Graphical representation of various steps involved in working of a computer. The main parts shown in this block diagram are input unit, processing unit and output unit. The processing unit is divided into three parts namely memory unit, control unit and arithmetic logic unit.
PSEB 6th Class Computer Notes Chapter 2 Computer Components 3

Parts of Central Processing Unit
The Central Processing Unit of a computer system is divided into three parts.

  1. Memory Unit
  2. Control Unit
  3. Arithmetic and Logical Unit

PSEB 6th Class Computer Notes Chapter 2 Computer Components 4
1. Memory Unit: This unit is also known as storage unit. This unit holds the data and instruction in it. It can store data and instruction temporary and permanently. Many types of memories are used in this unit. Type of memory is used for special purposes. These memories vary in size, storage capacity nature of operation, speed and cost.

2. Control Unit: Control unit is meant for controlling all the activities of the computer. This unit works as the brain of a computer. It performs all the operations given in the form of instructions. It also controls the functioning of other components of the computer. It controls both input and output units also.

3. Arithmetic and Logical Unit: This is the third part of the Central Processing Unit. This unit is related to performing all the arithmetic and logical operations. A lot of calculations are done by computer in each type of work. All these calculations are done by this unit of CPU. Part of Central Processing Unit is integrated within the processor.

Types of Computer Memories
Computers can store data in many ways. This is possible due to the use of different types of memory in computers.

Computer memory can be classified into two types.

  1. Primary Memory
  2. Secondary Memory

PSEB 6th Class Computer Notes Chapter 2 Computer Components 5

Primary Memory:
Primary memory is also called main memory. It is directly accessible by the Central Processing Unit of the computer. All the instructions and data are placed in this memory before processing. This memory is also known as main memory.

Primary memory is of two types.

  1. Random Access Memory
  2. Read Only Memory

1. Random Access Memory: This memory is also known as RAM. This memory is very fast. All the data and instructions are stored in this memory when the computer is working. It is a volatile type of memory. It means that when the computer is switched off its contents gets destroyed. This memory cannot store the data permanently. But without this memory the computer cannot work.

2. Read Only Memory: It is also known as ROM. It is a permanent type of memory. This memory is placed on computers and other electronic devices in the form of microchips. The ordinary user cannot write in this memory. He can only read from this memory. That is why this memory is called Read Only Memory. Normally this memory stores the data and information which is required to start a computer. Only users cannot write in this memory. Only the manufacture of this memory can write in it.

PSEB 6th Class Computer Notes Chapter 2 Computer Components

Secondary Memory
Secondary memory is also known as auxiliary memory or external memory. This memory is used to store data and instructions for a long time. This memory is a non-volatile memory. The storage capacity of secondary memory is higher than primary memory. This memory is not directly accessible from the CPU. Different types of memory storage devices are used in this type such as hard disk, CD, DVD, pendrive, Magnetic tape etc.

Categories of Computer:
The computers can be categorised according to their speed, memory processing capability, storage capacities and generations.

There are four main types of computer.

  1. Micro computer or personal computer
  2. Mini computer
  3. Mainframe computer.
  4. Supercomputer

PSEB 6th Class Computer Notes Chapter 2 Computer Components 6
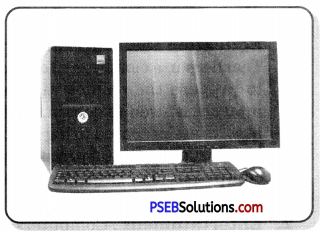
1. Micro Computer or Personal Computer: Micro or Personal Computers are the most common computers. These are the computers which are used in homes, schools and offices. These computers are small in size and the cost of this computer is very less. These computers can be afforded by small businesses, small schools and individuals also. The computer on which we work falls in this category. Examples of computers of this category are desktop computer, laptops, palmtops, tablets, mobile phones etc.

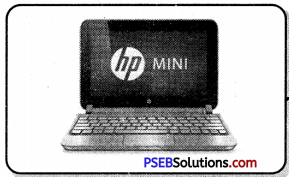
2. Mini Computer: This type of computer has more processing capabilities than a microcomputer.
These computers are also larger in size.
These computers are used by multiple users at a time. The main features of these computers is highest storage capacity sharing of resources and high processing speed. Micro computers are mainly used as small or mid range servers. These computers are used in large businesses, large team based companies and scientific applications.
PSEB 6th Class Computer Notes Chapter 2 Computer Components 7

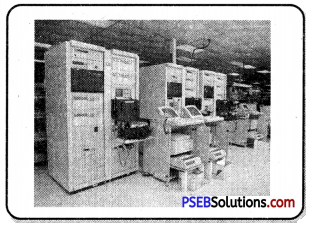
3. Mainframe Computer: The processing speed of Mainframe computers is higher than micro and mini computers. These computers are capable of handling large amounts of data within less time. These computers are capable of performing operations on large amounts of data with high processing speed. Mainframe computers are used in patience such as government offices, banks etc.
PSEB 6th Class Computer Notes Chapter 2 Computer Components 8

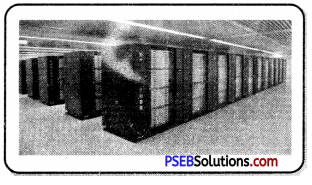
4. Supercomputer: Supercomputer is the most powerful computer invented till now. The processing speed of supercomputers is very fast. It can store a large amount of data. These computers are specially used for complex application. Supercomputers are the most powerful and expensive computers till now. The application areas of these types of computers are weather forecasting climate research, oil and gas exploration and processing of astronomical data.
PSEB 6th Class Computer Notes Chapter 2 Computer Components 9

PSEB 6th Class Computer Notes Chapter 1 Introduction to Computer

This PSEB 6th Class Computer Notes Chapter 1 Introduction to Computer will help you in revision during exams.

PSEB 6th Class Computer Notes Chapter 1 Introduction to Computer

Introduction to Computer:
Computers are used everywhere these days. All the offices, banks, school, colleges use computers for their daily work. Let us try to understand the meaning of computers.

Meaning of Computer:
A computer is an electronic device which gets the data and instructions from the user. It processes the data as per given instructions and gives the result in the desired form. Computer can be defined as:

A computer is an electronic machine that accepts data as input from the user and processes the data under the control of a set of instructions and gives the result as an output.
PSEB 6th Class Computer Notes Chapter 1 Introduction to Computer 1
Literally, the word computer is taken from Latin word compute which means to calculate. So in simple words, we can say that a computer is an electronic device which was made to calculate. Earlier their definition was correct as the main work of the computer was to calculate. Now the computer is doing a lot of work to decide the calculation.

PSEB 6th Class Computer Notes Chapter 1 Introduction to Computer

Uses of Computer:
Following are the uses of computer in Modern Times:

  • We can do mathematical calculations on the computer.
  • We can play games on the computer.
  • We can draw pictures on the computer.
  • We can listen to songs and watch films on the computer.
  • We can use computers to print books and newspapers.
  • We can use computers to book our tickets to travel in trains, buses and airplanes.
  • We can check the arrival and departure time of trains, buses and airplanes with the help of a computer.
  • We can check the weather conditions of any place before travelling.
  • We can print reports, results of our school or time table.
  • We can store our data into a computer for future use.

Applications of Computer
Computers are used in many areas. Some of the application areas of computers are given below:
PSEB 6th Class Computer Notes Chapter 1 Introduction to Computer 2

1. Education: Students and teachers are using computers in their education. Teachers use computers to teach the students and students use computers to prepare their notes making, drawing and making projects etc. The internet is used to search, study material, results, time table and various reports are prepared using the computer. Computers are also used for record keeping, online data, processing etc. Punjab Education Department is using computer on their web portal like www.epunjabschool.gov.in www.pseb.ac.in

2. Entertainment: Computers are a good source of entertainment also. The user can watch movies, listen song and camp. Beautiful presentations can be made on the computer. All the films made in these days use computers for their special effects.

3. Sports: Computers are also used in the sports field. They are used to improve the performance of players to keep data and to evaluate the performance and to display information about various tournaments which will happen in future. Digital scoreboards are also a part of games today. The players can improve their by analysing their record.

4. Communication: Computers have given new ways of communication. The user can make video calls, audio calls, chat using computer data and send email to their friends and relatives. Any type of data can be shared using smartphone, tablet, laptop and computers.

5. Shops: Shopkeepers are also using computers for their various works. They are using computers to manage their stock to generate purchase orders to generate bills to advertise their shop. The use of computers in shops save a lot of time for the shopkeeper and the customer.

6. Hospitals: Hospitals are using computers to maintain patient records and to monitor the health of patients. The medical history of a patient can be stored and communicated by using a computer. Now the doctor is also using a computer to check their patient from a remote place. Computers are also used in Laboratories to do 2x and data analysis.

7. Banks: The hanking system is working by using computers. All types of records of customers are maintained by using computers. Then use a computer to maintain data of accounts withdrawal of money deposit of money, loans etc. Customers can now use e-banking services to do their work from their home. ATMs are totally computer based.

8. Government Offices: Government offices are using computers in governance, bill payment, Income Tax application processing. Most of the government’s work is online these days. The citizens can apply for any government service with the help of using computer and internet from their homes. They can pay to build Taxes and avail other governmental services using the internet.

9. Travel: Computers are also used for travel purposes. The user can book their tickets, get knowledge of some geographical areas, check availability of means of transport, cost, estimation and regional culture etc. The user can also book hotels from their home by using the internet.

Characteristics of Computer
The main characteristics of computer are as given below:
PSEB 6th Class Computer Notes Chapter 1 Introduction to Computer 3
Characteristics of Computer
Speed Accuracy Reliability Diligence Automotion Storage
1. Speed: Computer is a very fast machine. It can do calculation in milliseconds. It can complete days work in seconds. That is why it has reduced human effort.

2. Accuracy: Computer is an accurate machine. It never makes any mistakes. If a mistake is performed in any calculation that is always due to human error. A computer can do any task repeatedly for thousands of times without any error.

3. Reliability: Reliability means the ability of being trusted. A computer is a reliable machine. We cannot doubt the results given by computers because
they are always correct. There is no need of rechecking the results. It gives the same result every time.

4. Diligence: Computer never gets tired. It can to do work for many days or even for years. During this time its efficiency does not decrease and neither it commits errors after long working. In fact, a computer is a hardworking machine.

5. Automation: Automation means to do the work automatically. Computers can be instructed to do the work without any interaction. He can be given the instructions and the computer can do work without asking anything. We just need to start the computer and ask him to do the particular work. After that it will do the whole work without asking anything.

6. Storage: The storage capacity of computers is very large. It can attach many storage devices such as hard disk, pen drive at 17 to it. It can store any type of data such as text, audio, video, animation in it. We can also store the storage capacity of computers. Computers store data for a very long time.

Portable Computing Devices
Portable devices are those devices which can be easily carried from one place to another. Technology has given us many portable devices. Some of them are explained below:
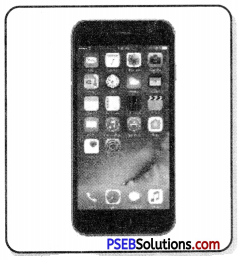
1. Mobile Phone or Smartphone: It is the most common portable computing device used these days. Each one is using their mobile phones these days. Smartphones can do a lot of calculation work and processing.
Their speed is also very fast. Modern mobile phones are equipped with camera large storage capacity and High processing speed.
PSEB 6th Class Computer Notes Chapter 1 Introduction to Computer 4
They can be used in education, business trading, entertainment, gaming etc. Mobile phones are very small devices. It can be carried in our pockets. There are a lot of mobile phones available in the market with different features.

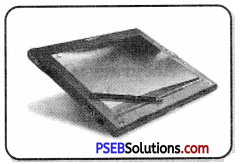
2. Tablet Computer: It is a small computer.
It is mainly known as a tablet. If the battery is used in this tablet. It has a touch screen which is used to give input and get the output. Tablets can be used for many purposes. Most of the students are using tablets in their education at home as well as at their schools.
PSEB 6th Class Computer Notes Chapter 1 Introduction to Computer 5

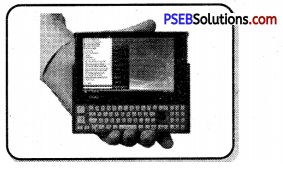
3. Palmtop Computer: Palmtop computer is a small size computer which can be placed on our palm. This computer has a small screen and small keyboard. It is just like a mobile phone having a keyboard. These computers are not very popular in these days. These computers were used for limited purposes only
PSEB 6th Class Computer Notes Chapter 1 Introduction to Computer 6

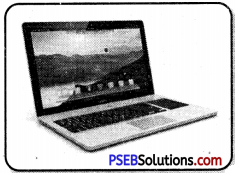
4. Laptop Computer: Laptop computer is the most famous computer these days. It is a computer with a big screen and keyboard attached to it. It can be easily taken from one place to another. If the battery is used to give power to the laptop computer. All it had also a touchpad and many other features built in it.
PSEB 6th Class Computer Notes Chapter 1 Introduction to Computer 7

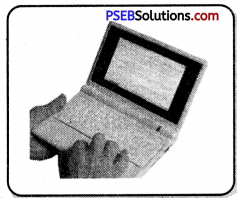
5. Note Book: It is a portable computer. It is smaller than laptop. It is also lighter in weight. It has a battery to work. The battery can be charged again and again. It can be easily taken from one place to another.
PSEB 6th Class Computer Notes Chapter 1 Introduction to Computer 8

PSEB 6th Class Computer Notes Chapter 1 Introduction to Computer

Limitations of Computer:
PSEB 6th Class Computer Notes Chapter 1 Introduction to Computer 9
Computers are capable of doing a lot of work. But, after all this is a machine and unable to do some tasks. These kinds of tasks are considered as limitations of computers.

Some of the main limitations of computer are as under:

  • A computer cannot take decisions by itself.
  • A computer cannot correct wrong instructions.
  • Computer cannot do any work without instruction from the user.
  • It does not have feelings or IQ (Intelligence Quotient)
  • It does not have knowledge and experience like a human being.
  • Computer can not start work until asked.

PSEB 7th Class Computer Notes Chapter 8 Storage Devices

This PSEB 7th Class Computer Notes Chapter 8 Storage Devices will help you in revision during exams.

PSEB 7th Class Computer Notes Chapter 8 Storage Devices

Introduction:
Memory is like the human brain. A computer system needs memory to store the data and instructions for processing. Whenever we talk about the ‘memory’ of a computer system, we usually talk about the primary memory and secondary memory. Now in this chapter we will learn about these two types of memory.

What is Memory?
Computer memory is a physical device capable of storing data and information. It is a storage space where data and instructions are stored either for processing or for further uses. The memory is divided into large number of small parts called cells. Each cell has a unique address. It can store data and instructions either temporarily (RAM) or permanently (ROM) which can be reused at any time.

Memory can be either volatile or non-volatile.

  • Volatile Memory: Memory that loses work when a computer is switched off. For example, RAM is volatile. When you are working on a document, it is kept in RAM, and if the computer loses power, your work is lost.
  • Non-volatile Memory: This memory, also called NVRAM, is the memory that retains its contents even when power is lost. EPROM is an example of unstable memory.

Types of Computer Memory:
There are many types of memory in a computer; the most basic is primary memory, also called system memory, and the secondary memory, commonly called storage. Details about these memories are given ahead:

Primary Memory:
Primary memory is the main memory of a computer system. It stores the data temporarily. It holds only those data on which computer is currently working. Primary memory is directly accessed by the CPU. It has limited storage capacity and data is lost when power is switched off.

Primary memory is a semiconductor memory because it is manufactured using semiconductor devices. The capacity of primary memory is very limited and is always less than that of secondary memory. It is more expensive than secondary memory.

Characteristics of Main Memory

  • These are semiconductor memories.
  • It is known as the main memory.
  • Usually volatile memory.
  • Data is lost in case power is switched off.
  • It is the working memory of the computer.
  • Faster than secondary memories.
  • A computer cannot run without the primary memory.

Types of Primary Memory:
There are two types of primary memory:

  • RAM (Random Access Memory)
  • ROM (Read Only Memory)

1. RAM: RAM stands for Random Access Memory. This is a volatile memory. This means it stores data or instructions temporarily. It is located on the motherboard. When you start the computer, Data and instructions from the hard disk are stored in RAM. The CPU uses this data to perform the required functions. RAM loses all data as soon as you shut down the computer.

The most important thing to understand about RAM is that RAM memory is very fast, it is a read/write memory. It is much more expensive than secondary memory. Due to the high cost of RAM, most computer systems use both primary and secondary memory, RAM is further divided into two types:
(a) SRAM (Static Random Access Memory): This stores a bit of data using the state of a six transistor memory cell.
(b) DRAM (Dynamic Random Access Memory): This stores a bit data using a pair of transistor and capacitor which constitute a DRAM memory cell.

SRAM DRAM
1. Transistors are used to store information in SRAM. 1. Capacitors are used to store data in DRAM.
2. SRAM is faster as compared to DRAM. 2. DRAM provides slow access speeds.
3. These are expensive. 3. These are cheaper.
4. SRAMs are low density devices. 4. DRAMs are high density devices.
5. These are used in cache memories. 5. These are used in main memories.

2. ROM: This means read only memory. It is a non-volatile memory. It stores the data permanently. These are the IC (integrated circuits) inside the PC that makes up the ROM. ROM stores a startup program called ‘Bootstrap Loader’. When the computer’s power is turned on “Bootstrap Loader” checks and starts the device connected to the PC. ROM can only be read by CPU but cannot be changed.

Types of Read Only Memory (ROM):
(a) PROM (Programmable Read Only Memory): PROM is read¬only memory that can be modified only one time by a user. Once programmed, the data and instructions contained in it cannot be changed.
(b) EPROM (Erasable Programmable Read Only Memory): It can
be reprogrammed. To delete data from it, place it in front of an ultra violet light. To re-program it, delete all previous data
(c) EEPROM (Electrically Erasable Programmable Read Only Memory): Data stored in EEPROM can be deleted and modified as many times as user wants. Implementing electric field can erase data, no need for ultra-violet light. We can only delete parts of the chip.

Secondary Memory
Secondary memory is permanent memory. It is not directly accessible by CPU. It communicates with the CPU through the main memory. Secondary memory stores data and holds it even when power is off. It is used to store large amount of data or programs. It is less expensive than the primary memory.
Secondary memory refers to the various storage media on which a computer can store data and programs. Floppy disks, Hard Disks, magnetic disks, magnetic tapes are the examples of secondary memory.

The Secondary storage media are of two types:

  1. Fixed: Fixed Storage media is an internal storage medium like hard disk that is fixed inside the computer.
  2. Removable: Storage medium that are portable and can be taken outside the computer are termed as removable storage media like CD, DVD, Pen drive etc.

Characteristics of Secondary Memory

  • These are magnetic and optical memories.
  • It is known as the backup memory.
  • It is a non-volatile memory.
  • Data is permanently stored even if power is switched off.
  • It is used for storage of data in a computer.
  • Computer may run without the secondary memory.
  • Slower than primary memories.

1. Magnetic Tapes: Magnetic discs are made of hard metal or synthetic plastic material. Magnetic material is coated on both sides of the disc platter and both sides can be used for storage. The magnetic disk provides direct access to both small and large computer systems. Magnetic audio tapes are used to record sound and music. Magnetic video tapes are used to record analog voice and video signals. These are low cost tapes. Hard disks and floppy disks are examples of magnetic tapes.

2. Floppy Disk: Also known as floppy diskette, it is a removable, portable secondary storage device. This was created in 1964 by IBM. It is a small plastic disc about 3.5 inches in size. These disks have very low storage capacity and can store approximately 1.4 MB of data. It can be read or written by a floppy disk drive.

3. Hard Disk: Hard disks are the secondary storage devices used to store data permanently. It is directly connected to the disk controller on the motherboard. Hard disks are flat, circular plates made of aluminum or glass and coated with a magnetic material. Hard disk platters typically spin very fast at 5400 to 7200 cycles/minute.

It has unlimited storage space and its storage capacity ranges from 20 GB to 500 GB. It used to install a new program or application on the device. Software programs, images, videos, etc. all can be saved to the hard drive.

There are two types of hard disks.

  • Internal Hard Disk: Internal hard drives are located inside your computer. Most computers come with a single internal hard drive, which includes the operating system and pre-installed applications.
  • External Hard Drive: An external hard drive, also called a portable hard drive. It is a device connected to the outside of a computer via a USB connection. It is often used to back up a computer or portable storage.

4. Optical Drives: Optical drives are a storage medium from which data is read and written by a laser. Optical disks can store up to 6GB of data. Optical storage devices are the most widely used and reliable storage devices.

The most commonly used types of optical storage devices are:

  • CD-ROM
  • DVD-ROM
  • CD-RECORDABLE
  • CD-REWRITABLE
  • PHOTO – CD

1. CD: A compact disc is a flat, round, optical storage medium invented by James Russell. It is a portable storage medium that was used to digitally store and play the audio, video and other data. Compact discs have greater storage capacity than floppy disks. These disks can store 650-700 MB of data. This is a very reliable storage media.

There are two types of CDs:
(а) CD-R: CD-R stands for Compact Disc-Recordabie, also known as ROM is a digital optical disk storage format. A CD-R disc is a compact disc that can be written once and arbitrarily read multiple times.
(B) CD-RW: CD-RW (compact disc-rewritable) is a digital optical disk storage format introduced in 1997. A CD-RW compact disc (CD-RW) can be read, written, erased, and rewritten.

2. DVD: Stands for Digital Video Disc or Digital Versatile Disc. It is a digital optical disc data storage format that was invented and developed in 1995 and released in late 1996. DVD is a type of optical media used to store digital data. It is the same size of a CD, but it has a large storage capacity. Some DVDs are specifically formatted for video playback, while others contain different types of data, such as software programs and computer files.

While using CDs and DVDs, we should keep the following in mind:
(a) CD / DVD should always be covered.
(b) The back shiny part of the CD / DVD should not be touched.
(c) Don’t write on the back of the CD / DVD.
(d) CD / DVD should not be folded.
(e) To clean CDs / DVDs, a soft cloth should be used. You can also use water to remove dust from it.

3. Pen Drive: A pen drive is a portable universal serial bus (USB) flash memory device. It is used to store and transfer audio, video and data files from a computer. The major advantage of USB pen drives over other portable storage devices such as floppy disks or DVDs / CDs is their compact shape and size; they work faster and can store more data. Memory Card: A memory card is a flash memory. It is used in electronic devices such as digital cameras, Mobile phones or video game consoles.

The memory card can stores data, images, music, games or other computer files. Memory cards have no moving parts so they are not easily damaged. They are more compact and portable than CDs or DVDs, and they can store more data than CDs. The data stored in the memory card can be read with the help of card reader.

Differences between Primary Memory and Secondary Memory
In this lesson, we have talked about both primary and secondary memory. Both are quite useful in their own way, now we will look at the difference between the both.

  • Primary memory is also called internal memory. Secondary memory is also called backup memory or auxiliary memory.
  • Primary memory can be accessed by data bus while secondary memory is accessed through I/O channels.
  • Primary memory data is accessed directly by the processing unit. Secondary memory data cannot be accessed directly by the processor.
  • Primary memory is more expensive than secondary memory. Secondary memory is cheaper than primary memory.
  • Primary memory is both unstable and static. Secondary memory is always unchanging memory.

Note:

  • Memory is an electronic holding space for instructions and data.
  • Memory is used to store data and instructions.
  • Memory can be either volatile or non-volatile.
  • Primary memory is the main memory of a computer system. It is used to store the data temporarily.
  • Primary memory consists of ROM and RAM.
  • Secondary memory is permanent memory that communicates indirectly with the CPU through the main memory.
  • Hard disks and floppy disks are examples of magnetic tapes.
  • Internal hard drive is a hard drive that resides inside the computer.
  • An external hard drive is connected to the outside of a computer via a USB connection.
  • A pen drive is used to store and transfer audio, video and data files from a computer.
  • Data stored in the memory card can be read with the help of card reader.

PSEB 7th Class Computer Notes Chapter 7 Introduction to Multimedia

This PSEB 7th Class Computer Notes Chapter 7 Introduction to Multimedia will help you in revision during exams.

PSEB 7th Class Computer Notes Chapter 7 Introduction to Multimedia

Introduction:
Multimedia is an interactive media and provides many powerful ways to present information to the user. It provides communication between users and digital information. It is a medium of communication. Some of the areas where multimedia is widely used are education, training, reference materials, business presentations, advertising and documentation.

Multimedia:
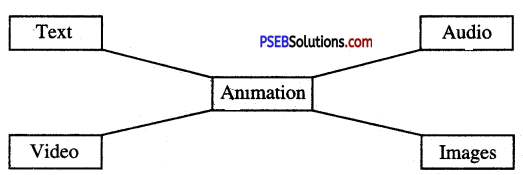
Multimedia is a form of communication that combines different types of data such as text, audio, images, animations or video into a single presentation. Multimedia is a computer based technology where all kinds of information can be digitally presented, displayed, processed and transmitted.

As the name suggests, multimedia is a combination of multi and media. Multi means many and media means the way by which data can be transmitted or sent. Email, newspaper, messaging, radio, TV context, etc. are all examples of media.

Components of Multimedia
PSEB 7th Class Computer Notes Chapter 7 Introduction to Multimedia 1
1. Text: Text is the primary part of multimedia and the most common way of conveying information to another person. It is a combination of characters and certain symbols. Text is commonly used to send messages. In multimedia we can present text in a very attractive way using fonts, colors and styles. The most commonly used software for viewing text files are Microsoft Word, Notepad, WordPad etc.

We can use two types of text in multimedia.
(а) Static Text: Static text is a simple text that we use to type messages or other documents or given along with images to describe the image.
(b) Hypertext: Hypertext is text that contains links to other texts. These texts are displayed on the screen with blue underline. By clicking on this text we can easily and quickly go to the linked page.

2. Images: Every multimedia presentation is based on images. In multimedia we make the concept more effective and presentable with the help of images. Sometimes we do not like to read the large amount of text therefore images are used to explain the concept in very easy manner.

There are two types of images:
(a) Raster or Bitmap Images: Bitmap images are real images that are captured from digital cameras or scanners.. A bitmap is a simple matrix of small dots called a pixel that creates a raster or bitmap image. Each pixel contains two or more colors. Generally bitmap images are not editable. Bitmap images require a large amount of memory.
(b) Vector Images: Vector images are drawn using lines, circles and other mathematical equations. These images remain smooth even when zoomed in. Vector imagery requires less memory to store and thus we can use less data to represent the image. These images are editable.

3. Audio: In multimedia audio means recording or playing sound, speeches, music etc. Audio is an important part of multimedia because the concept that we cannot understand in the form of text, we explain in audio format.

Some sound formats are:
(a) MIDI: The full name of MIDI is Musical Instrument Digital Identifier. It is a communication tool developed for computers and electronic devices. It’s a flexible and easy way to create music projects in multimedia.
(b) Digital Audio: Digital audio is a better alternative to MIDI files. Digital sound files are created from predefined music to record live music. We can digitize any type’of sound. These files are larger in size than MIDI. The sound quality of these files is better than MIDI files. A special format is used for digital audio. This is called a WAV. Commonly used software for playing audio files is: Quick Time. Real Player, window media player.

4. Video: Video means moving pictures with sound. This is the best way to communicate with each other. It is used in multimedia to present more information and saves a lot of time. The most commonly used software for watching videos are: Quick Time, Real Player, window media player.

The video is divided into two parts:
(a) Analog Videos: Analog video is created in a video camera. Analog video, represents moving visual images (video) in the form of analog signals. The red, green and blue intensities are used to record these videos.
(b) Digital Videos: Digital video is an electronic representation of moving visual images (video) in the form of encoded digital data. Digital video is audio/visual data in a binary format. Information is represented as a sequence of zeroes and ones.

5. Animation: Animation is the process of displaying multiple images one after the other. In traditional animation, to show on film, images are drawn or painted by hand on transparent celluloid sheets. Today, most animations are made with computer-generated imagery (CGI). Animation is a method in which images are shown as a video at high speed. For example Cartoon movies, games etc.

There are two types of animation:
(а) Path Animation: In this animation, path geometry is used as an input.
(b) Frame Animation: In this animation, pictures are shown moving in a frame.

PSEB 7th Class Computer Notes Chapter 7 Introduction to Multimedia

Features of Multimedia:

  • Photo Gallery: Show your photos arranged in a nice-looking grid format.
  • Slideshows: Combine your pictures with music and animate them in a slideshow.
  • Audio Player: Add music, podcasts or other audio files to your website.
  • Video Player: Upload videos and display them in a professional player or embed videos directly from video sharing websites such as http:// www.youtube.com
  • Embedded Documents: Embed already existing documents from script.com or other document sharing websites directly into your website for easy viewing.

Requirements of Multimedia
In multimedia, projects are created by combining text, graphics, sounds, videos, etc. These projects require verity of hardware and software. These hardware and software are based on the need of the project, budget and its presentation. The hardware and software commonly used in multimedia are as given ahead:

Hardware Requirements
The following hardware is required to create multimedia apps. This hardware include inputs, outputs and storage devices.
1. Input Devices: Those devices which are used to enter data and instructions into a computer are called input devices. They add text, graphics, sounds, videos, etc. to projects. The following are the input devices used in multimedia.
(a) Keyboard
(b) Mouse
(c) Scanner
(d) Touch Screen
(e) Microphone
(f) Voice Recognition System
(g) Digital Camera
(h) Joystick
(i) Light Pen

2. Output Devices: Those devices which are used to receive data from a computer. For example printing a document, displaying images on a screen and playing audio or video. Below are the names of some of the output devices.
(а) Monitor
(b) Audio Devices
(c) Video Devices
(d) Projectors
(e) Speakers
(f) Printers etc.

3. Storage Devices: The process of permanently saving data and instructions is called storage, and the devices in which multimedia projects are stored are called storage devices. The following are some of the storage devices used to store multimedia projects:
(a) Hard Disk Drive
(b) Magnetic Tape
(c) RAM
(d) CD-R, CD-RW, DVD
(e) Pen Drive
(f) External Disk Drive

Software Requirements
Multimedia software is a tool used to edit and manage the key elements of multimedia such as text, graphics, sound, animation and video.

The following are some of the specific software used for multimedia projects.

  • Adobe Director
  • Create Together
  • Media Blander
  • Media Works
  • Play mo
  • Multimedia Builder
  • 4 File Format for Multimedia

File formats are designed to store specific types of information. Such as JPEG for storing raster data, AI for storing vector data, WAV and MPEG for storing audio data and video data. Before reading about the file format in multimedia, we need to know how many types of files are in multimedia.

Multimedia consists of 3 types of files which are mentioned ahead:

  • Uncompressed: These are the files which are not compressed and are capable of storing a large file size.
  • Lossless: Files that can be compressed and when they are compressed there is no loss in image quality such as (Vector images) which do not lose quality even when zoomed in and the image will remain clear.
  • Lossy: Files that lose their quality when compressed. Such as bitmap Images. The easiest way to find any file type is to look at the file extension. The file extension determines which file it is.

Audio File Format
Audio file format is the file format used to store digital audio data on a computer system. Below are some audio file formats:

  • MP3: The full form of MP3 is MPEG audio Layer-3. It is a standard technology and format that reduces the size of the file by one-tenth of the actual size and does not allow any loss in sound quality. The extension of these files is MP3.
  • WAV: The most popular audio file format in Windows for storing compressed sound files. In order to the reduced the size of the files, these files can be converted to MP3 file format. The extension of these files is WAV.
  • WMA (Window Media Audio): These file formats are used to encode digital audio files similar to MP3. It can compress files at a higher rate than MP3. WMA files can be compressed to any size to match many different connection speeds or bandwidths. Their file extension is .wma.
  • AAC (Advanced Audio Coding): The default audio format of Apple iTune. They work very well on Apple computing but do not work on web browsers. Their file extension is .aac.
  • Real Audio: This format has been developed by Real Media to allow steaming of audio with low bandwidth. Its file extensions are ,rm, .ram.

Video File Format
Video files are a collection of images, audio and other data. The following are many different formats for encoding and saving video data.

  • AVI (Audio Video Interleave); One of the oldest video formats developed by Microsoft. Due to its simple architecture, these files are able to run on different systems such as Windows, Macintosh, Linux. The file extension of these files is .avi.
  • MPEG (Moving Pictures Expert Group): The first popular video format on the web is MPEG, These are compressed video files that can store both audio and video files. The file extension of these files is .mpeg.
  • MP4: MP4 is one of the earliest digital video file formats introduced in 2001. Most digital platforms and devices support MP4. An MP4 format can store audio files, video files, still images and text. In addition, MP4 delivers high quality video with relatively small files. The file extension of these files is .mp4.

PSEB 7th Class Computer Notes Chapter 7 Introduction to Multimedia

Image File Format
There are many different image formats and image file extensions that can be used to create and save images to a computer. The most common image formats are listed below:
1. TIFF: Stands for Tagged Image File Format. TIFF file format is widely used bitmapped file format. TIFF files originally use lossless compression. Today TIFF files also use lossy compression according to the requirement. It allowing for very high-quality images but also larger file sizes.TIFF can store many different types of image such as 1 bit image, grayscale image, 8 bit color image, 24 bit RGB image etc. It is supported by many image editing applications, software used by scanners and photo-retouching programs. The file extension of these files is .tiff.

2. BMP: The bitmap file format (BMP) is a very basic format supported by most Windows applications. BMP files are uncompressed. It allowing for very high-quality images but also larger file sizes. Therefore, these are not suitable for the internet. BMP can store many different type of image: 1 bit image, grayscale image, 8 bit color image, 24 bit RGB image etc. The file extension of these files is .bmp.

3. GIF (Graphics Interchange Formats): The GIF format is one of the most popular on the Internet due to its compact size. They are widely used for web graphics, as they are limited to 256 colors and can be animated. The file extension of these files is .gif.

4. JPEG (Joint Photographic Experts Groups): Jpeg is a “loosy” format meaning it compresses the image to make it a smaller file. Compression of the image causes loss of image quality but this loss is usually not noticeable. JPEG files are very common on the Internet and JPEG is a popular format for digital cameras. The file extension of these files is -jpeg.

5. PNG (Portable Network Graphics): PNG files are a lossless image format designed to actually improve and convert GIF format. Unlike the 256 colors supported by GIF, PNG files can handle up to 16 million colors. The file extension of these files is .png.

6. RAW: Raw images are images that are not processed by a camera or scanner. Most digital SLR cameras can shoot in RAW format. The file extension of these files is raw.

Creating text files and using a word processor is the most common task on a computer. The following are the most common file formats used to store text files and documents.

  • RTF (Rich Text Format): Rich Text Format is a primary file format. Files of this format can be read in any word processor. The file extension of these files is .rtf
  • Plain Text: Plain text files can be opened, read and edited with most text editors. The most commonly used text editors are Notepad (Windows), Gadget or Nano (Unix, Linux), Text Edit (Mac OS) and more. Other computer programs are also capable of reading and importing plain text. Plain text is a real and popular way to deliver an email.

Multimedia Presentation
The multimedia presentations are electronic documents that can include text, diagrams, graphics, photographs, sounds, animations, video clips etc.

Multimedia presentations are used to convey a message to others using a variety of communication methods. These presentations usually include text, animation, video, audio or interactive features such as forms, popup and more. First presentations were offering by Microsoft PowerPoint. You could say that most PowerPoint presentations are multimedia presentations. Today there are many multimedia presentation creators available who use various tools to make the presentation attractive which attracts the attention of the audience.

The following should be kept in mind when creating a multimedia presentation.

  • Text should be kept to a minimum in multimedia presentations.
  • The level of audio and music quality should be good.
  • The keyboard and mouse should be accessible for the convenience of the user.
  • Multimedia presentation should be effective and small in size.

Types of Multimedia Presentation
There can be many types of multimedia presentations, some of which are as follows:
1. Virtual Presentation: Where hosts and viewers attend the presentation remotely, are becoming common place. It is a technology that allows us to gather information on any topic and create a virtual presentation using high technology hardware software tools.

2. Slide Presentation: A slide is a presentation page. A group of slides is known as a slide deck. A slide show is a display of a series of slides or images in an electronic device or on a projection screen. A slide can be a 35 mm slide seen with a slide projector. Presentation slides can be created in many pieces of software such as Microsoft PowerPoint, Apple Keynote, LibreOffice Effects, Preeze,

3. Web Presentations: When we add audio, video, animation etc. to web pages instead of static photos and text, web Pages turn into web presentations.

Applications of Multimedia
Multimedia is the most fast growing area in the field of information technology. A Multimedia is an application which uses media sources like text, images, sound/ audio, animation and video on a single platform. Following are the common areas of applications of multimedia.
1. Education: Multimedia is used to teach students in school and colleges. Nowadays multimedia CDs are used instead of text books.

2. Business: Multimedia applications are used in business for marketing, advertising, network communications, online shopping and more. It is also used in commercial marketing to motivate customers to buy products. ‘

3. Advertisement: Advertising industry uses multimedia to promote businesses, products and services. Multimedia advertising is done using animations and graphic design. Television, radio and print advertising are the most common mediums used in advertising.

4. Entertainment: Multimedia is widely used in the entertainment *> industry. It is used especially in movies and video games to create special effects. Music and video apps are a great example of multimedia in entertainment.

5. Public Places: Multimedia is available in many public places like trade ’ shows, libraries, railway stations, museums, malls, airports, banks, hotels and exhibitions in the form of kiosks. It provides information to the customers and helps them.

6. Software: Software engineers can use multimedia in computer entertainment to design everything from entertainment to digital games; it can be used as a learning process.

7. Medical Services: Multimedia also use in Hospitals. For surgery methods, Tiny digital cameras are inserted in human body and it displays the inner scene of the body. In this way the medical practitioners were , able to see the inner part without examine it.

Note:

  • Multimedia is a combination of the two words multimedia and media.
  • Multi means many, media means mean of communication such as newspaper, email, radio, television.
  • The five main elements of multimedia are text, voice, pictures, animation and video.
  • Hardware and software are essential elements for multimedia.
  • There are two types of images in multimedia: raster images and vector images.
  • Multimedia has two types of videos: analog video and digital video.
  • Animation is a method in which pictures are sorted and played as a video. For example: Cartoon movies.
  • Multimedia applications are use in education, banking, entertainment, advertising, hospital field.

PSEB 7th Class Computer Notes Chapter 6 Microsoft Word Part-IV

This PSEB 7th Class Computer Notes Chapter 6 Microsoft Word Part-IV will help you in revision during exams.

PSEB 7th Class Computer Notes Chapter 6 Microsoft Word Part-IV

Introduction:
A table is a grid of cells arranged in rows and columns. Tables are useful for various tasks such as presenting text information and numerical data. In Word, you can create a blank table, convert text to a table, and apply a variety of styles and formats to existing tables.

Table:
A table is a collection of rows and columns where data is grouped together. Rows are placed horizontally and columns are placed vertically in the table and the intersection of a row and column is known as CelL Cells are small boxes in the worksheet where we enter data. For example sample table is shown below :

Name Class Roll No. Subject
Shine 4th 6 Math
Grace 5th 7 Hindi
Mishit 6th 8 English

In this lesson, we will learn how to create a table, how to join rows and columns, how to format a table, etc.

Creating a Table
In MS Word, we can create tables in three ways :

  • With the help of table buttons.
  • With the help of Insert Table option.
  • With the help of draw table options.

Creating a Table using the Insert Table Option
Below are the steps to create a table using the Insert Table option :
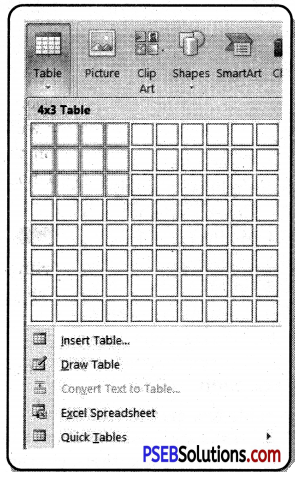
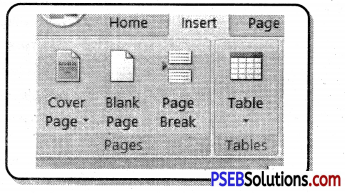
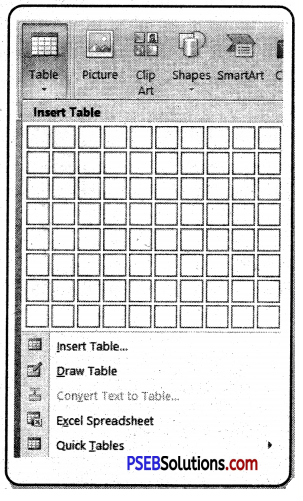
(а) In the Insert tab, click on the “Table” command from the Table group.
(b) A dropdown menu will open as shown in the picture above, click on the “Insert Table” option from this menu.
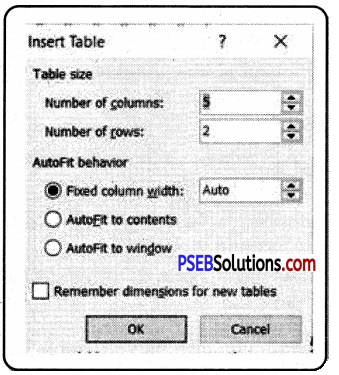
(c) The Insert Table dialog box will appear.
(d) In this box, specify the number of rows and columns and click on the ok button.
PSEB 7th Class Computer Notes Chapter 6 Microsoft Word Part-IV 1

PSEB 7th Class Computer Notes Chapter 6 Microsoft Word Part-IV

Creating a Table with the Help of a Draw Table Option
The steps to create a table with the help of a draw table option are as follows:
(а) In the Insert tab, click on the “Table command from the Table group.
(b) A dropdown menu will open as shown in the picture above, click on the Draw Table option from this menu.
(c) The mouse pointer will turn into a pencil.
(d) Draw a rectangle on the page with the help of a pencil.
(e) Draw vertical and horizontal lines to form columns and rows as needed.
PSEB 7th Class Computer Notes Chapter 6 Microsoft Word Part-IV 2

Enter Text into Table
Below are the steps for inserting text into a table :

  • Click on the cell in which you want to insert the text.
  • Now type
    Or
  • You can also add text using copy paste

To Convert Text to a Table
Steps to convert text into table are as follows :

  • Select the text which you want to convert into table.
  • Click on the “Table” command in the “Table” group of the Insert tab.
  • Select the command “Convert Text To Table”.
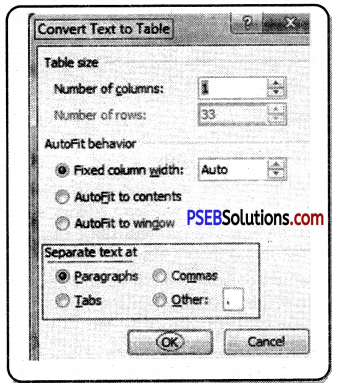
  • The “Convert Text to Table” dialog box opens.
  • Select the desired option in the Separate text at section.
  • Click OK button.

PSEB 7th Class Computer Notes Chapter 6 Microsoft Word Part-IV 3

Convert Table into Text
Steps to convert table into text are as follows :

  • Select the rows of tables you want to convert to text.
  • On the Layout tab, in the Data section, click “Convert To Text”.

PSEB 7th Class Computer Notes Chapter 6 Microsoft Word Part-IV 4
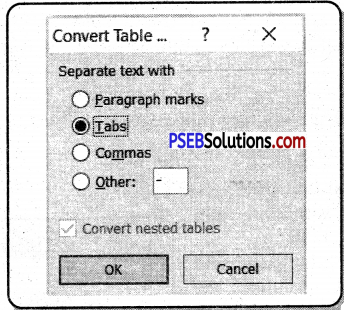
In the Convert Table box, under Separate Text With, click on the different character you want to use instead of the column boundaries. Rows will be separated by paragraph symbols.
PSEB 7th Class Computer Notes Chapter 6 Microsoft Word Part-IV 5
Click Ok.

Modifying a Table
Once you have included the table in your document, if you need to add or remove more data, you can easily add and delete rows and columns into the table. You can also change the look of your table.
When you select a table in Word, the Design and Layout tabs appear below the Table Tools on the Ribbon. Using the commands on the Layout tab, you can make various modifications into the table.

Adding ROMS to Tables
In any table, you can add a row above or below the selected cell. In MS Word we have 2 ways to add row into the table. Which are as follows :

Method 1.
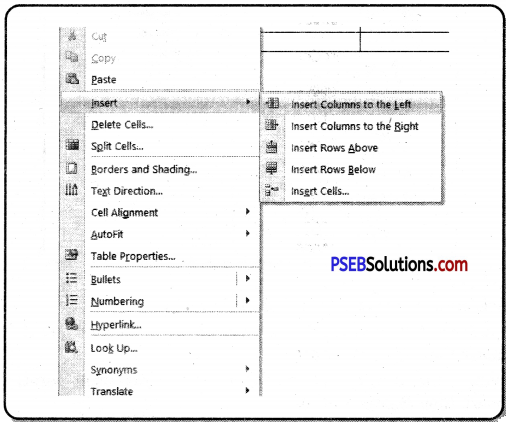
Below are the steps to add rows to the table.

  • Place the cursor in the table where you want to add the new row.
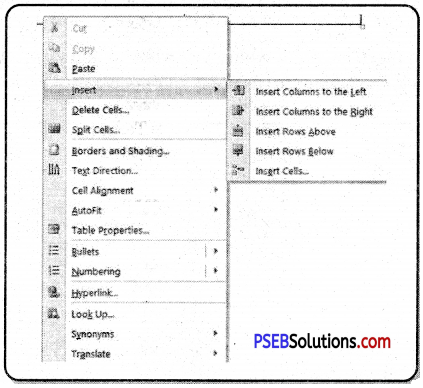
  • Now right click on the mouse, a drop-down menu will appear on the screen.
  • Click on the Insert option from this menu.
  • If you want to add a new row above the insertion point, click on the “Insert Row Above” option.
  • If you want to add a new row below the insertion point, click on the “Insert Row Below” option.
  • A new row will appear above the insertion point.

PSEB 7th Class Computer Notes Chapter 6 Microsoft Word Part-IV 6

Method 2.
The step of adding rows to the table is given below :

  • Place the cursor in the table where you want to add the new row.
  • From the “Rows & Columns” group of the “Layout tab”, click on the “Insert Above/Insert Below” option.
  • A new row will appear below/above the insertion point.

PSEB 7th Class Computer Notes Chapter 6 Microsoft Word Part-IV 7

PSEB 7th Class Computer Notes Chapter 6 Microsoft Word Part-IV

Adding Columns to Tables
In MS Word, you can add a new column to the right or left of the insertion point in a table. There are two ways to add columns in Word which are as follows :

Method 1.

  • Place the insertion point where you want to add new column.
  • Right-click on the mouse. A menu will appear.
  • Click on the Insert option from this menu.
  • If you want to add a new column to the left of the insertion point, click on the “Insert Cloumn to the left” option.
  • If you want to add a new column to the ‘right of the insertion point, click on the “Insert Column to the right” option.
  • A new column will now appear to the right or left of the cursor.

PSEB 7th Class Computer Notes Chapter 6 Microsoft Word Part-IV 8

Method 2.
Below is the step to add a column to the table:

  • Place the cursor in the table where you want to add the new column
  • From the “Rows & Columns” group of the Layout tab, click on the “Insert Left/Insert right” option.
  • A new column will now appear to the right or left of the cursor.

Adding Cells to Tables
In MS Word, you can add a new cell around the selected cell, such as right, left, up or down.
The steps to add a new cell are as follows :

  • Click in the cell.
  • Press the right mouse button inside the cell.
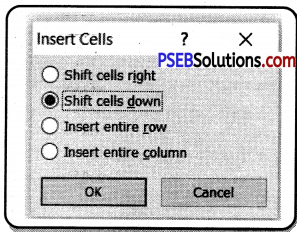
  • From this menu click “Insert” and then click “insert cell” option.
  • Choose which side of the selected cell you want new cell.
  • Click the OK button.

PSEB 7th Class Computer Notes Chapter 6 Microsoft Word Part-IV 9

Deleting a Row or Column
Here are the steps to delete a row or column from the table :

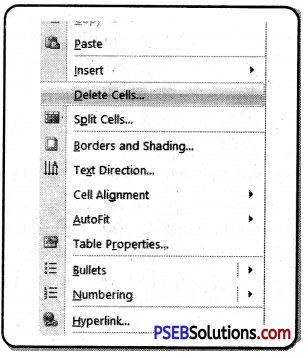
  • Select a row or column.
  • Right click your mouse. A menu will appear.

PSEB 7th Class Computer Notes Chapter 6 Microsoft Word Part-IV 10

  • Click on the Delete Cells option,
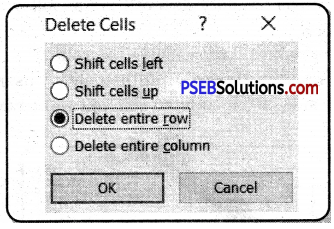
  • A Delete Cell dialog box will now open.

PSEB 7th Class Computer Notes Chapter 6 Microsoft Word Part-IV 11

  • Click “Delete entire row” option to delete the row or click “Delete entire column” option to delete the column.
  • The appropriate row/column will be deleted.

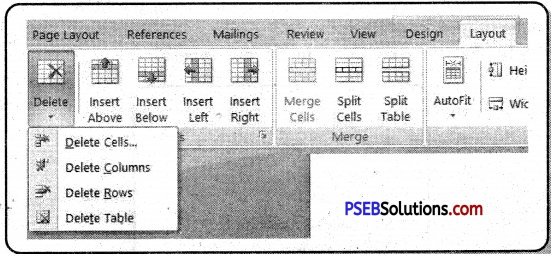
Delete Rows or Columns using the Layout Tab

  • Select the row or column you want to delete.
  • Click the “Delete” button from the Rows & Columns group of the Layout tab.
  • A dropdown menu will open.

PSEB 7th Class Computer Notes Chapter 6 Microsoft Word Part-IV 12
From this menu, click the “Delete Row’” option to delete the row or click the “Delete Column” option to delete the column and if you want to delete the entire table, click the” Delete Table” option.

Deleting Cells using the Layout Tab

  • Select the row or column you want to delete.
  • Click the “Delete” button from the Row’s & Columns group of the Layout tab.
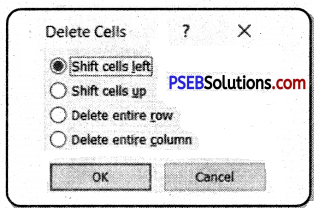
  • Now a dropdown menu will open, click on “Delete Cells” option,
  • A Delete Cell dialog box will now open.

PSEB 7th Class Computer Notes Chapter 6 Microsoft Word Part-IV 13

  • From this box click on “Shift Cells Left” / “Shift Cells Right” option.
  • The selected cell wall be deleted.
    Or
  • Press the right mouse button inside the cell you want to delete.
  • A menu will appear, click on the “Delete Cell” option from this menu.
  • A “Delete Cell” dialog box will open.
  • In this box, click on Shift Cells Left / Shift Cells Right option.
  • The selected cell will be deleted.

PSEB 7th Class Computer Notes Chapter 6 Microsoft Word Part-IV

Properties of Tables
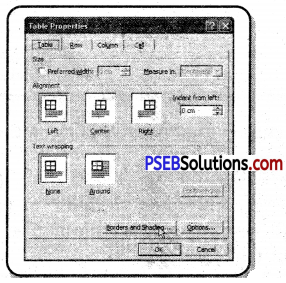
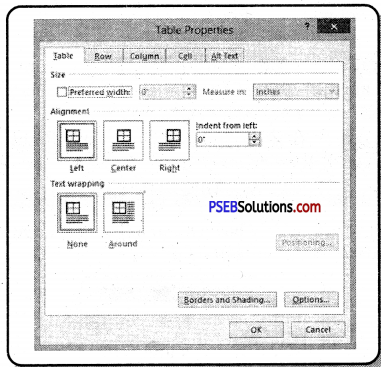
With the Table Properties dialog box we can adjust the alignment of the table and the size of the row, column or cell.
PSEB 7th Class Computer Notes Chapter 6 Microsoft Word Part-IV 14
In MS Word we can also split or merged the Cells into a table.

Changing Alignment of Table
The method of aligning the table is as follows :

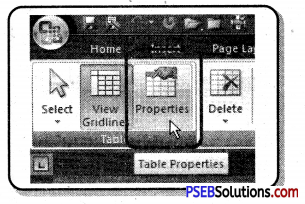
  • Click the cursor anywhere in the table.
  • Click on Layout tab.
  • Click on “Properties” button in the “Table” group. A dialog box will appear.

PSEB 7th Class Computer Notes Chapter 6 Microsoft Word Part-IV 15
In the dialog box, select the “Table” tab.
PSEB 7th Class Computer Notes Chapter 6 Microsoft Word Part-IV 16
Choose the alignment you like and Click on the OK button.

Changing Size of Row, Column or Cell
Steps to resize the rows, columns and cells are as follows :

  • Click in the cell, row, column that needs to be resized.
  • Click on Layout tab.
  • Click on “Properties” in the Table group. A dialog box appears as shown in figure 6.16.
  • Select Row, Columns or Cells tab as required.
  • Enter the required value in height for row, Width for column.
  • Click on OK button.

Splitting the Cell:
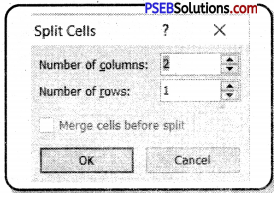
Microsoft Word allows cells to be divided into multiple cells. Steps to divide a cell into several smaller sub-cells are as follows :

  • Place mouse pointer inside the cell that you want to split into several cells.
  • Now click on the “Layout” tab and then click on the “Split cells” button from the “Merge” group.

PSEB 7th Class Computer Notes Chapter 6 Microsoft Word Part-IV 17
A “Split Cells” dialog box will open and ask about the Number of columns/ Number of Rows.
PSEB 7th Class Computer Notes Chapter 6 Microsoft Word Part-IV 18

  • Select the required number of rows and columns
  • Click the OK button.

Splitting the Table
Microsoft Word allows a table to be split into multiple tables but a single operation always splits the table into two tables.

The following are simple steps to split a table into two tables in a World Document.

  • Place the cursor in the row that you want to be the first row of the second table.
  • Click the Split Table button ‘ from the Merge group on the Layout tab.

PSEB 7th Class Computer Notes Chapter 6 Microsoft Word Part-IV 19

Merging Cells
Microsoft Word allows two or more cells to merge to form one large cell. You will often need to combine the columns in the top row to create a table title. You can combine cells row-by-column or column-by-column, you can’t mix cells diagonally :

The steps for merging cells are as follows :

  • Select the cells we want to merge.
  • Click the Merge Cells button from the Merge group on the Layout tab.

PSEB 7th Class Computer Notes Chapter 6 Microsoft Word Part-IV 20
When clicked, this option will convert all selected cells into one cell.

PSEB 7th Class Computer Notes Chapter 6 Microsoft Word Part-IV

Note:

  • A table is a grid of cells arranged in rows and columns.
  • Tables are often used to present data in a systematic way.
  • The horizontal lines of a table are called rows and the vertical lines are called columns.
  • The intersection of rows and columns is called cell.
  • Using the Draw Table option we can draw a complex table, for example:
  • If we want to keep the number of cells in each row of the table and their height different, we can use the Draw Table option.
  • Press “Tab” or “Right Arrow” key to move forward in different cells.
  • Press “Shift + Tab” key or “Left Arrow” key to move back and forth between different cells.
  • After creating a table in Word, we can insert a new column to the right or left of any column and a new row above or below any row.
  • Dividing a cell into more than one cell is called splitting.
  • Combining two or more cells into one cell is called merging.
  • “Table Properties button allows you to resize table rows, columns and cells.

PSEB 7th Class Computer Notes Chapter 5 Microsoft Word Part-III

This PSEB 7th Class Computer Notes Chapter 5 Microsoft Word Part-III will help you in revision during exams.

PSEB 7th Class Computer Notes Chapter 5 Microsoft Word Part-III

Introduction
We can do a lot of work or formatting on the picture in our Word document. Also work in page layout, background etc. and then review our work and print it.

Format Picture Tool
The Format Picture toolbar in MS Word gives us all the options to format the picture. You can do any kind of formatting with the help of picture tool bar such as increase the size of the picture, change the color of the picture, change the background of the picture, change the brightness of the picture, etc. The image toolbar on the ribbon only appears when we select an image.
The Picture Format tool bar has 4 groups like Adjust, Picture Style, Arrange, Size. These four groups provide different types of formatting options for formatting an image.
PSEB 7th Class Computer Notes Chapter 5 Microsoft Word Part-III 1

Adjust Group:
You do not need to use additional picture editing software to create high quality images for your document. Instead, you can use Adjust tools to correct and improve your photos.
1. Correction: This command is used for brightness, sharpness, softness and adjustment of images for better printing or screen presentation. Steps to use this command are as ahead:
(a) Select photo.
(b) In the Format tab, click on the Correction option from the Adjust group. A drop-down menu will now open.
(c) From this menu, select sharpen/Soften and brightness Contrastsettings according to toyour needs.

To make these settingsmore detailed, go toPicture Format >> Corrections >> “PictureCorrections Options”options. The FormatPicture sidebar appears. This allows you to provide special settings for Sharpness, Brightness and Contrast.
PSEB 7th Class Computer Notes Chapter 5 Microsoft Word Part-III 2

2. Picture Color: Microsoft Word allows you to control the color and tone of your picture and you can repaint the whole picture for special effects.

Steps to change the picture color are as follows:
(a) Select picture.

(b) In the Format tab, click on the Color option from the Adjust group. A drop-down menu will open.

(c) In this menu there are 3 options:

  • Color Saturation: This controls how bright the colors are in the image.
  • Color Tone: This controls the temperature of the color, from cool to warm.
  • Recolor: This controls the overall color of the image. Use this option to make the image black and white or grayscale, or to colorize it with a different color.

(d) Choose any of the options as per your need.
PSEB 7th Class Computer Notes Chapter 5 Microsoft Word Part-III 3
There are three more options in this dropdown menu which are as follows:

  • More Variation: Repaints the image with a different color than the options provided.
  • Set Transparent Color: Makes some colors transparent so that the background color is visible.
  • Picture Color Options: The format opens the picture sidebar, where you can customize the settings for color saturation, tone and recolor.

3. Artistic Effect: This option can be used to add artistic effects to a picture. Using this option, the picture looks like a sketch or painting.

Below are the steps to add Artistic Effects to the photo:
(а) Select picture.
(b) In the Format tab, click on the Artistic Effects option from the Adjust group. A drop-down menu will appear.
(c) To preview the style, place your mouse pointer over the picture styles.
(d) Now choose the style according to your need.

PSEB 7th Class Computer Notes Chapter 5 Microsoft Word Part-III

Compress Picture:
With this button the image can be compressed. To reduce the size of documents, pictures can be reduced in storage size. You can change the resolution of an image or delete a cropped part of an image.

The steps to compress a picture are given below:
(a) Select the picture.
(b) In the Format tab, click on the Compress picture option from the Adjust group.
(c) Now a Compression Settings dialog box will open.
(d) If you want to print the picture, click on the Print (220 ppi) option.
(e) If you want to reduce the size of the file to e-mail, click on the E-mail (96 ppi) option.
(f) If you want to upload the file to a webpage or projector, click on Project Options.
PSEB 7th Class Computer Notes Chapter 5 Microsoft Word Part-III 4

Change Picture: Sometimes we need to change the picture in our document, we can easily replace the already exist picture with a new picture with the help of “Change picture”. “Change picture” command replaces the existing picture into a new picture while preserving the formatting and size. The steps to change the photo are as follows:
(а) Select the picture you want to change.
(b) In the Format tab, click on the Change picture option from the Adjust group.
(c) The Insert dialog box opens.
(d) Select a new image from this dialog box and click the Insert button.

Reset Picture: If you want to remove all formatting changes to a picture in the document, “Reset Picture” command will be used. This button is used to undo all formatting changes made to the picture and restore it to its original format.
(а) Select the picture.
(b) In the Format tab, click on the Reset picture option from the Adjust group.

7. Remove Background: This option is used to automatically remove unwanted parts of an image. Areas to remove or keep can be marked in the picture. Following are the steps to remove the background of a photo:
(a) Select the image from which you want to remove the background.
(b) Click the “Remove Background” option from the Adjust group in the Format tab.
(e) Now the default background area will be marked with magenta cokr, while the foreground will remain its natural color.
(d) If the default area isn’t correct, go to Background Removal > Picture Tools and do one or both of the following:

if parts of the picture that you want to keep are magenta, select
“Mark Areas to Keep” option and use the drawing pencil
PSEB 7th Class Computer Notes Chapter 5 Microsoft Word Part-III 5
to mark the areas on the picture that you want to keep.

To remove more parts of the picture, select “Mark Areas to Remove” option and use the drawing pencil
PSEB 7th Class Computer Notes Chapter 5 Microsoft Word Part-III 5
to mark those areas.

When you’re done, select “Keep Changes” or “Discard All Changes”.
PSEB 7th Class Computer Notes Chapter 5 Microsoft Word Part-III 6

Picture Style Group
Picture Styles Gallery offers many preset styles that make it easy for you to add borders and special effects with one click.
1. Picture Style Gallery : This field provides a list of different formats that can be applied to an image. To see what each style will do, just move the mouse pointer over each style. To apply the style on a picture steps are as follows :
(a) Select the photo whose style you want to change.
(b) On the Format tab, in the Picture Styles group, click any style you like.
PSEB 7th Class Computer Notes Chapter 5 Microsoft Word Part-III 7

2. Picture Border: Use this command to change the color, width, or line style of the border of the image. Steps to add border as follows:
(a) Select the image to which you want to add a border.
(b) On the Picture Format tab, in the Picture Styles gallery, select Picture Border command. A drop-down menu will appear.
(c) From this menu select color for border line.
(d) Select weight (thickness) of boarder line.
(e) Select whether the line of the border is dashed.

3. Picture Effects: Click this button to add visual effects to the picture such as shadows, 3-D effects, and glows. Steps to add an effect to a picture are as follows:
(а) Select the picture for which you want to add or change an effect.
(b) Under the Format tab, in the Picture Styles group, click Picture Effects command.
(c) A drop-down list will appear. From this menu select appropriate effect for image.

Arrange Group
In this group, all the options that determine the position of the text are available. This option determines which side of the text is to be placed on the picture. The commands of this group are Text Wrapping, position, align, rotate etc.
1. Picture Position: This button is used to change the position of the image on the page. A gallery of different locations will be displayed. You can also click on the “More Layout options” link to display additional options.
(a) Select the item whose position you want to change.
(b) Click on the “Position” option from the Arrange group.
(c) Choose the right place for your object as shown in the picture.
PSEB 7th Class Computer Notes Chapter 5 Microsoft Word Part-III 8

2. Text Wrapping: This feature is used to apply wrapping to an image. When wrapping is applied, text can be typed around the image. Make it easy to move images from one place to another in a document. To apply the text wrapping on the image follow these steps:
(a) Select the image which you want to apply wrapping.
(b) From the Picture Tools tab, in the Arrange group, click on the “Text Wrapping” option.
PSEB 7th Class Computer Notes Chapter 5 Microsoft Word Part-III 9

Do one of the following:
(a) Click “Square” command to type the text around the border of your picture.
(b) Click ‘Tight” command to type text around a clip art image or an irregularly shaped image.
(c) Click “Behind Text” command to display the text on the image.
(d) Click “In Front of Text” command to display the image on the text.
(e) Click “Top and Bottom” command to place the image on your line. (/) Click “More Layout Options” command for more layout Options. From this dialog box, specify the distance between the text and the image.

3. Bring Forward: Use this button when an image is behind another image and needs to be highlighted. Click on the list arrow to select Bring Forward, Bring to Front, or Bring in Front of Text options.

4. Send Backward: When an image appears on top of another image and needs to be moved to the back of the image, click this button. Click the list arrow to select Move Backward, Move Back., or Back to Text.

To bring an object to the front or back, steps are as follows:
(а) Select an object. The Format tab will appear.
(b) From the Format tab, click the “Bring Forward” or “Send Backward” drop-down box.
(c) From the drop-down menu, select “Bring to Front” or “Send to Back”.
(d) The objects will reorder.

5. Align Objects: This option is used to align a group of images at the top, bottom, right, or left position. If only one image is selected, the image will be arranged to the specified location on the page.

To align two or more objects, steps are as follows:
(a) Hold the Shift (or Ctrl) key and click the objects you want to align.
(b) From the Format tab, click the Align command and select one of the six alignment options.
(c) The objects will align based on the option you selected.

6. Group: This option is used to combine groups of images so that they can be formatted and moved as an image. To group objects, steps are as follows:
(a) Hold the Shift (or Ctrl) key and click the objects you want to group.
(b) From the Format tab, click the Group command and select Group.
(c) The selected objects will now be grouped.

7. Rotation: Click this button to rotate the image to a different orientation. It is possible to specify the degree of rotation. To rotate an object, steps are as follows:
(a) Select an object. The Format tab will appear.
(b) From the Format tab, click the “Rotate” command. A drop-down menu will appear.
(c) Select the desired Rotation option.
(d) The object will rotate.

PSEB 7th Class Computer Notes Chapter 5 Microsoft Word Part-III

Group
This group provides the option to resize the photo and remove unwanted parts.
1. Crop: Crop button is used to delete the unwanted part of an image. When you crop an image, an unselected part of the picture is removed. Steps to crop the image are as follows:
(a) Select the image you want to crop. The Format tab appears.
(b) On the Format tab, click the Crop command.
(c) Black handles will appear around the image. Click, hold and drag a handle to crop the image.
(d) Click the Crop command again. The image will be cropped.

2. Height: To change the height of the image, enter a size in the box or click the spinner arrow to change the height.

3. Width: To change the width of the image, enter a size in the box or press the spinner arrow to change the width.

Page Layout Tab:
This is the third tab of the ribbon. This tab allows you to control the look of your document, means you can change the page size, margins, line spacing, indentation, documentation, orientation, etc. The Page Layout tab contains five sets of related commands; Manage themes, page setup, page backgrounds,
PSEB 7th Class Computer Notes Chapter 5 Microsoft Word Part-III 10

Page Setup Group
With the help of this group, we can use margins, position, size, columns, etc. to improve the structure of our document.
1. Margins: A margin is the space between the text and the edge of the page. By default, a new document’s margins are set to Normal, which means it has a one-inch space between the text and each edge. Depending on your needs, Word allows you to change your document’s margin size. Steps to Format Page Margins:
(a) Click on the “Page layout” tab.
(b) Click on the Margins command. A drop-down menu will appear. By default “Normal” option will be Select.
(c) Click on any Pre-defined margin.
PSEB 7th Class Computer Notes Chapter 5 Microsoft Word Part-III 11

Steps to Use Custom Margins:
(a) Click on “Margins” from the Page Layout tab and select “Custom Margins”.
(b) Page Setup dialog box will appear.
(c) Adjust the margin size for ‘ each side of the page and click Ok.
PSEB 7th Class Computer Notes Chapter 5 Microsoft Word Part-III 12

2. Orientation: To change the position of a document from a portrait to a landscape, click this button. To change the position of the page, steps are as follows:
(a) Select the Page Layout tab.
(b) In the Page Setup group, click on the “Orientation” command.
(c) Click “Portrait” or “Landscape” to change the position of the page.
Landscape format means the page is horizontal, while portrait format means it is vertical.
PSEB 7th Class Computer Notes Chapter 5 Microsoft Word Part-III 13
3. Size: Click this button to resize the page that will be used for the document. To resize the page, steps are as follows:
(a) Select the Page Layout tab.
(b) Click on the “Size” command and a drop-down menu will appear.
(c) The current page size will be highlighted in this list.
(d) Click the size option as you want.
PSEB 7th Class Computer Notes Chapter 5 Microsoft Word Part-III 14

4. Columns: This button is used to split the selected text into two or more columns in a document. A gallery of different column formats is available in this command. To split the text into columns, steps are as follows:
(a) Select the Page Layout tab.
(b) Click on the “Columns” command and a drop-down menu will appear.
(c) Select the number of columns for text.
PSEB 7th Class Computer Notes Chapter 5 Microsoft Word Part-III 15

Page Background Group
From this group you can choose watermarks, page colors and borders for your document.
1. Watermark: It is just like a stamp. It is used for confidential documents. A watermark is an image that appears blurred behind the text on a page. The steps to add a
watermark to the docu¬ment are given below:
(a) Open the document to which you want to include the water-mark.
(b) Click the Page Layout tab and then click the “Watermark” button to display a list of standard watermark options.
(c) You can select any available standard watermark by clicking on it. This will apply to all pages of the document.
PSEB 7th Class Computer Notes Chapter 5 Microsoft Word Part-III 16

2. Page Color: With the help of this option we can apply different colors, textures and pictures to the background of the page in our document. Steps to add background color or texture are as follows:
(a) Click on “Page color” command in the Page Background group from the Page Layout tab.

(b) A drop-down menu will appear.

(c) Choose one of the following options from this drop-down menu:

  • To apply the background color click any color from “Theme Colors or Standard Colors”.
  • To apply the texture, Gradient, pattern and pictures into the background, click “Fill Effects” option.
  • A Fill Effect dialog Box will appear. Select appropriate design for you background. ‘

3. Page Border: Page borders are used to set borders around the page. Here we can design our page border.
(a) Click on the “Page Borders” option in the Page background group, the Page border dialog box appears.
(b) In the “setting” list, we can choose the border of our choice.
(c) In “Style” list, we can choose style for the line as per our choice. id) Click on the arrow in “Color” drop-down list and select a border color.
(e) Click on the arrow in “Width” drop-down list and select the width of the border.
(f) If we want to use clip art instead of borders in Style, click on the arrow that appears under Art and select a border graphic.
(g) To continue, click on the arrow that appears under “Apply to” and click on the available option as per your requirement.
(h) Click on OK.

PSEB 7th Class Computer Notes Chapter 5 Microsoft Word Part-III

Review
In the Review tab we can see features like Spelling & Grammar, Word Count, “Translatipn and Language”.

Proofing Group
Proofing features help us to create flawless professional documents.
1. Spelling and Grammar Check:
To do Spelling and Grammar check, steps are as follows:
(a) From the Review tab, click the Spelling & Grammar command.
(b) The Spelling and Grammar dialog box will appear.
(c) This dialog box offer one or more suggestions for spellings and grammatical errors.
(d) You can select a suggestion and click “Change” to correct the error.
PSEB 7th Class Computer Notes Chapter 5 Microsoft Word Part-III 17

2. Word Count: Word Count is a feature that allows us to determine the number of words, letters and paragraphs in our document. We can also find this number in the status bar at the bottom of the window. Just click the “Word Count” command from proofing group on Review tab.

Printing Documents
Once you’ve created your document, you may want to print it to view and share your work offline. It’s easy to preview and print a document in Word using the Print option.
PSEB 7th Class Computer Notes Chapter 5 Microsoft Word Part-III 18

(a) On the File tab or Office button, click Print command.
(b) A print dialog box will appear.
(c) In the “Name” drop-down list select the name of you printer.
(d) In the “Copies” box, enter the number of copies you want.
(e) In “Page Range” option select “All” option if you want to print all pages of your document.
(f) If you want particular page to print then click “Pages” radio button and type page number in the box.
(g) Now click “Print” option. Your document will be print.

Note:

  • When we click on the picture, the “Picture Tools Format tab” appears. The color option has three categories — color saturation, color tone, Re-color.
  • In MS Word File size can be reduced by compressing images, reducing resolution and deleting cropped areas.
  • The Reset Picture option eliminates the formatting and editing of the selected image.
  • The Picture Border option determines the color, width and line style of the outline for the selected picture.
  • Picture effect adds visual effects to the picture such as shadows, 3-D effects, and glows.
  • Wrap text changes the way the text is wrapped around the selected object. Crop option helps in cropping and removing unnecessary parts of the picture.
  • Orientation Specifies the portrait or landscape format of the page. Landscape means setting the page in horizontal direction.
  • Portrait means setting the page in a vertical direction.
  • Spelling errors in words are indicated by a red wave line while grammatical errors are represented by a green wave line.
  • We use the “Word Count” option to find the number of words in a Word document.

PSEB 7th Class Computer Notes Chapter 4 Microsoft Word Part-II

This PSEB 7th Class Computer Notes Chapter 4 Microsoft Word Part-II will help you in revision during exams.

PSEB 7th Class Computer Notes Chapter 4 Microsoft Word Part-II

Introduction:
Sometimes we need to create, design and manage effective documentation. To do this, we need to know how to format a document. Formatting means changing the general arrangement and appearance of the text in a document.

There are three types of text formatting available in MS-Word:

  1. Character Formatting
  2. Paragraph Formatting
  3. Page.

In addition, we need to know how to highlight our document so that readers can easily read all the important parts of the document. MS Word gives us the ability to present our documents in a very efficient way. In this lesson, we will learn about formatting text, inserting pictures, inserting charts, creating objects, word art, clip art and more.

Text Selection
Before applying any type of formatting to text in MS Word or any word processing software we have to select the text so that we can apply the formatting on that selected text. We can select text using the mouse button or the keyboard keys.

How to Choose Text in MS Word?
Place the cursor in front of the text and then left click on the mouse button, hold it and drag it over the text and then release it. The text will be selected.

  • Double click on the word to select the same word.
  • To select the entire paragraph, click within the paragraph three times.
  • To select the complete document, in the Home tab from the editing group, click Select command and then click the Select All button.
    Or
    Press Ctrl + A from the keyboard.
  • Press Shift + Arrow keys from the keyboard; Hold down the Shift key and press the arrow button, Word will select the text in the direction of the arrow button. There are three arrow keys in numeric keypad, so you can select text in three different directions.

PSEB 7th Class Computer Notes Chapter 4 Microsoft Word Part-II 1

Home Tab:
The Home tab is the default tab in Microsoft Word. It consists of five groups of related commands; Clipboard, fonts, paragraphs, styles and editing. It helps you change the document settings like font size, adding bullets, adjusting style and many more common features. This helps you to return to the home section v of the document.
PSEB 7th Class Computer Notes Chapter 4 Microsoft Word Part-II 2

Clipboard Group
The Clipboard group is the first group to the left side of the Home Tab. This group contains four commands such as cut, copy, paste, format printer. It is often used in conjunction with the editing group, to the right of that tab.
In this topic, today we will learn how to cut copy and paste a word or paragraph.

PSEB 7th Class Computer Notes Chapter 4 Microsoft Word Part-II

Copy Paste Options
When we need to retype a word or paragraph in a document, we use the Copy option. Using the Copy option, we save our time and effort. Using the Copy option, you can copy text from one place to another. MS Word offers a variety of ways to copy and paste text.

Some popular methods are given below:
Method 1.

  • First select the text you want to copy.
  • Click the Home tab and click the Copy command.
  • Place the cursor where you want to paste the text.
  • Click on the Paste command in the Home tab as shown in the picture above.

PSEB 7th Class Computer Notes Chapter 4 Microsoft Word Part-II 3

Method 2.

  • First select the text you want to copy.
  • Hover the cursor over the selected text and right click on the mouse. ignore AH
  • A menu will appear; Select the “Copy” option from this.
  • Now, move the cursor to the desired position and right click on the mouse.
  • A menu will appear; Select the “paste” option from this.

PSEB 7th Class Computer Notes Chapter 4 Microsoft Word Part-II 4

Method 3.

  • First select the text you want to copy.
  • Now press the Ctrl + C button.
  • Now, move the cursor to the desired position and press the Ctrl + V button.

Cut Paste Option
Cut Paste Option means to move the selected text from one place to another. In Microsoft Word, you can cut text from a document and paste that text into ‘another document or anywhere in the same document. After cutting the text, it is stored in the clipboard.

Method 1.

  • First select the text you want to cut.
  • Click the Home tab and then click the Cut command.
  • Place the cursor where you want to paste the text.
  • Click on the Paste command in the Home tab as shown in the picture above.

PSEB 7th Class Computer Notes Chapter 4 Microsoft Word Part-II 5

Method 2.

  • First select the text you want to cut.
  • Now click the right button of the mouse on selected text.
  • A menu will appear; select the “Cut” option from this menu.
  • Now, move the cursor to the desired position and right click on the mouse.
  • A menu will appear; select the “Paste” option.

PSEB 7th Class Computer Notes Chapter 4 Microsoft Word Part-II 6

Method 3.

  • First select the text you want to copy.
  • Now press the Ctrl + X button.
  • Now, move the cursor to the desired position and press the Ctrl + V button.

Format Painter
With the help of Format Painter we can copy the format already applied to the text in our document very easily and without wasting time. Below are the steps for copying text formatting:

Method 1.

  • First select the text whose formatting you want to copy.
  • Click the Home tab and click the Format Painter command.
  • The pointer changes to a paintbrush icon.
  • Use the brush and drag it over the text where you want to apply the formatting.
  • To cancel formatting, press the Esc key or click on the Format Painter command.

PSEB 7th Class Computer Notes Chapter 4 Microsoft Word Part-II 7

Method 2.

  • First select the text whose formatting you want to copy.
  • Now press the Ctrl + Shift + C button.
  • Click on the text where you want to apply the copied formatting.
  • Now press the Ctrl + Shift + V button.

Font Group
Text typed with the help of a typewriter is very simple and black in color, in this text we can neither change the color of the letters nor change its style but MS Word has given us a facility with which we can present our text in a very attractive way, we can change the color, style, size etc. of our text. The Fonts group of the Home tab gives us a number of character formatting commands such as font style, font size, font color, bold, italic, underline.

Pressing Ctrl + Shift + F keys will open the Font dialog box on the screen as shown in the picture below:
PSEB 7th Class Computer Notes Chapter 4 Microsoft Word Part-II 8

Font Face
Font face is used to change the appearance of the text. Steps to change the font face of the text are as follow:

  • Select the text whose font you want to change.
  • Select the appropriate font from the Font dialog box as shown in the picture above.
    Or
  • Select the font from the Font drop-down menu in the Font group on the Home tab. Here I have selected the Times New Roman option.

PSEB 7th Class Computer Notes Chapter 4 Microsoft Word Part-II 9

PSEB 7th Class Computer Notes Chapter 4 Microsoft Word Part-II

Font Size
To change the size of the text, font side option is used. Steps to change the font size are as follow:

  • Select the text whose size you want to change,
  • Select the appropriate size from the Font dialog box as shown in the picture above.
    Or
  • Select the size option from the Font drop-down menu in the Font group on the Home tab. Here I have selected the size 12.

PSEB 7th Class Computer Notes Chapter 4 Microsoft Word Part-II 10

Grow Font and Shrink Font
As shown in the picture below, large size A is called Grow Font and small size A is called Shrink Font. With the help of Grow Font we can increase the size of selected text by one size and with the help of Shrink Font we can reduce the size of selected text by one size.
PSEB 7th Class Computer Notes Chapter 4 Microsoft Word Part-II 11

  • Select the text whose size you want to increase.
  • Click on Grow Font.
    Or
    Press Ctrl +> Shortcut button on the keyboard:
  • Select the text whose size you want to decrease.
  • Click on the Shrink font.
    Or
    Press Ctrl + < Shortcut button on the keyboard.

Font Style
Word processor software uses three basic font styles for text, these are as follows:
PSEB 7th Class Computer Notes Chapter 4 Microsoft Word Part-II 12

  • Bold: If you want to thicken the text in your document, the Bold (B) option will be used. To do this, first select the text and then press the B button from the Font group. Or press the Ctrl + B Shortcut button on the keyboard.
  • Italic: If you want to italicize the text in your document, the Italic (I) option will be used. To do this, first select the text and then click the I button from the Font group. Or press the Ctrl + I Shortcut button on the keyboard.
  • Underline: If you want to underline the text in your document, the underline (U) option will be used. To do this, first select the text and then click the U button from the Font group. Or press the Ctrl + U Shortcut button on the keyboard.

Font Color:
If you want to change the color of a word or paragraph in your document, you must select a font color for this purpose. Here are the steps to change the color of the text.

  • Select the text you want to change color.
  • Select the appropriate color from the Font dialog box as shown in the picture above.
    Or
  • Select the text you want to change the color.
  • Click on the Font Color option from the Font group as shown in the picture below. Now a pull down menu will open.
  • Choose your favorite color from this menu. Now your text will change to that color.

PSEB 7th Class Computer Notes Chapter 4 Microsoft Word Part-II 13

Text Highlight Color:
Just as we can highlight a word or a sentence in our written document with the help of a pen, we can highlight our text with any color in MS Word.

  • Select the text you want to highlight.
  • Click on the Text Highlight
    PSEB 7th Class Computer Notes Chapter 4 Microsoft Word Part-II 14
    option from the Fonts group. Now a pull down menu will open.
  • Now choose your favorite color from this menu. Your text will be highlighted in that color.

Clear Formatting:
PSEB 7th Class Computer Notes Chapter 4 Microsoft Word Part-II 15

This option works to remove the formatting applied to the text
document. For this, select the text whose formatting you want to delete, and then click Clear Formatting from the Home tab.

Change Text Case:
(а) Sentence case: It capitalizes the first letter of each sentence.
(b) Lowercase: It changes the text from uppercase to lowercase.
(c) Uppercase-: It capitalizes all the all letters of your text.
(d) Capitalize Each Word: It capitalizes the first letter of each word.
(e) Toggle Case: It allows you to Shift between two case views, e.g. to Shift between Capitalize Each Word and cAPITALIZE eACH wORD.
PSEB 7th Class Computer Notes Chapter 4 Microsoft Word Part-II 16

You can easily change the text case in your document by follow these steps:

  • Select the text you want to change.
  • Click on the change case option from the Fonts group. Now a pull down menu will open.
  • Select the desired case. Your text will be change in that case.

PSEB 7th Class Computer Notes Chapter 4 Microsoft Word Part-II

Paragraph Group
The paragraph group provides options related to the setting of the paragraph. Such as alignment, bullet, numbering, line and paragraph spacing etc.

Click on the Show / Hide button to show paragraph symbols and other hidden formatting symbols. Or press the (Ctrl + *) button from the keyboard.

Alignment
You can change the text alignment in your document to make it more presentable and readable.
There are four types of alignments available in the paragraph group which is as follows:

  • Align Text Left (Ctrl + L): Aligns the selected text with the left margin.
  • Align Text Right (Ctrl + R): Aligns the selected text with the right margin.
  • Center (Ctrl + E): This aligns the selected text to the center within the margin.
  • Justify (Ctrl + J): Aligns text to both left and right margins, adding extra space between words as necessary.

PSEB 7th Class Computer Notes Chapter 4 Microsoft Word Part-II 17

Here are the steps to change the alignment:

  • Select the text.
  • Click the appropriate alignment button from the Paragraph group of the Home tab.

Bullets and Numbers
Bullets or numbers are used to create a list in a document or to convert typed text into a list. Here are the steps to add bullets and numbers to a list:

  • Place the cursor where you want to insert the bullet/number.
  • If you want to insert a bullet, click on the Bullet option in the paragraph group and if you want to insert a number, click on the Number button.
  • If you want more bullets/numbers style options, click on the arrow to the right of the bullet/number command. This will open the drop down menu.
  • Now select any bullet/number style that you want to add from this list.

Paragraph Indenting:
Indenting a paragraph allows you to set text within a paragraph at different margins. There are several options for indenting:

  • First Line: This option controls the left limit for the first line of the paragraph.
  • Hanging: Controls the left boundary of each line in a paragraph except the first line.
  • Left: Controls the left border for each line in a paragraph.
  • Right: Controls the right limit for each line in a paragraph.

To indent paragraphs, you can follow the steps below :

  • Place the cursor where you want to increase or decrease the indent.
  • Click on the indent
    PSEB 7th Class Computer Notes Chapter 4 Microsoft Word Part-II 18
    buttons to control the indent
  • Repeatedly click the indent button to increase or decrease the size of the indent.

Line Spacing Adjustment
Line spacing represents the vertical distance between lines within a paragraph and determines the position of each line corresponding to the line above it. By default the line spacing is 1.15. You can increase or decrease the spacing between lines from the Paragraph dialog box. The line spacing drop-down menu includes two options, Add Space Before Paragraph and Add Space After Paragraph, this option adds a line of space above paragraph and below paragraph. Adding space will be removed by clicking this option again.

You can change the space between lines and paragraphs by following the steps below:

  • Select the paragraph you want to change.
  • On the Home tab, click the Paragraph dialog box launcher.
  • Click the Indents and Spacing tab from the paragraph dialog box.
  • In the Spacing section, adjust the space according to your needs.

PSEB 7th Class Computer Notes Chapter 4 Microsoft Word Part-II 19
Click on the line spacing button in the paragraph group as
PSEB 7th Class Computer Notes Chapter 4 Microsoft Word Part-II 20
and click on the required option from the drop down menu.
Or
To add single line space press (Ctrl +1), to add double line space press (Ctrl + 2) and to add 1.5 line space press (Ctrl + 5).

Borders and Shading
You can add borders and shading to paragraphs and full pages.
1. Shading: This option is used to color the background of the paragraph or selected text.
PSEB 7th Class Computer Notes Chapter 4 Microsoft Word Part-II 14

2. Border: This option is used to customize the border of the selected cell or text.
PSEB 7th Class Computer Notes Chapter 4 Microsoft Word Part-II 21
If you want to apply a border/shading to a paragraph or an entire page, first select the paragraph or page, then click the Borders or Settings button. For more border/shading options, click the small arrow next to it.

PSEB 7th Class Computer Notes Chapter 4 Microsoft Word Part-II

Style Group
You can create professional and presentable documents in MS Word by applying different styles. Changing the style of text can make your document look amazing as well as prepare your document for a table of contents page. You have several choices to choose from.

To use Quick Styles:

  • Select the text you want to format.
  • Click the Styles group next to the Home tab dialog box.
  • Click the style you want to apply.

PSEB 7th Class Computer Notes Chapter 4 Microsoft Word Part-II 22
To see all options, click the dialog box launcher in the lower right corner of the Styles section.

Editing Group
The edit group actually appears at the far right of the Home tab. There are three options in this group which are as follows:

  • Find (Ctrl + F): If you want to find a particular word or phrase in a document or an entire page, you can use the “Find” option.
  • Replace (Ctrl + H): You can use this option if you want to delete any word and insert new word in that position.
  • Select: This option is used to select a document .There are three different options for selection, which are as ahead:
    (а) Select All (Ctrl + A): This option allows us to select the entire document.
    (b) Select Object: This option allows you to select one or more objects, (c) Select Text with Similar Formatting: This option allows us to select words with similar formatting.
  • GoTo (Ctrl + G): With the help of this command, we can easily reach a specific place in the document. Such as pages, sections, bookmarks, footnotes, end notes, etc.

Finding Words:
If you want to search for a word in a document follow these steps :

  • Click the Find option from the Editing group on the Home tab.
  • Type the words in the Find What box as shown below and click on the Find Next option.

PSEB 7th Class Computer Notes Chapter 4 Microsoft Word Part-II 23

Replacing Words:
To replace a word or more in a document follow these steps:
Click the Replace button from the Editing group on home Tab. The Find and Replace dialog box will display.
PSEB 7th Class Computer Notes Chapter 4 Microsoft Word Part-II 24

  • Type the word you want to change in the Find What box as shown.
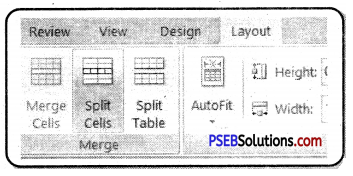
  • In the Replace With box, type the word with which you want to replace the old word.
  • Click on the Find Next option.
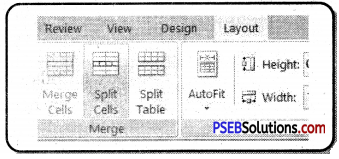
    You can use the Ctrl + F keys to find words and the Ctrl + H shortcut keys to replace words.
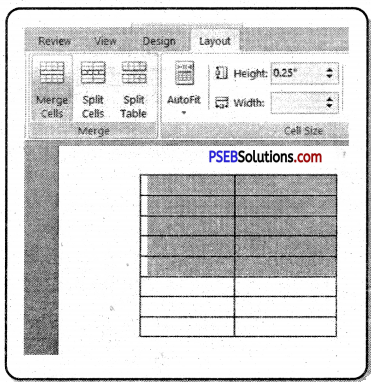
Insert Tab
This tab contains all the commands for inserting items into your documents like Pages, Tables, Links, Header and Footer, Text, Symbols are all insert tab options.

Pages
There are 3 options in the page group as shown in the picture below:
PSEB 7th Class Computer Notes Chapter 4 Microsoft Word Part-II 25
1. Cover Page: This button can be used to insert a pre-formatted cover page for a document. The information displayed on the page is filled in after the page is created.

Steps to add a Cover Page :
(a) From the Insert Tab, in the Pages group, click the Cover Page button.
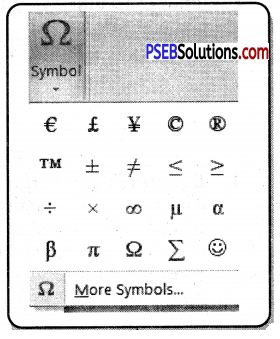
(b) Select the cover page of your choice.
(c) Add in important information by editing the text that displays on the cover page.

2. Blank Page: This option is used to insert a new blank page into a document at the cursor position. If you want to add a new page anywhere in your document, click on the Blank Page option in the Page group from the Insert tab.

3. Page Break: This option is used to delete a page at the current cursor position and start a new page. In simple words we can say that it divides the page into two parts. For Page Break, click on the Page Break option from the Page group or use the Ctrl + return keys.

Tables Group
This button is used to insert a table into the document. With this option, you can create a table or row or column in the document. Or you can set the rows and columns of the table as your wish. In MS Word you can easily convert text to table.

Here are the steps to insert a table:

  • Place the cursor where you want to place the table.
  • Click the Table button from the tables group in the Insert tab. A dropdown table grid will open.
  • Click and drag over the small boxes to determine the number of columns and rows for your table.

PSEB 7th Class Computer Notes Chapter 4 Microsoft Word Part-II 26

According to Insert Table dropdown menu we have three more options to insert a table into the document.

  • Insert Table: You can click the Insert Table menu item to type in the number of columns and rows.
  • Draw Table: Click the Draw Table button to use a pencil tool to draw cells of a table.
  • Quick Table: By clicking on the Quick Tables option, we get a list of different table designs. You can choose any design of your choice for the table.

Illustrations Group
This group allows us to add photos, clip art, shapes, smart art, etc. in our document.
1. Pictures: This option is used to insert photos into your document. Here are the steps to insert pictures into the document:
(a) Place the cursor where you want to insert the image.
(b) In the Insert tab, click on the Picture option from the Illustrations tab.
(c) The Insert Picture dialog box will open.
(d) From this dialog box, click the image you want to insert.
(e) Click on the Insert button.
PSEB 7th Class Computer Notes Chapter 4 Microsoft Word Part-II 27

2. Shapes: This button is used to insert the shapes such as circles, squares, arrows and triangles into a document, When the button is clicked. Here are the steps to insert the shape:
(а) In the Insert tab, click on the Shapes option from the Illustrations tab.
(b) A gallery of different shapes will appear.
(c) Click the desired shape and then drag the shape into the document.
PSEB 7th Class Computer Notes Chapter 4 Microsoft Word Part-II 28

If you want to write something in the drawn shape, here are the steps:
(a) Right click on the drawn shape.
(b) Click Add Text from the pop-up menu.
PSEB 7th Class Computer Notes Chapter 4 Microsoft Word Part-II 29
You are now able to type the text in your Shape.

3. Smart Art: Smart Art graphics are visual representations of information. The Smart Art option is used to present information in the form of an image easily and quickly. This option offers many different layouts to effectively communicate your message or ideas. The steps to add smart art graphics are given below:
(а) On the Insert tab, in the Illustration group, click Smart Art.
(b) In the Choose a Smart Art Graphic dialog box, choose the layout you want to insert.
(c) Click the Ok button to insert your Smart Art graphic.
PSEB 7th Class Computer Notes Chapter 4 Microsoft Word Part-II 30
1. Click the Text Pane from the Create Graphic group in the Design Tab.
PSEB 7th Class Computer Notes Chapter 4 Microsoft Word Part-II 31
2. Type your text in the Type your text here box.
PSEB 7th Class Computer Notes Chapter 4 Microsoft Word Part-II 32
In the Smart Art Graphic, click the [Text] box and then type your text. For best results, use this option after you have added all the boxes.

Charts
Use this feature to insert a bar, area or line chart in a document. Steps to insert the chart are as follow:

  • From the Insert tab, in the illustrations group, select Chart button.
  • From the pull down menu, select the chart design you would like to use and then click Ok.

PSEB 7th Class Computer Notes Chapter 4 Microsoft Word Part-II

Clip Art
Clip art refers to a graphic or a picture that you can insert in your document. It comes in different formats and styles. It is used to enhance the appearance of a document. The steps to insert a clip art are given below:

  • Place the cursor where you want to insert the clip art.
  • From the Insert tab in Illustrations group click the Clip Art button.
  • A task pane appears on the right side of document.
  • Enter the keyword in ‘Search for’ field and select the suitable option in ‘Search in’ and ‘Results should be’ fields.
  • Click Go, clip art menu will appear.
  • Select the desired clip art.

Header & Footer
Header and Footer are parts of a document that contain specific information such as page number and total number of pages, title of the document, company logo, any photo, etc. A header appears at the top of each page and footer appears at the bottom of each page.

To insert the header and footer in your document steps are as follows:
1. From the Insert tab, click the Header / Footer option from the Header & Footer group.

2.Now a drop down menu of pre-design heading styles will open, from this menu you can choose any style as per your need.

3. Similarly clicking on the Footer option will open the already created Footers design and you can choose any design as per your need.
PSEB 7th Class Computer Notes Chapter 4 Microsoft Word Part-II 33
4. Now click on Edit Header or Edit Footer from the Header or Footer drop down menu.
PSEB 7th Class Computer Notes Chapter 4 Microsoft Word Part-II 34
5. Now you can edit the header/footer of your document.

6. Click the Close Header and Footer button to exit edit mode.

Insert Date and Time in Header/Footer
To insert the date or time in the header or footer, follow the instructions below:

  • From the Insert tab, click the Date & Time option in the Text group.
  • A Date & Time dialog box will open.
  • Select the date format from the‘Available Format’list.
  • Choose your desired language.
  • Click the Update Automatically check box.
  • Click the OK button at the bottom of the dialog box.

PSEB 7th Class Computer Notes Chapter 4 Microsoft Word Part-II 35

Removing Headers and Footers
The steps for removing headers and footers are as follows:

  • From the Insert tab, click the Header/Footer command from the Header & Footer group.
  • Now the drop down menu will open, from this menu you can click on Remove Header/Remove Footer option.

Page Number
MS Word automatically places a page number on top of each page and place it in the title, footer or sidebar. We can use the “Format page number” option to assign different numbers to these pages with the help of MS Word. Page number drop-down commands include: top of page, bottom of page, page margin, current position, format page number and delete page number.

1. Top of Page: If you want to put a number at the top of your page, click on the Page Number option from the Header & Footer group of the Insert tab and click on the Top of Page option from the drop-down list.

2. Bottom of Page: If you want to enter the number at the bottom of your page, click on the Page Number option from the Header & Footer group of the Insert tab and click on the Bottom of Page option from the drop¬down list.
PSEB 7th Class Computer Notes Chapter 4 Microsoft Word Part-II 36
3. Current Position: If you want to enter the page number on the position of your cursor, click on the Page Number option from the Header & Footer group of the Insert tab and click on the Current Position option from the drop-down list.
4. Remove Page Number: If you want to delete the previously entered page number, click on the Page Number option from the Header & Footer group of the Insert tab and click on the Remove Page Number option from the drop-down list.

Text Group:
The following options are available in the text group:

  • Text: Text boxes are used to highlight text in a document.
  • Quick Parts: Click this button to insert pre-formatted text, auto-text, document properties and fields into a document. Several different types of Quick Parts are available. It is also possible to create customized Quick Parts to use later in documents.
  • Word Art: To insert decorative text into a document, click this button.
  • Drop Caps: Drop Caps wrere used to create a capital character at the beginning of a paragraph. When this button is clicked, three options for drop caps will be displayed.

Hover the mouse over one edge of the text box. Mouse pointer will turn into a cross with arrows.
PSEB 7th Class Computer Notes Chapter 4 Microsoft Word Part-II 37
Click, hold and drag the text box to the desired location.

Resize Text Boxes

  • Click on the text box you want to resize.
  • Click, hold and drag the two-sided arrow-shaped handle on the corners or sides of the text box until it is the desired size.

Word Art
Word Art is designed to allow you make your text more attractive; you can format your text to make it look like a picture or 3D art and enhance its appearance in different ways. The steps to insert Word Art are given below:

  • Select the text you want to change.
  • Then click on the Insert tab.
  • Click on the WordArt drop-down arrow in the Text group.

PSEB 7th Class Computer Notes Chapter 4 Microsoft Word Part-II 38

  • A drop-down menu of WordArt style will appear. Click the style you want to use.
  • Word will automatically create a text box for the text.
  • Now click Ok button, the text will appear in the selected style.

Add Drop Cap Text

  • Select a paragraph from your document.
  • From the Insert Tab, in the Text group, click Drop Cap.
  • Select the Drop Cap option of your choice from the menu.

Symbols Group.
Two buttons allow you to add special typing to your document. These buttons are Equation and symbols.
PSEB 7th Class Computer Notes Chapter 4 Microsoft Word Part-II 39
1. Equation: This button is used to insert a mathematical equation into a document. The equation tools ribbon will appear when the button is clicked. This ribbon is used to create the equation. A list of common equations is also available.
You can add it to your document by clicking on the equation you need from the Built-In Equation list as shown in the picture below:
Or
Click “Insert New Equation.” You will see a new “Equation Tools” Ribbon tab, giving you the option to create your own equation from scratch.
PSEB 7th Class Computer Notes Chapter 4 Microsoft Word Part-II 40

2. Symbols: The Symbols tool allows you to type characters that are not often found on the keyboard. This button is used for inclusion in copyright or trademark documents.
PSEB 7th Class Computer Notes Chapter 4 Microsoft Word Part-II 41
Click on the button to see some recently used symbols:

  • Place your cursor where you want to add the symbol.
  • From the Insert Tab, in the Symbols Group, click Symbol button.
  • Select the symbol of your choice from the available options.
  • If you don’t find the symbol at first, click the More Symbols option and select from the choices made available.

PSEB 7th Class Computer Notes Chapter 4 Microsoft Word Part-II

Note:

  • Formatting means changing the general arrangement and appearance of the text in a document.
  • There are three types of text formatting available in MS-Word:
    1. Character Formatting
    2. Paragraph Formatting
    3. Page.
  • The Home tab is the default tab in Microsoft Word which consists of five groups of related commands; Clipboard, fonts, paragraphs, styles and editing.
  • The Fonts group of the Home tab gives us a number of character formatting commands such as font style, font size, font color, bold, italic, underline.
  • With the help of Format Painter we can copy the format already applied to the text in our document.
  • We can also reverse the work done during editing using undo command. If we have made a mistake while editing the text in the document, we can correct it by clicking on the Undo command from the “Quick access” toolbar and this will undo the last change we made to the document,
  • With the help of Grow font we can increase the size of selected text by one size.
  • With the help of Shrink font we can reduce the size of selected text by one size.
  • Word processor software uses three basic font styles for text, these are Bold, Italic and Underline.
  • Clear Formatting option is used to remove the formatting applied to the text document.
  • There are four types of text alignments available in the paragraph group, which are Align Text Left, Align Text Right, Center and Justify.
  • Bullets or numbers are used to create a list in a document or to convert typed text into a list.
  • To find a particular word or phrase in a document the “Find” option is used.
  • If you want to delete any word and insert new word in that position, use Replace option.
  • “Select Text with similar Formatting” option allows us to select words with similar formatting.
  • Insert tab contains all the commands for inserting items into your documents like Pages, Tables, Links, Header and Footer, Text, Symbols etc.
  • With the help of “Draw Table” button, we use a pencil tool to draw cells of a table.
  • Page Break option is used to delete a page at the current cursor position and start a new page.
  • Clip art refers to a graphic or a picture that you can insert in your document.
  • Header arid Footer are parts of a document that contain specific information such as page number and total number of pages, title of the document, company logo, any photo, etc.
  • A header appears at the top of each page, and footer appears at the bottom of each page.
  • Text boxes are used to highlight text in a document.

PSEB 7th Class Computer Notes Chapter 3 Microsoft Word Part-I

This PSEB 7th Class Computer Notes Chapter 3 Microsoft Word Part-I will help you in revision during exams.

PSEB 7th Class Computer Notes Chapter 3 Microsoft Word Part-I

Introduction:
Word processing is the most commonly used software in computers, with the help of this, we can create documents, save the documents, print the documents and also we can edit the already created document. Let’s learn about these features of word processing.

Wort Processing:
We make a lot of mistakes when typing a document with the help of typewriter, which we can’t correct again, we have to type the document again to make it better, but word processing gives us a facility through which we can easily correct our mistakes in typed documents without having to retype them.
Word processing is a process by which we can create, save and print any type of document in a computer and it can be used anytime in the future and can be edited if required.
The software that is used for word processing process called word processor. For example: MS Word, NotePad, WordPad and word perfect all are word processors.

Features of Word Processing:
Following are the features of word processor:

  • A word processor provides an easier and faster method to type the text.
  • It offers so many styles, size, color, effects for text.
  • Using a word processor, you can apply editing operations to the text.
  • It stores all your documents for. future use.
  • It allows you to insert photos, music, background etc. into the document.
  • It can move any document from one place to another with the help of cut, copy, and paste option.
  • You can delete, edit, update the data in the pre-created document at any time.
  • It helps us to find and correct mistakes in the typed text.
  • It also provide the facility to check the grammar mistakes in the typed text.

PSEB 7th Class Computer Notes Chapter 3 Microsoft Word Part-I

Word Processing – Software:
A word processor is a software program capable of creating, saving and printing typed documents. Today, the word processor is one of the most widely used software programs on the computer, it can create different types of files and to create these files requires different software such as WordPad, Microsoft Office, Microsoft Word, etc are some examples of word processors.

Today in this lesson we will read about MS Word word processor.

Microsoft Word
Microsoft Word is a word processor software program published by Microsoft Company also called MS Word, WinWord, Word. Microsoft Word provides advanced features for creating and saving different types of documents. For example, we can create letter typing, emails, reports, tables, etc. in Microsoft Word.
PSEB 7th Class Computer Notes Chapter 3 Microsoft Word Part-I 1

Some of the basic applications of MS Word are as follows:

  • Creating and saving a text document.
  • Editing and formatting existing documents.
  • Make the document attractive with the help of different styles, size, colors and effects.
  • Creating graphical documents with images, charts, smart art etc.
  • Identify grammatical and spelling errors in the document.

Features of Microsoft Word
Some of the special features of Microsoft word are as follows:

  • MS Word allows us to include text anywhere in the document.
  • We can delete any word, line or page from the document as easily as we erase the words written on paper.
  • We can cut and copy the text and paste it anywhere in the same document or any other document.
  • MS Word allows us to set the page margin and page size according to our needs.
  • We can add Bold, Italic and Underline effects to the text.
  • We can change the size, style, color of the text.
  • We can add header on the top of pages and footer on the bottom of the page.
  • We can add pictures, chart, graphs and smart art.
  • We can convert the text into tables.
  • You can also set different margins in a document and also determine the different locations to start a paragraph.
  • It also provides us with the facility of macro. This is a list of many commands with which our time is saved.
  • MS Word also provides us the facility of spelling checks. It shows a red line below the words that are incorrect.
  • MS Word also provides us the facility of grammar checks.
  • It also provides Find and Replace option.
  • It also provides the facility of dictionary with which we can find many words with the same meaning and use them in our document.

Starting MS Word
The steps to start MS Word are as follows:
1. First, click the Start button
PSEB 7th Class Computer Notes Chapter 3 Microsoft Word Part-I 2
on the desktop

2. Now click on All Program from the popup menu as shown in the picture below.

3. Now click MS Office! MS Word.
PSEB 7th Class Computer Notes Chapter 3 Microsoft Word Part-I 3
Or
Type “Word” in the search bar as shown in the picture below and press Enter key from the keyboard
PSEB 7th Class Computer Notes Chapter 3 Microsoft Word Part-I 4

Components of MS Word Window
When you start the Word application then a window opens on the screen as shown in the picture below. Let us understand the different important parts of this window.
PSEB 7th Class Computer Notes Chapter 3 Microsoft Word Part-I 5
1. File Menu: This option is available in the upper left corner of the window, it contains many of the following commands:
(a) Home: It has options like font color, font size, font style, alignment, bullets, line spacing, etc. All the basic elements that someone might need to edit their document are available in the Home option.
PSEB 7th Class Computer Notes Chapter 3 Microsoft Word Part-I 6
(b) Insert: Tables, sizes, images, charts, graphs, headers, footers, page numbers, etc. are available in insert options.

(c) Design: The template (pre-created document design) or the design in which you want your document to be created can be selected under the Design tab.

(d) Page layout: Under the Page Layout tab we can find the options such as Margins, Orientation, Columns, Lines, Indentations, Spacing, etc.

(e) Reference: This tab is most useful for those who are preparing thesis or writing books or working on a long document. Footnote, table of content, bibliography, captions etc. options can be found under this tab.

(f) Review: Spell check, grammar, thesaurus, word count, language, translation, comments, etc. can all be tracked under the Review tab.

2. Quick Access Toolbar: Collection of buttons that provide one click access to commonly used commands such as Save, Undo or Redo. You can also customize this according to your preference.

3. Title Bar: This bar window is at the top of the screen and the name of the open document appears on it. Above this bar are three control buttons:
PSEB 7th Class Computer Notes Chapter 3 Microsoft Word Part-I 7
minimize, maximize, close button

4. Ribbon: The ribbon consists of three organized commands:
PSEB 7th Class Computer Notes Chapter 3 Microsoft Word Part-I 8
(a) Tabs: These appear on the top of the ribbon and contain groups of related commands. For example: home, insert, page layout ribbon, references, mailings Review etc. all are tabs. We have already read about them.
(b) Group: They handle related commands; the name of each group appears below the group on the ribbon. For example, a group of commands related to fonts (Font Group) or a group of commands related to alignment (paragraph group), etc.
(c) Commands: Commands appear in each group as described above. For example: Cut, Copy, Paste, Font Size, Color, Alignment etc. are all commands.

5. Ruler: There are two rulers in the word window – a horizontal ruler and a vertical ruler. The horizontal ruler appears just below the ribbon and is used to set margins and tab stops. The vertical ruler appears on the left side of the word window and is used to determine the vertical position of the page.

6. Help: The help icon can be used whenever you want to get help related to MS Word. It provides excellent tutorials on various topics related to Word.

7. Document Area: Right below the ruler, there is a large space called the text area. This is the area where we type our document; the blinking line in this area is called the insertion point which indicates that your typing will start from this place.

8. Status Bar: It displays the information of the document as well as the position of the insertion point. From left to right, this bar contains information on the total number of pages and words, document language, etc.

9. Dialog Box Launcher: This appears as a very small arrow in the lower-right corner of most groups of the ribbon. Clicking this button opens a dialog box or task pane that provides more options about the group.

10. View buttons: At the bottom right of the window screen is a set of 5 buttons that allow us to view the document in a different view.
PSEB 7th Class Computer Notes Chapter 3 Microsoft Word Part-I 9
(a) Prints Layout: This is the default document view in Word. The Print Layout view shows the document as it would appear after printing.
(b) Full-Screen Layout View: This view opens the document to a full screen. This layout helps us to make our document easily readable above the screen.
(c) Web Layout: This view displays a document on the screen the way it will look when viewed in a Web browser if you saved it as a web page.
(d) Out Line View: The outline view shows the document as an outline form.
(e) Draft View: This is the most commonly used view, in this view we can edit our document very quickly and easily.

PSEB 7th Class Computer Notes Chapter 3 Microsoft Word Part-I

Creating a New Document
Follow these steps to create a new document:
PSEB 7th Class Computer Notes Chapter 2 Windows Explorer 1

  • Click the office button and then click File menu
  • Now click on New option from the drop down menu, as shown in the picture.
  • A New Document dialog box will appears on the screen.
  • Click Blank Document option from this dialog box and then Click Create Option as shown in picture.
  • Now a blank document will appear on the screen

Or
You can create a new document by pressing the Ctrl + N keys from the keyboard.
PSEB 7th Class Computer Notes Chapter 3 Microsoft Word Part-I 11
Open an Existing Document
Follow these steps to open an existing document:

  • Click the File tab or Office Button.
  • Click Open option. The Open dialog box appears.
  • As shown in picture below select a document which you want to open and then Click Open button.
  • Now your document will open on the screen.

Or
You can open an existing document by pressing the Ctrl + 0 keys from the keyboard.
PSEB 7th Class Computer Notes Chapter 3 Microsoft Word Part-I 12

Saving a Document
To save a newly created document follows these steps:

  • Click the File tab or Office Button.
  • Click Save option. The Save dialog box appears. As shown in picture below.
  • Now type the name of your document in File name box and then click Save button.

Or
You can also save your document by pressing the Ctrl + S keys from Keyboard Now your document is safe for future use.
PSEB 7th Class Computer Notes Chapter 3 Microsoft Word Part-I 13

PSEB 7th Class Computer Notes Chapter 3 Microsoft Word Part-I

Note:

  • Word processing is a process by which we can create, save and print any type of document
  • The software that is used for word processing process called word processor.
  • MS Word, NotePad, WordPad and word perfect are all word processors.
  • Microsoft Word is a word processor software program, provides advanced features for creating and saving different types of documents.
  • Tabs appear on the top of the ribbon and contain groups of related commands.
  • Group handle related commands; the name of each group appears below the group on the ribbon.
  • The large area at the bottom of the ruler is called the text area. We can type our document in this text area.
  • Text can be viewed on a computer screen before it is printed, errors can be detected and corrected.
  • A dialog box launcher is present in the lower right corner of each group.
  • Word allows us to view the document in 5 different views. Prints Layout. Full screen layout view, Web Layout, Out Line View, Draft view.

PSEB 7th Class Computer Notes Chapter 2 Windows Explorer

This PSEB 7th Class Computer Notes Chapter 2 Windows Explorer will help you in revision during exams.

PSEB 7th Class Computer Notes Chapter 2 Windows Explorer

Introduction:
Windows Explorer is an important part of Windows. It manages files and folders. You can cut, copy, paste, rename and delete your files and folders. Explorer puts your files and folders in the correct order.

There are two types of Explorer:

  1. Windows Explorer
  2. Internet Explorer.

Windows Explorer:
The main function of Windows Explorer is to provide a graphical interface for navigating the computer’s hard disk and associated media. It is used to view, organize and manage the files / folders on the computer’s hard disk. Windows Explorer is automatically launched any time you open a folder in Windows XP.
PSEB 7th Class Computer Notes Chapter 2 Windows Explorer 1
Windows Explorer is also called File Explorer. It is used to view files and folders on our computer. We can open the data, folder and library of the disk in the computer and also search for an item. We can use it to open, delete, rename, copy, move and create new folders.

Opening the Windows Explorer
We can open Windows explorer in many ways. Some of these are as follow:
PSEB 7th Class Computer Notes Chapter 2 Windows Explorer 2
Or
By default, Windows 10 includes a File Explorer shortcut on the taskbar. Its icon looks like a folder. Click or tap on it and File Explorer is opened.
PSEB 7th Class Computer Notes Chapter 2 Windows Explorer 3

Components of Windows Explorer
Components of the windows explorer are files, folders, and drives. With the help of Explorer we can easily find any file or folder.

  • File: File is the smallest unit of data storage.
  • Folders: Folders are used to store related files in one place.
  • Drive: Hard disk storage areas are called drives. For example Local Disk C, D, E, F, and G: drives.

With Windows Explorer we can easily access files, folders and drives. Windows Explorer is divided into following parts.

  • Left Pane: This is called the navigation pane. Here we can see drives, files and folders
  • Right Pane: When a file, folder is selected, its details appear in the right pane.

PSEB 7th Class Computer Notes Chapter 2 Windows Explorer 4
PSEB 7th Class Computer Notes Chapter 2 Windows Explorer 5

  • Forward and Back buttons: Enables you to go to folders you’ve already opened. If you go to a different folder, you can choose the Back button to return to the last folder you accessed.
  • Address Bar: Enables you to go to a different folder in the same Explorer window.
  • Search Box: Allows you to search for subfolders, documents, images, programs, Web pages, and bookmarks in the current folder.
  • Status Bar: Displays information about a selected folder and its contents, such as the total number of items in the folder, the number of items selected and total file size.
  • Ribbon: Enables you to perform layout, formatting, and sharing tasks, as well as how File Explorer displays your files and folders.

PSEB 7th Class Computer Notes Chapter 2 Windows Explorer

Series of Locations:
The folders and drives in the computer, the computer connected to the network and its shared folders, drives and printers are arranged in a tree shape. This sequence is called a series of locations. It contains the following items:
Favorites: The top most folder in this series is the Desktop folder. It contains desktop, downloads and recent place items.
PSEB 7th Class Computer Notes Chapter 2 Windows Explorer 6

2. Library Folder: By default this folder contains four libraries, such as; Documents, music, photos and videos. These folders contain related items; Such as pictures in pictures folder, related videos in video folder, etc.
PSEB 7th Class Computer Notes Chapter 2 Windows Explorer 7

3. Personal Folder: Your personal folder is named after the user name to which you have logged in to the computer and by default it contains the following folders; such as Contacts, Downloads, Favorites, Links, My Documents, My Music, My Pictures, My Videos, Saved Games and Search.
PSEB 7th Class Computer Notes Chapter 2 Windows Explorer 8

4. MY Computer: Disks in a computer; such as C: drive, D: Drive, E: Drive etc. and other connected devices such as Printer, USB, memory stick and camera are attached to the computer, they are visible here.
PSEB 7th Class Computer Notes Chapter 2 Windows Explorer 9

5. Network: If you are connected to a local network, you see other computers and devices in it.
PSEB 7th Class Computer Notes Chapter 2 Windows Explorer 10

6. Control Panel: Control Panel is used to configure hardware and software of computer system and to change settings of computer system.
PSEB 7th Class Computer Notes Chapter 2 Windows Explorer 11

7. Recycle Bin: It contains deleted files/folders or programs.
PSEB 7th Class Computer Notes Chapter 2 Windows Explorer 12

View means how files and folders appear in a computer system. Explorer views show the direction in which files and folders will appear. It has five types of views. These are thumbnails, tiles, icons, lists and details.

  • Small, Medium, Large and Extra Large Icons View: Items in this view are in more than one row and each item appears in the shape of an icon. Each item has a name.
  • Tiles Icon View: Items in this view are in more than one row and each item appears in the shape of an icon. Each item has a name. It contains other information, such as the type of file and its size.
  • List Icon View: Items in this view are in more than one column. Each item has a name and the icon is to the left of the name.
  • Content Icon View: Items in this view appear in the column. Each item is in the shape of an icon. It has a name and type of the file is written below it. Some other properties such as modification date and size below it are also visible, By default this view is used for search.
  • Detail Icon View: Each item appears as a table row. The first column contains the name of the item in the form of a small icon and the rest of the column lists its properties such as its size and the date and type of modification.

PSEB 7th Class Computer Notes Chapter 2 Windows Explorer 13

PSEB 7th Class Computer Notes Chapter 2 Windows Explorer

Change Display for a Single Folder

  • Open File Explorer.
  • Click the View tab at the top of the window.
  • In the Layout section, select Extra large icons, Large icons, Medium Icons, Small icons, List, Details, Tiles, or Content to change to the view you want to see.

There are many different types of files you can use. For example, Microsoft Word documents, digital photos, digital music, and digital videos are all types of files. When you use different applications, you’ll often be viewing, creating, or editing files. Files are usually represented by an icon. In the image below, you can see a few different types of files.
Windows uses folders to help you organize files. You can put files inside a folder, just like you would put documents inside a real folder. In the image below, you can see some folders on the desktop.

Selecting the Items
Usually before doing any work on a file or folder such as opening a file, closing a file, deleting file, copy a file etc. we have to select it. There are different ways to select a single file/folder or multiple files/folders.
1. Selecting a Single Item: If more than one item is available and you want to select one of the items in it, it can be selected by clicking with the mouse on that file.

2. Selecting More Than One File ; There are a few ways to select more than one file at a time:
(a) If you’re viewing your files as icons, you can click and drag the mouse to draw a box around the files you want to select. When you’re done, release the mouse; the files will be selected. You can now move, copy, or delete all of these files at the same time.
(b) Selecting All Items: If you want to select all files in a folder at the same time, open the folder in File Explorer and press Ctrl+A or click “Select all” option from the “Select” group on the Home tab. All of the files in the folder will be selected.
(c) Select items using the Shift key: To select a group of files from a folder, click the first file, press and hold the Shift key on your keyboard, then click the last file. All of the files between the first and last ones will be selected.
(d) Selecting an item using (Ctrl key): To select specific files from a folder, press and hold the Control key on your keyboard, then click the files you want to select.

3. Reverse selection: To reverse the selection, select the “Invert Selection” option in the Edit menu.

Creating a Folder
If you want to create a new folder, it is created in the current location. Here are some ways to create a folder:

  • Open the File explorer, click on the “New Folder” button option.
  • The new folder will appear. Type the desired name for the folder and press Enter.

Or
Press the Ctrl + Shift + N keys together from the keyboard. The new folder will appear. Type the name of the folder and press Enter key.
Or
Right-click on a blank space, click “New” ⇒ “Folder” in the context menu. The new folder will appear. Type the name of the folder and press Enter key.
PSEB 7th Class Computer Notes Chapter 2 Windows Explorer 14
Or
PSEB 7th Class Computer Notes Chapter 2 Windows Explorer 15

  • Place the cursor where you want to add your folder.
  • In File Explorer, click on the Home menu item.
  • From the Home riibbon, click on the New folder button.
  • Enter the name of your new folder and press enter key.

Re-naming the Item
You can change the name of any file or folder. Here are the steps to rename an item:

  • Click the file or folder, wait about one second, and click again. An editable text field will appear.
  • Type the desired name on your keyboard and press Enter. The name will be changed.
    Or
  • You can also right-click the folder and select “Rename” copy option from the menu that create shortcut appears. An editable text field will appear.
  • Type the desired name from , keyboard and press Enter. The name will be changed.

PSEB 7th Class Computer Notes Chapter 2 Windows Explorer 16

Delete a File or Folder
If you no longer need to use a file, you can delete it. When you delete a file, it is moved to the Recycle Bin. If you change your mind, you can move the file from the Recycle Bin back to its original location. If you’re sure you want to permanently delete the file, you will need to empty the Recycle Bin.

Following are the Steps to delete file/folder:

  • Select the file or folder you want to delete.
  • Press the Delete key from the keyboard. A message will appear asking for deletion.
  • Click on “Yes”. Item will be deleted.

PSEB 7th Class Computer Notes Chapter 2 Windows Explorer 17
Or

  • Click and drag the file to the Recycle Bin icon on the desktop.
  • To permanently delete the file, right click the Recycle Bin icon and select “Empty Recycle Bin”. All files in the Recycle Bin will be permanently deleted.

PSEB 7th Class Computer Notes Chapter 2 Windows Explorer

Copying or Pasting Items
To copy a file/folder the steps are as follow:

  • Select the item to be copied.
  • Select the “Copy” option from the “Clipboard” group on the “Home” tab.

Or
Press ctrl + c keys from the keyboard.
Right click on the file/folder you want to copy. A menu will open. From this menu select “copy” option. Now your file/folder will be copied.

Steps to paste the file/Folder are as follow:

  • Place the cursor where you want to paste the file/folder.
  • Select the “Paste” option from the “Clipboard” group on the “Home” tab.
  • Your copied item will now be pasted.

Or
Press the Ctrl + V key from the keyboard.
PSEB 7th Class Computer Notes Chapter 2 Windows Explorer 18
Or
Locate and right-click the desired location, then select “Paste” option from the menu appeared.

Move Items by Cut and Paste
Move items from one place to another is similar to copy and paste but in this the cut option is used instead of copy. The important difference between copy / paste and cut / paste is that when we copy and paste an item, a duplicate item of that specified item is created in a new location which does not move from its original location. An item moved by cut or paste does not move from its original location but moves to its original location.

Cut and paste is used as follows.

  • Select the item to be cut.
  • Select the “Cut” option from the “Clipboard” group on the “Home” tab.

Or
From the keyboard Press the Ctrl + X key.
Or
Right-click the mouse and select Cut from the menu that appears. Steps to paste the file/Folder are as follow:

  • Place the cursor where you want to pasite the file/folder.
  • Select the “Paste” option from the “Clipboard” group on the “Home” tab.
  • Your copied item will now be pasted.

Or
Press the Ctrl + V key from the keyboard.
Or
Locate and right-click the desired location, then select “Paste” option from the menu appeared.

Copying Items with Send To
The Send to Option is an easy way to copy one or more items or programs to a new location. Following are the steps to use Send to option:

  • Select the item to be copied.
  • Press the right mouse button; select the option “Send To” from the menu.
  • Now select the specified location. By default, the Send To submenu contains the following locations:
    (a) Compressed (zipped) Folder
    (b) Desktop (Create Short-cut)
    (c) Documents Library
    (d) Fax and Mail recipients
    (e) Removable devices, such as: USB, Memory Sticks Select the option as needed.

PSEB 7th Class Computer Notes Chapter 2 Windows Explorer 19

Searching
Search commands can be used to find files, folders, etc. Sometimes we save an item and forget its location and in the future when we need that item we can’t find it, but with searching we can easily find our item we search for.

  • Press the Ctrl + E key from the keyboard in Windows Explorer or click in the search box that appears in Windows.
  • Type one or more search terms. If you use more than one search term, vour file must match those search terms.
  • The results appear automatically in the item view as you type the search term. We do not need to press Enter key to do this.

PSEB 7th Class Computer Notes Chapter 2 Windows Explorer 20

Run Command:
The run command is obtained by clicking on Start button. Run commands are used to run a program or open folders and documents directly. Steps to use Run command are as follow:
1. Click on Start button.
2. Select All apps and expand Windows System, then click Run to open it. The run box will open.
Or
Just press the Windows key and the R key (win+R) at the same time, it will open the Run command box immediately.
PSEB 7th Class Computer Notes Chapter 2 Windows Explorer 21
Or
Type the word run inside search box in the taskbar, and then click Run from the search result. A Run dialog box will appear on the screen.

To open any program, type name in Run dialog box and click Ok. For Example type “Calc” to open the calculator.

Calculator:
Calc is the name of the spreadsheet program used in OpenOffice. A Calculator is an electronic hardware device or software capable of performing mathematical calculations, such as addition, multiplication, subtraction, or division. The calculator can also be used to calculate dates, convert currency, and if you’re using the Standard mode, you can keep the calculator window on top of other windows.

The steps for opening the calculator are as follows:
1. Click Start.
2. In the programs list, find and click the Calculator program.
PSEB 7th Class Computer Notes Chapter 2 Windows Explorer 21
Click Start.
Type “calc” in search box and press Enter.
Or
Press the shortcut keys Windows key+X.
In the Power User Task Menu, click the Run option.
Type “calc” in Run box and press Enter.
PSEB 7th Class Computer Notes Chapter 2 Windows Explorer 22

Customize Desktop:
Customizing is the process of changing the settings of a desktop.

Themes:
Themes are a combination of pictures, colors, and sounds. It has background, screen saver, border color and sound scheme.

Windows has the following themes:
(a) My Themes
(b) Arrow Themes
(c) Basic and High Contrast Themes

Following are the steps to apply the theme:

  • Open Settings.
  • Click on Personalization.
  • Click on Themes.
  • Click the Get more themes in the Microsoft Store option.
  • Select the theme you want.
  • Click the Get button.
  • Click the Apply button.
  • Click the newly added theme to apply it from the “Themes” page.

PSEB 7th Class Computer Notes Chapter 2 Windows Explorer

Desktop Background
It is a wallpaper image that appears behind the icons on your computer’s desktop. It can be in JPEG or Gif format. The following are steps to change the desktop background:
(а) Right-click the desktop and choose Personalize from the shortcut menu. The Personalization window appears.
(b) Click the Desktop Background link. The Desktop Background dialog box appears.
(c) Select a category of desktop background options from the Picture Location list box and then click the image from the background preview list that you want to use.
(d) The background is previewed on your desktop. Click Save Changes.
PSEB 7th Class Computer Notes Chapter 2 Windows Explorer 23

Screen Saver:
Screen saver is the graphics that appear on the screen after not working on the computer for some time. It is used for security and protection of the screen. We can set our own screen saver.

Steps to set the screen saver : Here are the steps to set up a screen saver
PSEB 7th Class Computer Notes Chapter 2 Windows Explorer 24
PSEB 7th Class Computer Notes Chapter 2 Windows Explorer 25
(a) Right-click the desktop and choose Personalize from the shortcut menu. The Personalization window appears.
(b) Click the Lock Screen option. The lock screen dialog box appears.
(c) In the Screen Saver Settings window, choose a screen saver from the drop-down list.
(d) Click on the Preview button to preview the screen saver.
(e)The screensaver has to be set to run auto-matically from the desktop. So type the time setting in the Wait option that appears in the picture.
(f) Click on Apply button and press Ok button.

Note:

  • Windows Explorer is an important part of Windows. It manages files and folders.
  • Windows Explorer is also called File Explorer. It is used to view files and folders on our computer.
  • Win key + E is used to open window Explorer .
  • File is the smallest unit of data storage.
  • Folders are used to store related files in one place.
  • Hard disk storage areas are called drives.
  • On navigation pane, we can see drives, files and folders
  • Address Bar enables you to go to a different folder in the same Explorer window.
  • Search Box allows you to search for subfolders, documents, images, programs, Web pages, and bookmarks in the current folder.
  • Control Panel is used to configure hardware and software of” computer system and to change settings of computer system.
  • Recycle Bin contains deleted files/folders or programs.
  • Explorer views show the direction in which files and folders will appear. O Explorer has five types of views.
  • Thumbnails, tiles, icons, lists and details views.
  • Ctrl+A keys are used to select all files and folders in explorer windows.