This PSEB 7th Class Computer Notes Chapter 6 Microsoft Word Part-IV will help you in revision during exams.
PSEB 7th Class Computer Notes Chapter 6 Microsoft Word Part-IV
Introduction:
A table is a grid of cells arranged in rows and columns. Tables are useful for various tasks such as presenting text information and numerical data. In Word, you can create a blank table, convert text to a table, and apply a variety of styles and formats to existing tables.
Table:
A table is a collection of rows and columns where data is grouped together. Rows are placed horizontally and columns are placed vertically in the table and the intersection of a row and column is known as CelL Cells are small boxes in the worksheet where we enter data. For example sample table is shown below :
| Name | Class | Roll No. | Subject |
| Shine | 4th | 6 | Math |
| Grace | 5th | 7 | Hindi |
| Mishit | 6th | 8 | English |
In this lesson, we will learn how to create a table, how to join rows and columns, how to format a table, etc.
Creating a Table
In MS Word, we can create tables in three ways :
- With the help of table buttons.
- With the help of Insert Table option.
- With the help of draw table options.
Creating a Table using the Insert Table Option
Below are the steps to create a table using the Insert Table option :
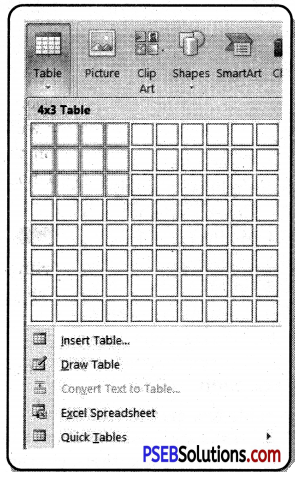
(а) In the Insert tab, click on the “Table” command from the Table group.
(b) A dropdown menu will open as shown in the picture above, click on the “Insert Table” option from this menu.
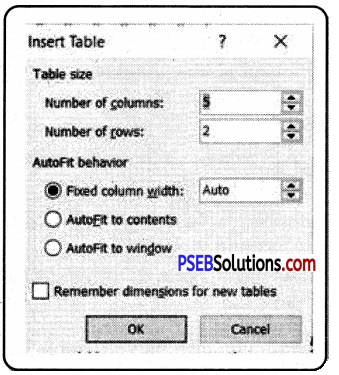
(c) The Insert Table dialog box will appear.
(d) In this box, specify the number of rows and columns and click on the ok button.
![]()
Creating a Table with the Help of a Draw Table Option
The steps to create a table with the help of a draw table option are as follows:
(а) In the Insert tab, click on the “Table command from the Table group.
(b) A dropdown menu will open as shown in the picture above, click on the Draw Table option from this menu.
(c) The mouse pointer will turn into a pencil.
(d) Draw a rectangle on the page with the help of a pencil.
(e) Draw vertical and horizontal lines to form columns and rows as needed.
Enter Text into Table
Below are the steps for inserting text into a table :
- Click on the cell in which you want to insert the text.
- Now type
Or - You can also add text using copy paste
To Convert Text to a Table
Steps to convert text into table are as follows :
- Select the text which you want to convert into table.
- Click on the “Table” command in the “Table” group of the Insert tab.
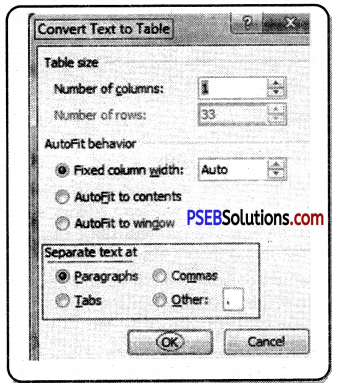
- Select the command “Convert Text To Table”.
- The “Convert Text to Table” dialog box opens.
- Select the desired option in the Separate text at section.
- Click OK button.
Convert Table into Text
Steps to convert table into text are as follows :
- Select the rows of tables you want to convert to text.
- On the Layout tab, in the Data section, click “Convert To Text”.
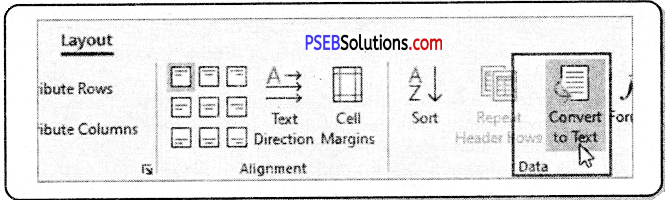
In the Convert Table box, under Separate Text With, click on the different character you want to use instead of the column boundaries. Rows will be separated by paragraph symbols.
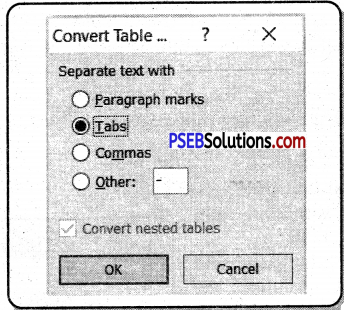
Click Ok.
Modifying a Table
Once you have included the table in your document, if you need to add or remove more data, you can easily add and delete rows and columns into the table. You can also change the look of your table.
When you select a table in Word, the Design and Layout tabs appear below the Table Tools on the Ribbon. Using the commands on the Layout tab, you can make various modifications into the table.
Adding ROMS to Tables
In any table, you can add a row above or below the selected cell. In MS Word we have 2 ways to add row into the table. Which are as follows :
Method 1.
Below are the steps to add rows to the table.
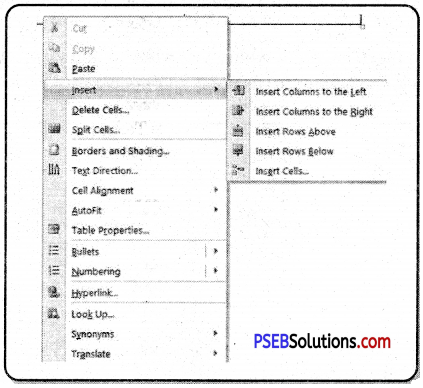
- Place the cursor in the table where you want to add the new row.
- Now right click on the mouse, a drop-down menu will appear on the screen.
- Click on the Insert option from this menu.
- If you want to add a new row above the insertion point, click on the “Insert Row Above” option.
- If you want to add a new row below the insertion point, click on the “Insert Row Below” option.
- A new row will appear above the insertion point.
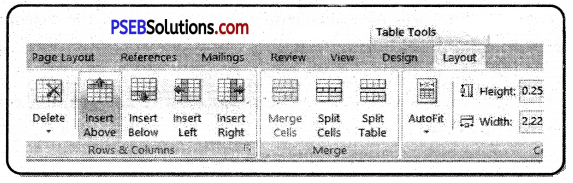
Method 2.
The step of adding rows to the table is given below :
- Place the cursor in the table where you want to add the new row.
- From the “Rows & Columns” group of the “Layout tab”, click on the “Insert Above/Insert Below” option.
- A new row will appear below/above the insertion point.
![]()
Adding Columns to Tables
In MS Word, you can add a new column to the right or left of the insertion point in a table. There are two ways to add columns in Word which are as follows :
Method 1.
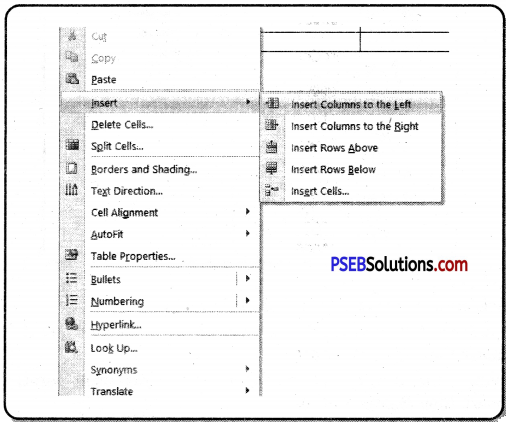
- Place the insertion point where you want to add new column.
- Right-click on the mouse. A menu will appear.
- Click on the Insert option from this menu.
- If you want to add a new column to the left of the insertion point, click on the “Insert Cloumn to the left” option.
- If you want to add a new column to the ‘right of the insertion point, click on the “Insert Column to the right” option.
- A new column will now appear to the right or left of the cursor.
Method 2.
Below is the step to add a column to the table:
- Place the cursor in the table where you want to add the new column
- From the “Rows & Columns” group of the Layout tab, click on the “Insert Left/Insert right” option.
- A new column will now appear to the right or left of the cursor.
Adding Cells to Tables
In MS Word, you can add a new cell around the selected cell, such as right, left, up or down.
The steps to add a new cell are as follows :
- Click in the cell.
- Press the right mouse button inside the cell.
- From this menu click “Insert” and then click “insert cell” option.
- Choose which side of the selected cell you want new cell.
- Click the OK button.

Deleting a Row or Column
Here are the steps to delete a row or column from the table :
- Select a row or column.
- Right click your mouse. A menu will appear.
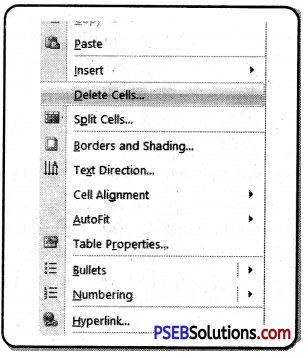
- Click on the Delete Cells option,
- A Delete Cell dialog box will now open.

- Click “Delete entire row” option to delete the row or click “Delete entire column” option to delete the column.
- The appropriate row/column will be deleted.
Delete Rows or Columns using the Layout Tab
- Select the row or column you want to delete.
- Click the “Delete” button from the Rows & Columns group of the Layout tab.
- A dropdown menu will open.
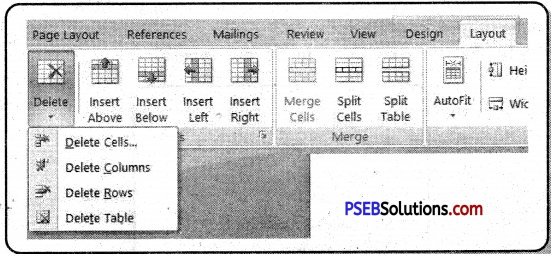
From this menu, click the “Delete Row’” option to delete the row or click the “Delete Column” option to delete the column and if you want to delete the entire table, click the” Delete Table” option.
Deleting Cells using the Layout Tab
- Select the row or column you want to delete.
- Click the “Delete” button from the Row’s & Columns group of the Layout tab.
- Now a dropdown menu will open, click on “Delete Cells” option,
- A Delete Cell dialog box will now open.
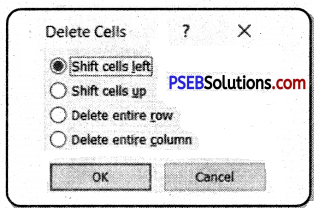
- From this box click on “Shift Cells Left” / “Shift Cells Right” option.
- The selected cell wall be deleted.
Or - Press the right mouse button inside the cell you want to delete.
- A menu will appear, click on the “Delete Cell” option from this menu.
- A “Delete Cell” dialog box will open.
- In this box, click on Shift Cells Left / Shift Cells Right option.
- The selected cell will be deleted.
![]()
Properties of Tables
With the Table Properties dialog box we can adjust the alignment of the table and the size of the row, column or cell.
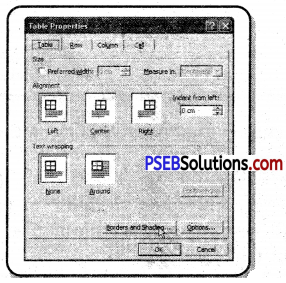
In MS Word we can also split or merged the Cells into a table.
Changing Alignment of Table
The method of aligning the table is as follows :
- Click the cursor anywhere in the table.
- Click on Layout tab.
- Click on “Properties” button in the “Table” group. A dialog box will appear.

In the dialog box, select the “Table” tab.
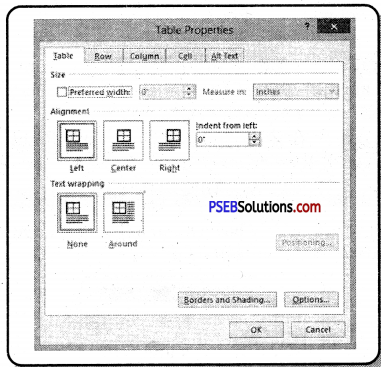
Choose the alignment you like and Click on the OK button.
Changing Size of Row, Column or Cell
Steps to resize the rows, columns and cells are as follows :
- Click in the cell, row, column that needs to be resized.
- Click on Layout tab.
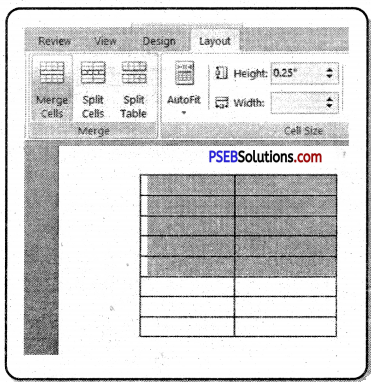
- Click on “Properties” in the Table group. A dialog box appears as shown in figure 6.16.
- Select Row, Columns or Cells tab as required.
- Enter the required value in height for row, Width for column.
- Click on OK button.
Splitting the Cell:
Microsoft Word allows cells to be divided into multiple cells. Steps to divide a cell into several smaller sub-cells are as follows :
- Place mouse pointer inside the cell that you want to split into several cells.
- Now click on the “Layout” tab and then click on the “Split cells” button from the “Merge” group.
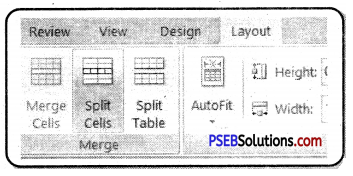
A “Split Cells” dialog box will open and ask about the Number of columns/ Number of Rows.
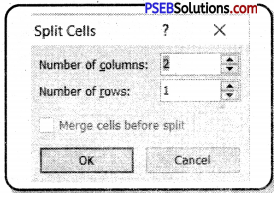
- Select the required number of rows and columns
- Click the OK button.
Splitting the Table
Microsoft Word allows a table to be split into multiple tables but a single operation always splits the table into two tables.
The following are simple steps to split a table into two tables in a World Document.
- Place the cursor in the row that you want to be the first row of the second table.
- Click the Split Table button ‘ from the Merge group on the Layout tab.
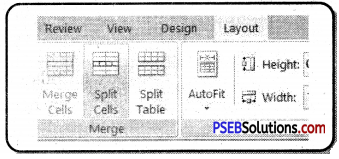
Merging Cells
Microsoft Word allows two or more cells to merge to form one large cell. You will often need to combine the columns in the top row to create a table title. You can combine cells row-by-column or column-by-column, you can’t mix cells diagonally :
The steps for merging cells are as follows :
- Select the cells we want to merge.
- Click the Merge Cells button from the Merge group on the Layout tab.
When clicked, this option will convert all selected cells into one cell.
![]()
Note:
- A table is a grid of cells arranged in rows and columns.
- Tables are often used to present data in a systematic way.
- The horizontal lines of a table are called rows and the vertical lines are called columns.
- The intersection of rows and columns is called cell.
- Using the Draw Table option we can draw a complex table, for example:
- If we want to keep the number of cells in each row of the table and their height different, we can use the Draw Table option.
- Press “Tab” or “Right Arrow” key to move forward in different cells.
- Press “Shift + Tab” key or “Left Arrow” key to move back and forth between different cells.
- After creating a table in Word, we can insert a new column to the right or left of any column and a new row above or below any row.
- Dividing a cell into more than one cell is called splitting.
- Combining two or more cells into one cell is called merging.
- “Table Properties button allows you to resize table rows, columns and cells.