This PSEB 10th Class Computer Notes Chapter 2 HTML Fundamentals will help you in revision during exams.
PSEB 10th Class Computer Notes Chapter 2 HTML Fundamentals
HTML stands for Hypertext Markup Language, and it is the most widely used language to write Web Pages.
- Hypertext refers to the way in which Web pages (HTML documents) are linked together. Thus, the link available on a webpage is called Hypertext.
- As its name suggests, HTML is a Markup Language which means you use HTML to simply “mark-up” a text document with tags that tell a Web browser how to structure it to display.
![]()
HTML:
Originally, HTML was developed with the intent of defining the structure of documents like headings, paragraphs, lists, and so forth to facilitate the sharing of scientific information between researchers.
Web page has many elements as page style, paragraph, list, table and picture etc. Each section is written in the form of tag. The tags indicate that the element viz. heading, list, paragraph etc to which the section of web page relates. Picture, sound and movie can be included in addition to the text in a web page.
Structure of Document:
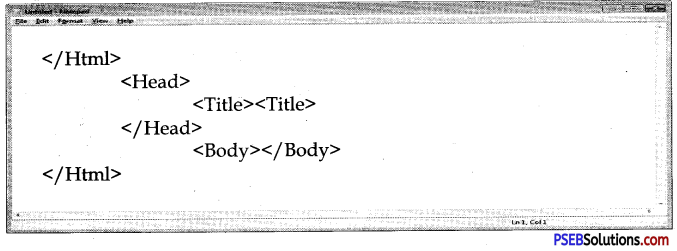
It is easier to understand the structure of a HTML document. The complete document is written between <HTML> and </HTML> tags. The tags <Head>, <Body>, <Title>etc are written between these. The structure of HTML document is explained in detail below:
Creating A Web Page or Html Document:
Web page is the first page of a website. This gives an introduction about whole website. This page contains many types of the links which are related with other web pages.
The whole of work regarding creation of web document is done in notepad. The steps to be followed to open a notepad are:
1. Start → Programs → Accessories → Notepad
Or
2. Notepad can also be opened by typing notepad in Run dialog box.
The notepad windows will be displayed. Create the document in the notepad as under :
<HTML>
<HEAD>
<TITLE> First Web Page</TITLE>
</HEAD>
<BODY>
This is my first Web page in HTML document.
</BODY>
</HTML>
![]()
Viewing HTML Document
Save this document as .html extension. For example, you can name this document as MyWebpage.html.
To look at web page we use some web browser. Internet explorer is a commonly used browser. The steps to look a webpage with the help of internet explorer are as under:
- Click on Start → Programs → Internet Explorer Internet explorer windows will be displayed.
- Click on File → Open Menu
- Go to MyWebpage.html file with the help of browse button and click on open button.
- Click OK. The internet explorer will show the Page.
Types of Web Browsers:
Web Browsers are software installed on your PC. To access the Web, you need a web browser, such as Netscape Navigator, Microsoft Internet Explorer or Mozilla Firefox.
There are four leading web browsers – Explorer, Firefox, Netscape, and Safari, but there are many other browsers available. You might be interested in knowing complete browser statistics. Now we will see these browsers in a bit more detail.
1. Internet Explorer. Internet Explorer (IE) is a product from software giant Microsoft. This is the most commonly used browser in the universe. This was introduced in 1995 along with Windows 95 launch and it has passed Netscape popularity in 1998.
2. Google Chrome. This web browser is developed by Google and its beta version was first released on September 2, 2008 for Microsoft Windows. Today, chrome is known to be one of the most popular web browser with its global share of more than 50%.
3. Mozilla Firefox. Firefox is a new browser derived from Mozilla. It was released in 2004 and has grown to be the second most popular browser on the Internet.
4. Safari. Safari is a web browser developed by Apple Inc. and included in Mac OS X. It was first released as a public beta in January 2003. Safari has very good support for latest teclinologies like XHTML, CSS2 etc.
5. Opera. Opera is smaller and faster than most other browsers, yet it is full- featured. Fast, user-friendly, with keyboard interface, multiple windows, zoom functions, and more. Java and non Java-enabled versions available. Ideal for newcomers to the Internet, school children, handicap and as a front-end for CD- Rom and kiosks.
![]()
HTML Tags:
HTML is made up of different tags and attributes. The tag is an HTML command that shows the layout or displays the desired output of a whole or part of the web page. HTML tag is bound by angular brackets ( <> ) that always opens with a < (less than) sign and closes with a > (greater than) sign. It controls the appearance, layout and flow of the web page.
A tag contains three parts: element (identification of tag), attribute and value.
HTML tags can be of two types:
1. Container/Paired Tags
2. Empty/Singular Tags
1. Container/Paired Tags. It is also called container tag. A tag is said to be a paired tag if it along with a companion tag or closing tag appears at the end. For example, the tag is paired tag. The tag with its closing tag is used to render in Bold Text. In paired tag, first tag is called the opening tag and the second tag is called the closing tag.
2. Empty/Singular Tags. The second type of tag is the singular tag, which is also known as a stand-alone tag or empty tag. The stand-alone tag does not have companion tag or closing tag.
For example: Other singular tags are:
Tags Description
<BR> Insert a link break
<HR> Defines a horizontal rule
<!–> Defines a comment
HTML Attributes:
An attribute defines a property for an element, consists of an attribute/value pair, and appears within the element’s start tag. An element’s start tag may contain any number of space separated attribute/value pairs.
An attribute is used to define the characteristics of an HTML element and is placed inside the element’s opening tag. All attributes are made up of two parts – a name and a value:
1. The name is the property you want to set. For example, the paragraph <p> element in the example carries an attribute whose name is align, which you can use to indicate the alignment of paragraph on the page.
2. The valuers what you want the value of the property to be set and always put within quotations.
| Tags | Attributes |
![]()
Body Tags:
It is main tag of HTML. It contains all other tags. Everything written in this tag is displayed.
Background Attributes:
It defines background image of HTML document <Body Background = “Image.JPG”>
Bg Color attribute:
It defines background color of HTML document <Body bgcolor = ” green” >
Difference between Background and BGCOLOR:
The difference between background and BGCOLOR is as ahead:
| Background | BGCOLOR |
| 1. Background attribute is used in body as well as in table tag ,to add background image in the given webpage or a table. | 1. BGCOLOR attribute is used in body as well as in table tag, to change the background color of the webpage or a table. |
| 2 Syntax <body background= “Red”> | 2. Syntax is <table bgcolor=”Green” > |
| 3. Example : <BQDY background-‘image.jpg”> | 3. Example : <body bgcolor-‘green”> |
Text Attribute:
It defines Text Color in HTML document <Body Text = “Read”>
Formatting In Html Documents:
HTML Headings
The heading tag is used to fix the heading. There are 6 levels of heading in all. The levels are numbered as heading 1 to heading 6. All the letters of the heading in a given level have same font. The font size goes on decreasing as we move from heading 1 to heading 6. The heading in level 1 is expressed by tags <H1> and </Hl>. Similarly in the heading in level 2 we use the tags <H2> and </H2>. <H6> is the lowest level. The font size in it is the smallest.
Tags – Description
<H1 >…</HI> – A first-level heading.
<H2>…</H2> – A second-level heading.
<H3>…</H3> – A third-level heading.
<H4>…</H4> – A fourth-level heading (seldom used).
<H5>…</H5> – A fifth-level heading (seldom used).
<H6>…</H6> – A sixth-level heading (seldom used).
Font Tag
Fonts play a very important role in making a website more, user friendly and increasing content readability. Font face and color depends entirely on the computer and browser that is being used to view your page but you can use HTML <font> tag to add style, size, and color to the text on your website. You can use a <basefont> tag to set all of your text to the same size, face, and color.
The font tag is having three attributes called size, color, and face to customize your fonts. To change any of the font attributes at any time within your webpage, simply use the <font> tag. The text that follows will remain changed until you close with the </font> tag. You can change one or all of the font attributes within one <font> tag.
![]()
Set Font Size
You can set content font size using size attribute. The range of accepted values is from 1 (smallest) to 7(largest). The default size of a font is 3.
Setting Font Face
You can set font face using face attribute but be aware that if the user viewing the page doesn’t have the font installed, they will not be able to see it. Instead user will see the default font face applicable to the user’s computer.
Specify Alternate Font Faces
A visitor will only be able to see your font if they have that font installed on their computer. So, it is possible to specify two or more font face alternatives by listing the font face names, separated by a comma.
<font face = “drial,helvetica”>
When your page is loaded, their browser will display the first font face available. If none of the given fonts are installed, then it will display the default font face, Times New Roman.
Setting Font Color
You can set any font color you like using color attribute. You can specify the color that you want by either the color name or hexadecimal code for that color.
Paragraph Tag:
Paragraph is the basic composition of HTML, Paragraph is started with <P> tag and closes with </P> tag. Whenever one has to get to next line leaving one line blank, <P> tag is used. The tag <P> leave a space equivalent to one line between previous line and the following line.
Paragraph Tag Attributes
The paragraph tag has a few basic attributes you should learn about to start with.
- id – this has to be unique to the page. An id can be used on multiple pages but only once on a single page.
An id can be used in the stylesheet to set specific formatting to the paragraphs with this id. - class – A class is used to apply styling to the paragraph. It can be applied to many paragraphs on the page or across the whole website.
- lang – defines the language used in the paragraph. You would use this if the contents of the paragraph is different from the base language of the web page. e.g. French when the rest of the page is in English.
- style – The style attribute is used when you want to apply specific styling to a paragraph.
Novice web page coders and some HTML editors do this when using the design view of the HTML editor like a word processing program. This adds unnecessary coding to the web page as this is a typical styling it can be applied using the stylesheet.
Using the style attribute of the paragraph tag makes it hard to manage the editing of the website because in the future if you want to change the styling you have to hunt down every instance of that inline style in all the pages. This can be quite a bit of work if you have a large site. We would recommend that you try and avoid using this paragraph tag attribute all together but if you absolutely have to use it, use it very few times.
![]()
The Line Break:
The line break tag is used to start the text from the new line. This tag does not leave a blank line space as the paragraph tag does. The text jumps to new line on using line break tag. The tag <BR> is a symbol for line break.
Difference between <P> and <BR> tags.
The difference between <P> and <BR> tag is as follows:
| Paragraph <P> Tag | Break <BR>Tag |
| 1. <P> tag is a container element which marks a block of text as a paragraph in a webpage and tlxl web browser leaves a line between two paragraphs. This tag has an attribute ALIGN, which can take three values – left, right and center. | 1. The <P> tag denotes a paragraph and ends with a </P> and is a container tag. t < BR> tag b an empty element that is used to break a line and display the proceeding text from the next line, without giving any spare between two lines. It has no attribute. The <BR> is a line break and is an empty tag. |
| 2. This tag is used to define paragraphs with in your text. | 2. This tag is simply a line break. It just jumps to the next line without any spacing or formatting options. |
| 3. Example: <P>hello Dear students </P> | 3. Example : Hello<BR>Dear Students. |
The HR Tag
The HR (Horizontal Ruler) tag is a very helpful html element for dividing up sections of text in a page, without having to resort to one pixel high graphic. The problem is that left unstyled, your leaving it up to the browser to determine how it looks. Which can be indifferent at the best of times.
One way to control this is by using the available HTML attributes:
- align: [left, center and right] noshade: (solid line)
- size: [pixel value] line height of the element
- width: [ pixel or percentage value ] width of the element
HTML Lists:
HTML offers web authors three ways for specifying lists of information. All lists must contain one or more list elements. Lists may contain:
- <ul> – An unordered list. This will list items using plain bullets.
- <ol> – An ordered list. This will use different schemes of numbers to list your items.
- <dl> – A definition list. This arranges your items in the same way as they are arranged in a dictionary.
![]()
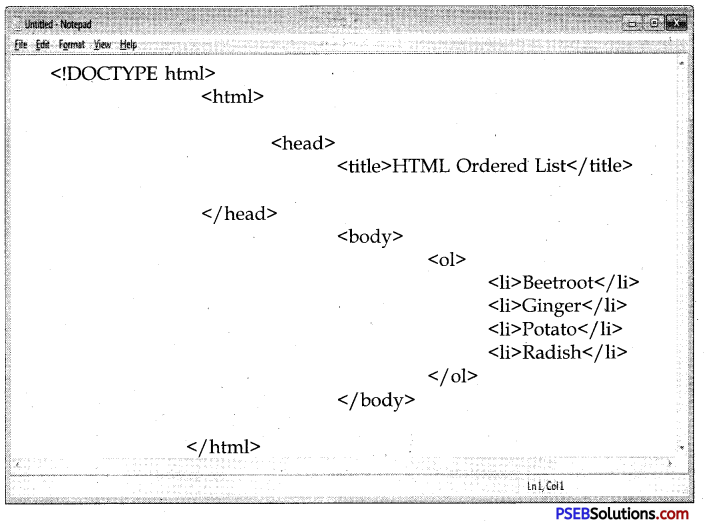
HTML Ordered Lists
If you are required to put your items in a numbered list instead of bulleted, then HTML ordered list will be used. This list is created by using <ol> tag. The numbering starts at one and is incremented by one for each successive ordered list element tagged with <li>.
Example
The type Attribute
You can use type attribute for <ol> tag to specify the type of numbering you like. By default, it is a number. Following are the possible options:
- <ol type = “1”> – Default-Case Numerals.
- <ol type = “I”> – Upper-Case Numerals.
- <ol type = “i”> – Lower-Case Numerals.
- <ol type = “A”> – Upper-Case Letters.
- <ol type = “a”> – Lower-Case Letters.
The start Attribute
You can use start attribute for <ol> tag to specify the starting point of numbering you need. Following are the possible options:
- <ol type = “1” start = “4”> – Numerals starts with 4.
- <ol type = “I” start = “4”> – Numerals starts with IV.
- <ol type = “i” start = “4”> – Numerals starts with iv.
- <ol type = “a” start = “4”> – Numerals starts with d.
- <ol type = “A” start = “4”> – Numerals starts with D.
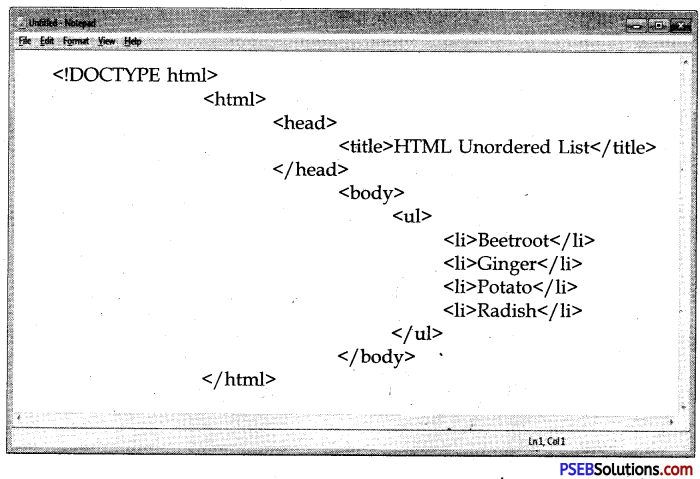
HTML Unordered List:
An unordered list is a collection of related items that have no special order or sequence. This list is created by using HTML <ul> tag. Each item in the list is marked with a bullet.
Example
The type Attribute:
You can use type attribute for <ul> tag to specify the type of bullet you like. By default, it is a disc. Following are the possible options:
- <ul type = “square”>
- <ul type = “disc”>
- <ul type = “circle”>
![]()
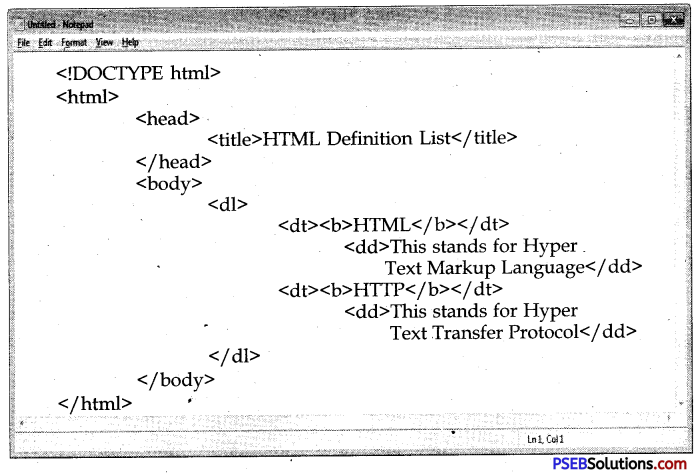
HTML Definition Lists:
HTML and XHTML supports a list style which is called definition lists where entries are listed like in a dictionary or encyclopedia. The definition list is the ideal way to present a glossary, list of terms, or other name/value list.
Definition List makes use of following three tags:
- <dl> – Defines the start of the list
- <dt> – A term –
- <dd> – Term definition
- </ dl> – Defines the end of the list
Example
Difference between Ordered and Unordered Lists:
The difference between ordered and unordered lists is as follows :
| Ordered List | Unordered list – |
| 1. In an Ordered list, the order of the list item is important. If we change the order, the meaning of the whole list changes.
2. Ordered List starts with <OL> and ends with</OL> tag. 3. Ordered List has an <U> (list Item) tag which defines the list dements defined in the list. 4. In an Ordered List, the attribute used is TYPE which has values as 1, A, a, I, i. 5. Default value of TYPE ATTRIBUTE is 1. |
1. In an unordered list the order of the items is not significant. We can swap two items or reverse the whole list and it still remains the same list.
2. Unordered List starts with <UL> and aids with</UL> tag. 3. Unordered List has an <U> (List Item) tag which defines the list dements defined in the list. 4. In an Unordered List the attribute used is TYPE which has values as *, o, and SQUARE. ‘ 5. Default value of TYPF. ATTRIBUTE is “Disc”. |
![]()
Nested List:
When a list is given in another list. It is called a nested list. We can give as many as list in another lists.
HTML – Images:
Images are very important to beautify as well as to depict many complex concepts in simple way on your web page. This tutorial will take you through simple steps to use images in your web pages.
Insert Image
You can insert any image in your web page by using <img> tag. Following is the simple syntax to use this tag.
<imgsrc = “Image URL” … attributes-list/>
The <img> tag is an empty tag, which means that, it can contain only list of attributes and it has no closing tag.
Example
To try following example, let’s keep our HTML file test.htm and image file test.png in the same directory.
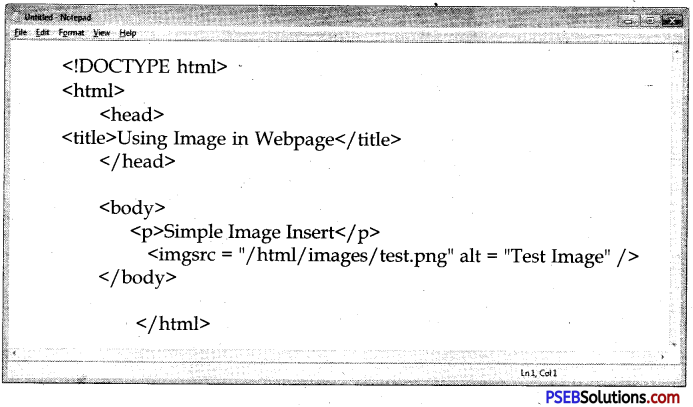
Set Image Location
Usually we keep all the images in a separate directory. So let’s keep HTML file test.htm in our home directory and create a subdirectory images inside the home directory where we will keep our image test.png.
Set Image Width/Height
You can set image width and height based on your requirement using width and height attributes. You can specify width and height of the image in terms of either pixels or percentage of its actual size.
![]()
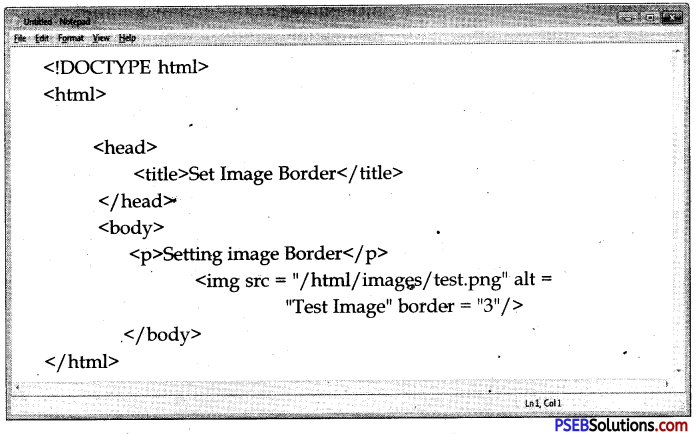
Set Image Border
By default, image will have a border around it, you can specify border thickness in terms of pixels using border attribute. A thickness of 0 means, no border around the picture.
Example
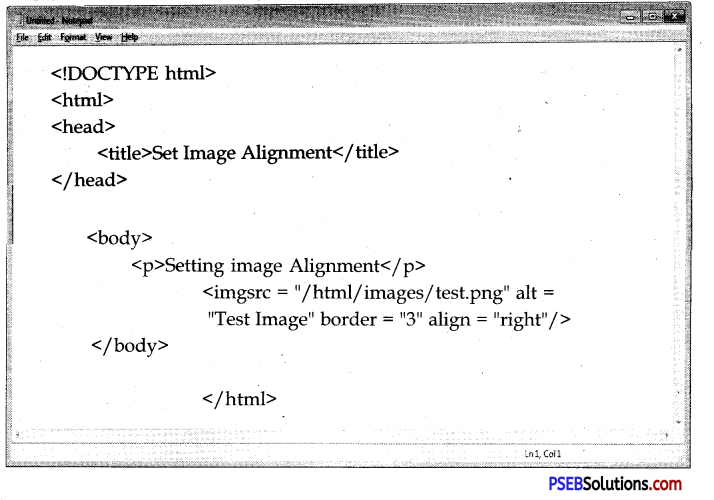
Set Image Alignment
By default, image will align at the left side of the page, but you can use align attribute to set it in the center or right.
Example
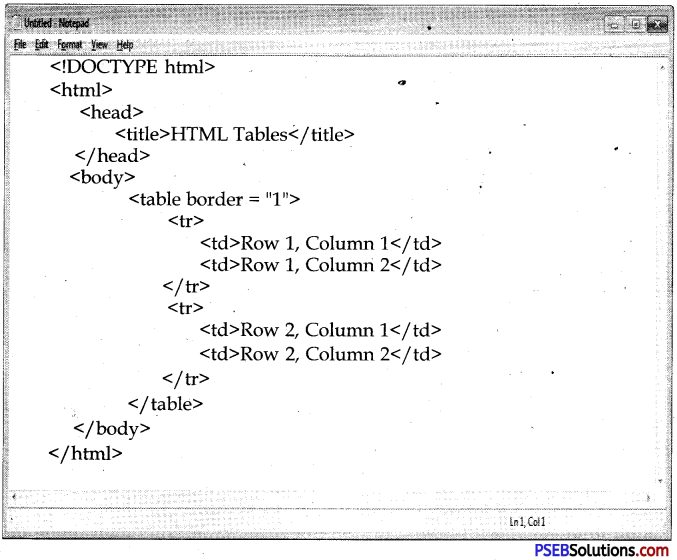
HTML-Tables:
The HTML tables allow web authors to arrange data like text, images, links, other tables, etc. into rows and columns of cells.
The HTML tables- are created using the <table> tag in which the <tr> tag is used to create table rows and <td> tag is used to create data cells. The elements under <td> are regular and left aligned by default.
Example
![]()
Table Heading
Table heading can be defined using <th> tag. This tag will be put to replace <td> tag, which is used to represent actual data cell. Normally you will put your fop row as table heading as shown below, otherwise you can use <th> element in any row. Headings, which are defined in <th> tag are centered and bold by default.
Cellpadding and Cellspacing Attributes
There are two attributes called cellpadding and cellspacing which you will use to adjust the white space in your table cells. The cellspacing attribute defines space between table cells, while cellpadding represents the distance between cell borders and the content within a cell.
Colspan and Rowspan Attributes
You will use colspan attribute if you want to merge two or more columns into a single column. Similar way you will use rowspan if you want to merge two or more rows.
Difference between Colspan and Rowspan Attributes
The difference between colspan and rowspan is as follows:
| Colspan | Rowspan |
| 1. Sometimes it makes sense for a cell to span multiple columns. This might be used for a header cell that titles a group of columns of entries.
2. Allows a single table cell to span the width of more than one cell or column. 3. ROWSPAN is attribute that is used in i.e. <th> and <td> tag. 4. It provides the same functionality as “merge cell” in spreadsheet programs like Excel. 5. Example: <th colspan=”3″> |
1. Sometimes it makes sense for a cell to span multiple rows. This might be used for a side-bar that groups rows of entries.
2. Allows “a single table cell to span the height of more than one row. 3. COLSPAN is attribute that is used in i.e. <th> and <td> tag. 4. It provides the same functionality as “merge cell” in spreadsheet programs like Excel. 5. Example: <th rowspan=”3″> |
Tables Backgrounds
You can set table background using one of the following two ways –
1. bgcolor attribute – You can set background color for whole table or just for one cell.
2. background attribute – You can set background image for whole table or just for one cell.
You can also set border color also using bordercolor attribute.
![]()
Table Height and Width
You can set a table width and height using width and height attributes. You can specify table width or height in terms of pixels or in terms of percentage of available screen area.
Table Caption
The caption tag will serve as a title or explanation for the table and it shows up at the top of the table. This tag is deprecated in newer version of HTML/ XHTML.
Table Header, Body and Footer:
Tables can be divided into three portions – a header, a body, and a foot. The head and foot are rather similar to headers and footers in a word-processed document that remain the same for every page, while the body is the main content holder of the table.
The three elements for separating the head, body, and foot of a table are –
- <thead> – to create a separate table header.
- <tbody> – to indicate the main body of the table.
- <tfoot> – to create a separate table footer.
A table may contain several <tbody> elements to indicate different pages or groups of data. But it is notable that <thead> and <tfoot> tags should appear before <tbody>.