PSEB 7th Class Computer Notes Chapter 1 Typing Tutor
This PSEB 7th Class Computer Notes Chapter 1 Typing Tutor will help you in revision during exams.
Introduction:
Typing tutor is the software with the help of which we learn to type fast and type correctly. It is a technique by which we learn the correct ways of typing.
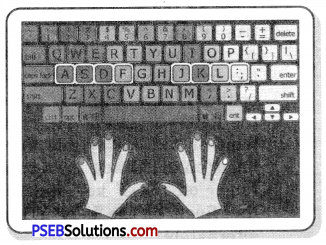
Touch Typing:
This is a technique by which we learn how to type correctly without looking at the keyboard. The keyboard is divided into two parts, left side and right side. Typing is done by placing the fingers on right position accordingly.
![]()
Fingers Position on Keyboard:
To type on a QWERTY keyboard, the left side keys are pressed with the left hand and the right side keys with the right hand. The keyboard has four lines. The fingers of both hands are placed on the line A.
This line is called the home row.
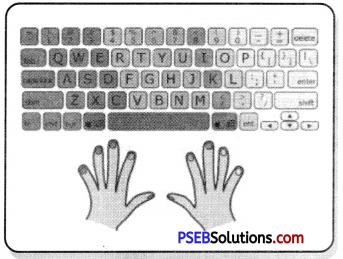
1. Home Row: The “home row” is the center row of keys on a keyboard. It starts from the alphabet A. The fingers are always rest on this line. The position of the fingers on this row is as follows:
First of all, the fourth finger (little finger) of our left hand is on the ‘A’ key, then third finger on the ‘S’ key, then second finger on the ‘D’ key and then first finger on the ‘F’ key and alternately on the ‘7’ key. The fourth, third, second and first fingers of the right hand should be on ‘L’, ‘K’, ‘J’ and ‘H’ respectively. Thumb of right hands should be on space bar.
| Left Hand | |
| Little/ Pinky Finger | A |
| Ring Finger | S |
| Middle Finger | D |
| Index Finger | F & G |
| Right Hand | |
| Little/ Pinky Finger | ; |
| Ring Finger | L |
| Middle Finger | K |
| Index Finger | J & H |
Fingers Position on first Row
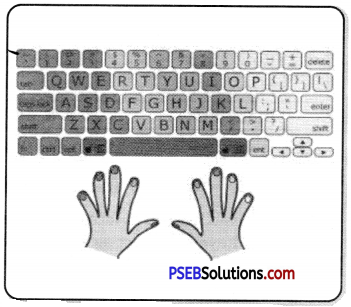
2. Second Row: The keys on the above line of the home row are called the keys on the second line. It starts with the letter ‘Q’. Turn the fourth finger (little finger) of your left hand on the ‘Q’ key, the third finger on the ‘W’ key, the second finger on the ‘E’ key and the first finger on the ‘R’ key or the ‘T’ key. Similarly, place the fourth finger of the right hand on the ‘P’ key, the third finger on the ‘O’ key, the second finger on the ‘I’ key and the first finger on the ‘U ‘or’ Y ‘key alternately.
| Left Hand | |
| Little/ Pinky Finger | Q |
| Ring Finger | W |
| Middle Finger | E |
| Index Finger | R & T |
| Right Hand | |
| Little/ Pinky Finger | P |
| Ring Finger | O |
| Middle Finger | I |
| Index Finger | U & Y |
Fingers Position on Second Row
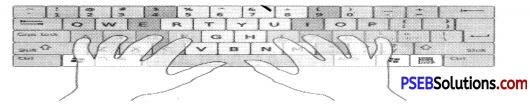
3. Third Row: The row below the home row is called the third row. It starts with the ‘Z’ key. The fourth finger of the left hand (Little Finger) will go to the ‘Z’ key and then return to the home row.
Similarly, place the third finger on the ‘X’ key, the second finger on the ‘C’ key and the first finger on the ‘V’ key or the ‘B’ key alternately.
Similarly, place the fourth finger of the right hand on the ‘/’back slash key, the third finger on the ‘.’dot Key, the second finger on the V comma key and the first finger on the ‘M’ key or the ‘N’ key alternately.
| Left Hand | |
| Little/ Pinky Finger | Z |
| Ring Finger | X |
| Middle Finger | C |
| Index Finger | V & B |
| Right Hand | |
| Little/ Pinky Finger | / |
| Ring Finger | . |
| Middle Finger | ? |
| Index Finger | M & N |
Fingers Position on Third Row
4. Fourth Row: The fourth row corresponds to the numeric keys. Be careful while typing the numbers. Our fingers should be on the home row. To type the numbers 100% correctly, it is recommended to press the numeric key with the corresponding finger and then bring it back to the home row. If all work is related to numbers, keep your fingers on the fourth line.


| Left Hand | |
| Little/ Pinky Finger | 1 |
| Ring Finger | 2 |
| Middle Finger | 3 |
| Index Finger | 4 & 5 |
| Right Hand | |
| Little/ Pinky Finger | 0 |
| Ring Finger | 9 |
| Middle Finger | 8 |
| Index Finger | 7 & 6 |
Fingers Position on Fourth Row
Numeric Keyboard:
The numeric keypad is located on the right hand side of the keyboard and has a total of 17 keys. They act as a calculator. While using the numeric keypad Num lock key must be turned on. Use the right hand when typing numbers on the numeric keypad.
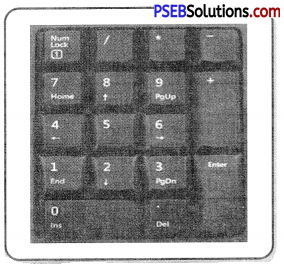
The position of the fingers on the numeric keypad is as follows:
- The thumb of the right hand is on the ‘0’
- On the first finger of the right hand ‘4’
- The second finger of the right hand on the ‘5’
- The third finger of the right hand on the ‘6’
Special Keys on Keyboard:
The special keys of the keyboard are as follows:
- Enter Key: This key is used to move to a new line. We use the smallest finger of our right hand to press the Enter key.
- Space Bar: The space-bar key is used to leave a space in two words. We use our thumbs to press the space key.
- Shift Key: This key is located on both side of the keyboard. It is used to write capital letters. If you want to type a capital letter with your left hand, press the shift key with the fourth finger of your right hand Similarly, to write a capital letter with the right hand, press the shift key with the fourth finger of the left hand.
- Backspace: This key is used to delete a character to the left of the cursor. We use the little finger of our right hand for this.
- Caps Lock Key: If the whole word, line or paragraph is to be written in capital letters, keep the Caps Lock Key in ON position. We use the little finger of our left hand for this.
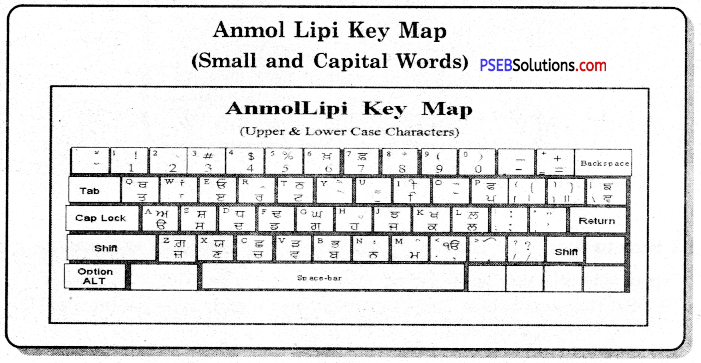
Punjabi Typing with Anmol Lipi:
We can easily type in Punjabi with Anmol Lipi font. We can also practice typing in Punjabi depending on the position of the fingers used in English language typing. Before typing, we have to choose the Anmol Lipi font. The Anmol Lipi font key-map is as follows:
Instructions to Increase Typing Speed:
Typing speed can be increased by keeping the following in mind:
- Concentrate in consistently, comfortably and correctly typing.
- The position of our hands/fingers should always be on the home-row. We should always start from this position and come back to the same position. We should move from the home-row position to other keys.
- As we press each key, we should repeat that letter in our mind,
- We should focus on pressing the right key rather than speed. Speed will increase automatically with time and practice.
- Do not look at the keyboard.
![]()
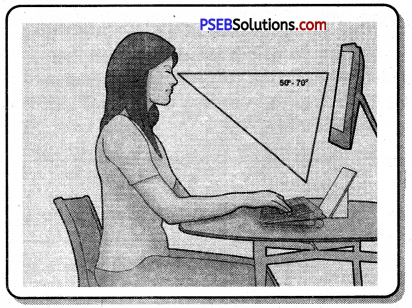
Sitting Position for Typing:
While typing, we should follow the following instructions for proper seating:
- The computer monitor should be in front of our eyes.
- Our focus should be on the monitor.
- Our fingers should be on the home-row keys.
- We should sit straight and in front of the keyboard.
- We should quickly press each key and return to the home row position.
- Our feet should be straight on the ground.
How to Avoid the Stress of Typing:
Stress and mistakes while typing on computer can be avoided as follows.
- Set your keyboard so that it is straight and slightly raised at the back. Do not keep your keyboard tilted downwards.
- Sit properly in front of your computer. Our screen should be two feet away from us and our copy should be in front of our eyes.
- Stretch your arms before starting work and also during intervals and strengthen your arms with exercise.
- We should rest our wrists when we are not typing.
- When typing, keep your wrists straight and bend your elbows at a 90 degree angle. Our wrists should not rest on the table while typing.
- If sitting on a chair, our knees are bent 90 degrees and our feet are straight on the ground, then the height of our chair is perfect.
- Exercise daily. This helps our body avoid stress after typing.
- Rest for a short time instead of a large interval while typing
Note:
- Typing tutor is the software with the help of which we learn to type fast and type correctly.
- Touch Typing is a technique by which we learn how to type correctly without looking at the keyboard,
- The keyboard is divided into two parts, left side and right side.
- Typing is done by placing the fingers on right position.
- The “home row” is the center row of keys on a keyboard.
- Home Row start from the alphabet A,
- The keys on the above line of the home row are called the keys on the second line.
- The row below the home row is called the third row.
- The fourth row corresponds to the numeric keys.
- The numeric keypad has a total of 17 keys.
- Enter key is used to move to a new line.
- The space-bar key is used to leave a space in two words.
- Shift key is used to write capital letters.
- Backspace key is used to delete a character to the left of the cursor. Caps lock is used to type the word, line or whole paragraph in capital letters.
- We can easily type in Punjabi with Anmol Lipi font.