This PSEB 10th Class Computer Notes Chapter 8 Microsoft Publishers-II will help you in revision during exams.
PSEB 10th Class Computer Notes Chapter 8 Microsoft Publishers-II
Advertisements:
Microsoft Publisher is a desktop publishing program that is part of the Microsoft Office suite. With Microsoft Publisher, you can create many professional-quality custom publications such as brochures, greeting cards, and signs. The publisher also allows you to create items that are larger than standard printer paper sizes, such as banners, by making them on multiple sheets of paper you can print and assemble.
![]()
Brochure:
A brochure is an informative paper document often used for advertising that can be folded into a template, pamphlet, or leaflet. Brochures are promotional documents, primarily used to introduce a company, organization, products, or services to the public. Brochures are distributed inside newspapers, handed out personally, or placed in brochure racks in high-traffic locations. They may be considered grey literature.
Now day’s brochures are also available in electronic format and are called e-brochures. They have the added benefit of having unlimited distribution and cost savings when compared to traditional paper brochures.
The most common types of single-sheet brochures are the bi-fold (a single sheet printed on both sides and folded into halves) and the tri-fold (the same, but folded into thirds). A bi-fold brochure results in four panels (two panels on each side), while a tri- fold results in six panels (three panels on each side).
Booklet brochures are made of multiple sheets most often saddle stitched stapled on the creased edge, or perfect bound like a paperback book, and result in eight or more panels.
How to Create a Banner in Microsoft Publisher:
Microsoft Publisher is a tool that enables users at home to create professional looking publications, banners, and flyers. Real estate professionals use Publisher to create banners and flyers for homes they are trying to sell. Banners can be made for special occasion parties, or advertising and marketing products. Save time and money by creating your own wonderful banner.
Following are steps that are used to create a banner in Microsoft Publisher:
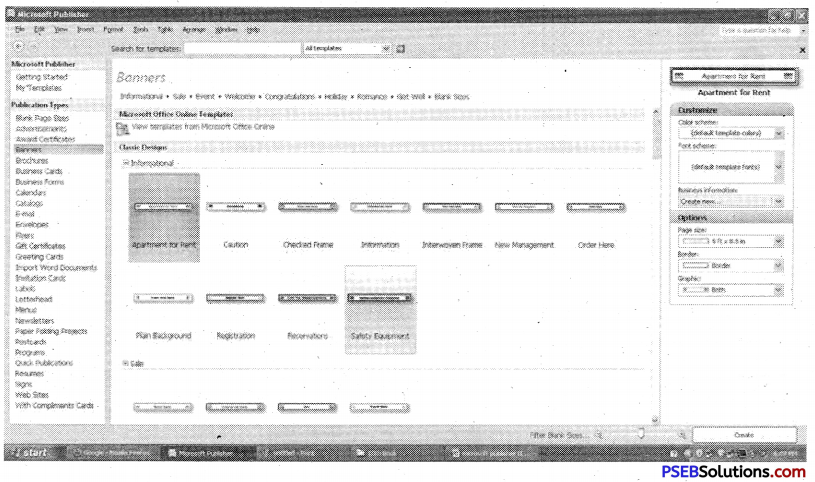
1. In the Publication Types list, click Banners.
2. In the Banners gallery, do one of the following:
- Click the banner design that you want – for example, Apartment for Rent.
- Click View templates from Microsoft Office Online, click the banner design that you want to download, and then go to step 4.
3. Under Customize and Options, select any options .that you want.
4. Click Create.
5. In the Format Publication task pane, do any of the following:
- To change the width and height of the banner, click Change Page Size in the task pane, and then choose the page size, or click Create custom page size.
- To change the banner’s color scheme, click Color Schemes in the task pane, and then choose the scheme that you want.
- To change the banner’s font scheme, click Font Schemes in the task pane, and then choose the scheme that you want.
6. In your banner, replace the placeholder text and pictures with the text and pictures or other objects that you want.
7. On the File menu, click Save As.
8. In the Save in box, click the folder where you want to save the new banner publication.
9. In the File name box, type a name for your banner publication.
10. In the Save as type box, click Publisher Files.
11. Click Save.
![]()
How to Create a Newsletter in Microsoft Publisher:
Newsletters are a great way to share information with family, friends and customers. Microsoft Publisher’s newsletter function provides complete design and layout flexibility. Use the program to select a design layout and color scheme, format text and insert images quickly and easily to create a custom newsletter.
Following are steps that are used to create a newsletter in Microsoft Publisher:
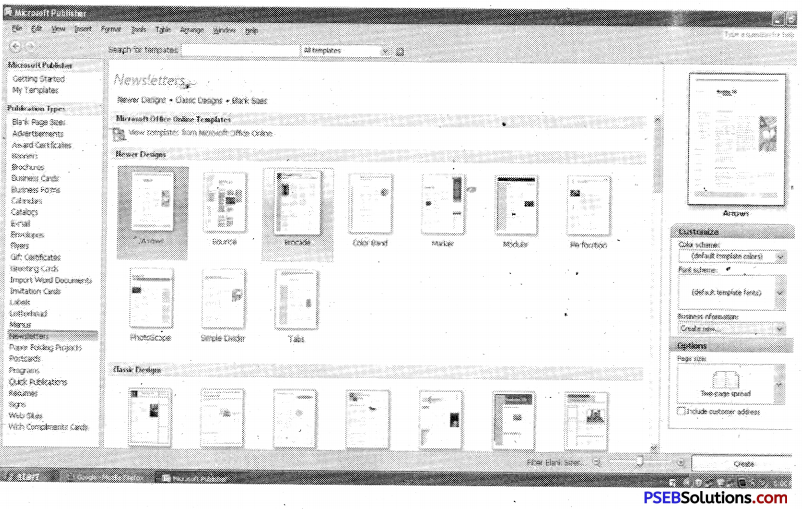
1. Choose a newsletter design. On the main menu click “File” and then “New” to open the Catalog Window. Click the “Newsletters” option on the Wizards menu, select the desired design from the options and then click “Start Wizard.” Enter your contact information in the window prompt. Delete the sample text in the field to leave a field blank. Click “Include color scheme in this set” and select the desired colors. Click “Update” when finished. Complete the steps in the Wizard or click “Finish” to exit the Newsletter wizard.
2. Enter the text. Place the mouse inside the desired text box and click once. Type the text or cut and paste from a Word document. Format the font style, size and appearance by using the main menu at the top of the screen. Place the mouse over the border until the word “Resize” appears. Click and drag the border to the desired size.
3. Insert images by clicking “Insert” and then “Picture.” Select from clip art or photos stored on your computer. Resize the image. Click and drag the mouse diagonally towards the center of the photo until the photo reaches the desired size.
4. Edit the text box-and image layouts as needed. Create a new text box by , clicking the text frame tool (“A”). Place the mouse in the desired location, then click and drag to create the desired box size. Place the mouse over the item until the word “Move” appears. Click and hold down the mouse and drag to the desired location. Place the mouse inside the box and click once, on the main menu click “Edit” and then “Delete Object” if you need to delete a text box.
5. Change the number of pages in the newsletter as needed. Click “Insert” and then “Page” and follow the instructions in the pop up window. Click the desired page number at the page display on the bottom of the screen and click “Edit” and then “Delete Page” to remove pages.
6. Finalize the newsletter. Proofread and spell check. Print the document on paper and place the pages in order to ensure the page numbers line up properly before copying. This is helpful if you plan to copy two-sided or convert to 11 × 17 inch paper.
![]()
How to create a Poster in Microsoft Publisher:
To create a poster in Publisher, create a banner, and then change the page size to the poster size that you want. Given ahead are steps that are used to create a poster in Microsoft Publisher:

1. In the Publication Types task pane, click Banners, do one of the following:
- Under Banners, click Blank Sizes.
- Click View templates from Microsoft Office Online, click the poster design that you want to download, and then go to step 3.
2. Under Blank Sizes, click the paper size thafyou want, or click Create custom.
3. Page size and create a custom page size.
4. Click Create.
5. In the Format Publication task pane, do any of the following:
- To change the color scheme, click Color Schemes in the task pane, and then choose the scheme that you want.
- To change the font scheme, click Font Schemes in the task pane, and then choose the scheme that you want.
6. On the File menu, click Save As.
7. In the Save in box, click the folder where you want to save the new publication.
8. In the File name box, type a name for your publication.
9. In the Save as type box, click Publisher Files.
10. Click Save.
How to Make a Decorative Envelope Using Microsoft Publisher:
Special occasion cards get piled away with the rest of the mail when they are in plain envelopes with no special decal or design to separate them from others. Design a special envelope using Microsoft Publisher for a single use birthday card envelope or to use on all your mailings, so that people will see your envelopes and know that they are from you. Relatives and close friends will also appreciate the time you took to make their envelope special.
Following are steps that are used to create an envelope in Microsoft Publisher:
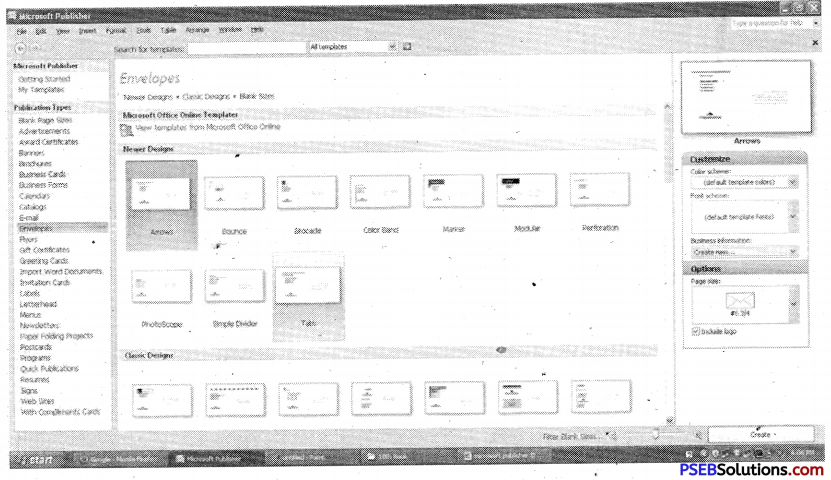
1. Launch Microsoft Publisher and click “Publications for Print.” A list of options will appear underneath this section. You can choose from several pre-made envelopes. These envelope designs are for several different types of businesses.
2. Delete any option or area of the envelope you do not need for your purpose. Select the area by left-clicking on the area once and it will bring up a border around the box. Right-click on the selection and choose “Delete.”
3. Move any of the pre-selected fields by dragging it to where you would prefer it. Select the area; move the mouse pointer till it becomes a four arrowed figure. Left click and hold the mouse button and drag the box to where you want it.
4. Fill in the address fields by highlighting and entering in the correct information.
5. Insert pictures and designs to the envelope to make it more personal. Click “Insert” and “Clipart”, “Object” or “Textbox.” Recipients of your letters will love having designs on the envelopes that display your personality.
6. Choose to make your own envelope from scratch by selecting “Blank Print Publication” from under the New section on the left-hand side of the Microsoft Publisher screen. Select “File”, “Page Setup” and a new window will appear. Hit “Envelope” from under the Publication Type and adjust any height and width dimensions you may need. This is easy, just measure your envelope.
7. Insert and edit till your message is clear from the design on your envelope. Try printing in grayscale and on regular paper before printing on any envelopes. This will save money and trees.
![]()
Greeting Card/ Invitation Card/ Compliment Card:
A greeting card/ Invitation card/ compliment card is a piece of card or high quality paper expressing friendship or any other sentiment. Although these cards are usually given on special occasions such as Birthdays, Anniversary, Christmas, Diwali or other holidays, they are also sent to convey thanks or express other feelings. These cards are usually packaged with an envelope, come in a variety of styles. There are both mass-produced as well as handmade versions that are distributed by hundreds of companies. These can also be designed with the help of MS Publisher.
Award Certificates:
- An award is something given to a person, a group of people, or an organization in recognition of their excellence in a certain field. An award may be accompanied by trophy, title, certificate, medal, badge, pin, or ribbon.
- Certification refers to the confirmation of certain characteristics of an object, person, or organization. This confirmation is often, but not always, provided by some form of external review, education, assessment, or audit.
- Certificates of achievement, merit, and honor can be powerful tools when used at the right time and presented in the right way.
- Receiving an award certificate gives a person the warm glow of knowing someone took the time to acknowledge them. And being the person who motivates others can be rewarding, too.
- Award certificates may include: Community Service Award, Great Job, Good Behavior or Course Completion. MS Publisher provides many templates for creating Award Certificates.
Envelops:
An envelope is a common packaging item, usually made of thin flat material. It is a flat paper container with a sealable flap designed to enclose a flat object, such as a letter, card or document. Traditional envelopes are made from sheets of paper. They are most commonly used for enclosing and sending mail (letters) through a prepaid-postage postal system. We can create envelop with MS publisher. After selecting the required envelop design, edit the color scheme and click on Create button. Now we can edit the envelop information and save it as a publication.
Labels:
A label is a piece of paper, polymer, cloth, metal, or other material affixed to a container or product. Information printed directly on a container or item can also be considered labeling. Labels have many uses, including providing information on a product’s origin, manufacturer (e.g., brand name), use, shelf- life and disposal etc. Many hazardous products such as poisons or flammable liquids must have a warning label.
Labels can be used for:
- Products. Permanent product labels need to remain secure throughout the life of the product. For example, a food label must.be secure until the food has been used.
- Packaging. Packaging may have labeling attached to or integral with the package. These may carry pricing, barcodes, UPC (Universal Product Code) identification, usage guidance, addresses, advertising, recipes, and so on.
- Assets: In industrial or military environments, asset labeling is used to clearly identify assets for maintenance and operational purposes. Such labels are frequently made of engraved Trifoliate or a similar material.
- Textiles. Garments normally cany separate care/treatment labels which typically indicate how the item should be washed for e.g. machine washed or diy cleaned. Textile labels may be woven into the garment or attached, and may be heat resistant, colorfast, washable. Printed labels are an alternative to woven labels.
- Mailing. Mailing labels identify the addressee, the sender and any other information which may be useful in transit.
- Security Labels. They are used for authentication, theft reduction, and protection against counterfeit and are commonly used on ID cards, credit cards, packaging, and products from CDs to electronics to clothing.
- Labels may be used for any combination of identification, information, and warning, instructions for use, environmental advice or advertising. They may be stickers, permanent or temporary labels or printed packaging.
![]()
Letterhead:
It is stationery with a printed heading. The heading usually consists of a name and an address, a logo or corporate design, and sometimes a background pattern. The term “letterhead” is often used to refer to the whole sheet imprinted with such a heading. Many companies and individuals prefer to create a letterhead template in a word processor or other software application. This generally includes the same information as pre-printed stationery, but at lower cost. Letterhead can then be printed on stationery or plain paper as needed or sent electronically.
Calendar:
A calendar is a system of organizing days for social, religious, commercial or administrative purposes. This is done by giving names to periods of time, typically days, weeks, months and years. Calendars are also used to help people manage their personal schedules, time and activities.
Calendars are also used as part of a complete timekeeping system: date and time of day together to specify a moment in time.
Resumes:
A resume provides a summary of our education, work history, credentials, and other accomplishments and skills. There are also optional sections, including a resume objective and career summary statement. Resumes are the most common document requested of applicants in job applications. A resume should be as concise as possible. Typically, a resume is one page long, although sometimes it can be as long as two pages. Often resumes include bulleted lists to keep information concise.
Curriculum vitae(CV)
Like resume, a curriculum vitaE (CV) provides a summary of one’s experience and skills. Typically, CVs are longer than resumes – at least two or three pages. CVs include information on one’s academic background, including teaching experience, degrees, research, awards, publications, presentations, and other achievements. CVs are thus much longer than resumes, and include more information, particularly related to academic background. We can create CVs with the help of MS Publisher in same way we have created Resumes above.
![]()
Menus:
In a restaurant, there is a menu of food and beverage offerings. A menu may be a list from which guests use to choose options available. Basically Menu is the main way to give or take order from guest. Guest may order properly to see the menu and be aware about our food and price. MS Publisher provides many templates for creating a Menu.
Signs:
A sign is a piece of paper, clothe, wood or any other material which is painted with pictures or words and which gives some information about a particular place, product, or event. We can create any of these sign using publisher.
Paper Folding Projects:
The paper folding templates include patterns for paper airplanes and origami projects alike. They include pages (that may require trimming) with “fold- lines” and others with instructions to create our paper masterpieces. We can enjoy these Paper Folding Projects in our leisure time and can make some creative things.
Microsoft Publisher offers templates for kids. These templates.consist of different paper folding projects like airplanes, boats, cups, and more.